No products in the cart.
⬇ Explore the functionalities of the invoice page by toggling between tabs below.⬇
Perform the following steps to create a new invoice.
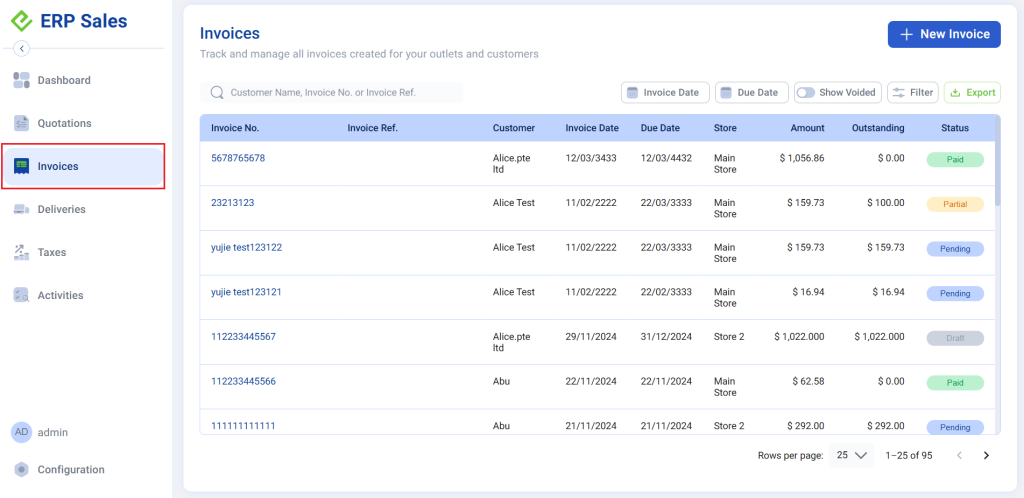
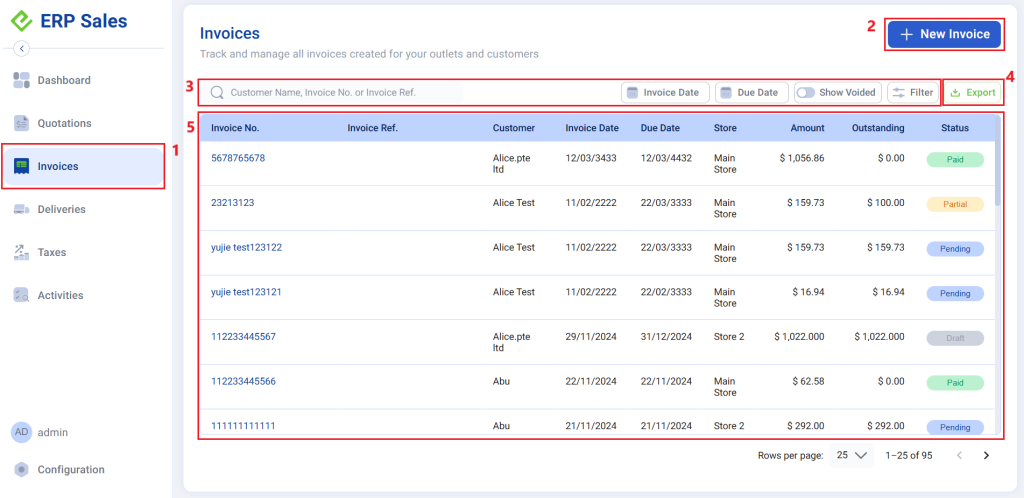
1. To access the Invoices main page, click on the Sales Panel and click on Invoices.
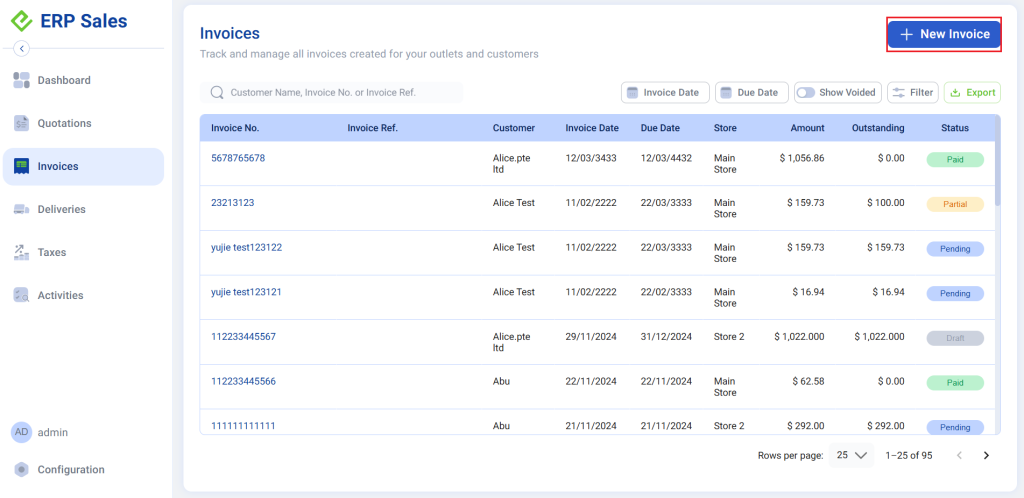
2. Click on “New Invoice” to Create a New Invoice.

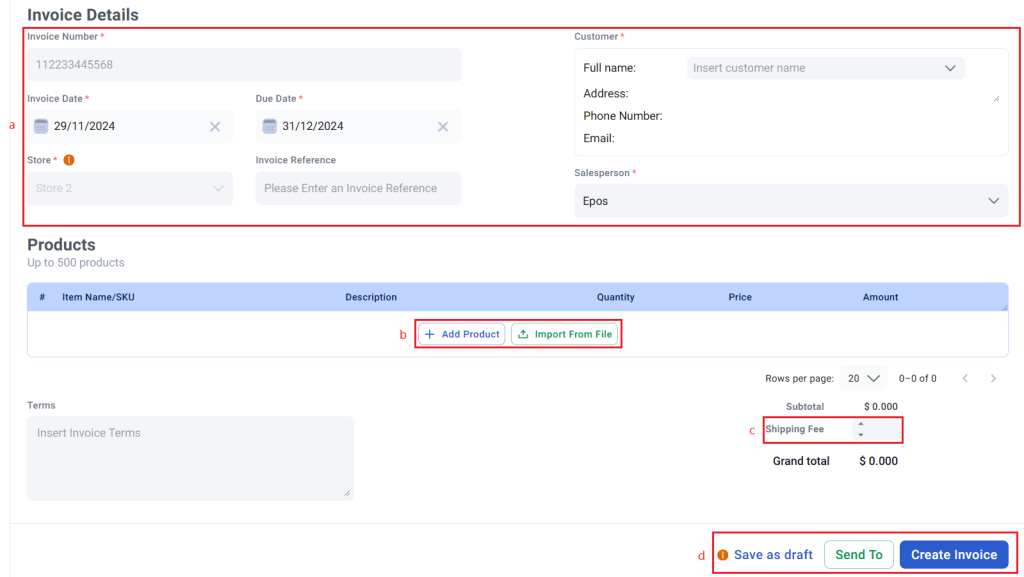
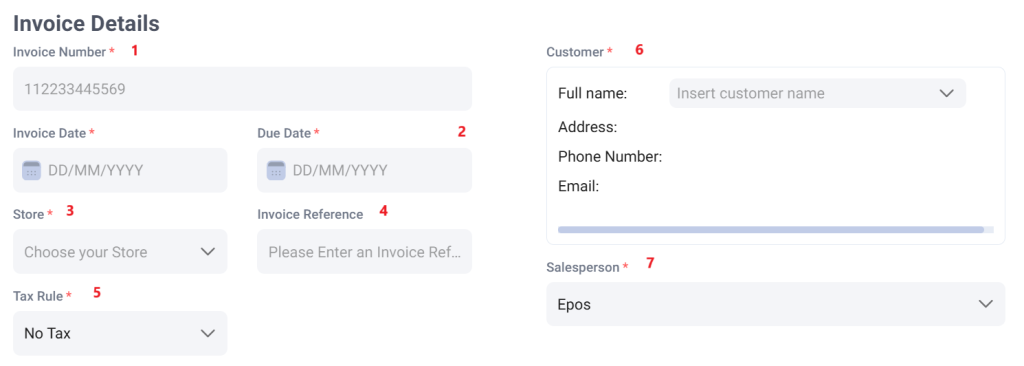
3. Fill in the relevant details to create invoice.
Fields/Function | Description |
a. Invoice Details | Input all the mandatory fields. |
b. Add Products / Import From File | Add Products: Click to add products individually |
c.Shipping fee | Fill in the shipping fee |
d. Save as draft / Send to / Create Invoice | Save as draft: allow user to do editing later.
Create Invoice: Create invoice button will be enabled after all the mandatory fields have been filled in. |
💡 Once an invoice is successfully created, it cannot be deleted from the Backend Portal.
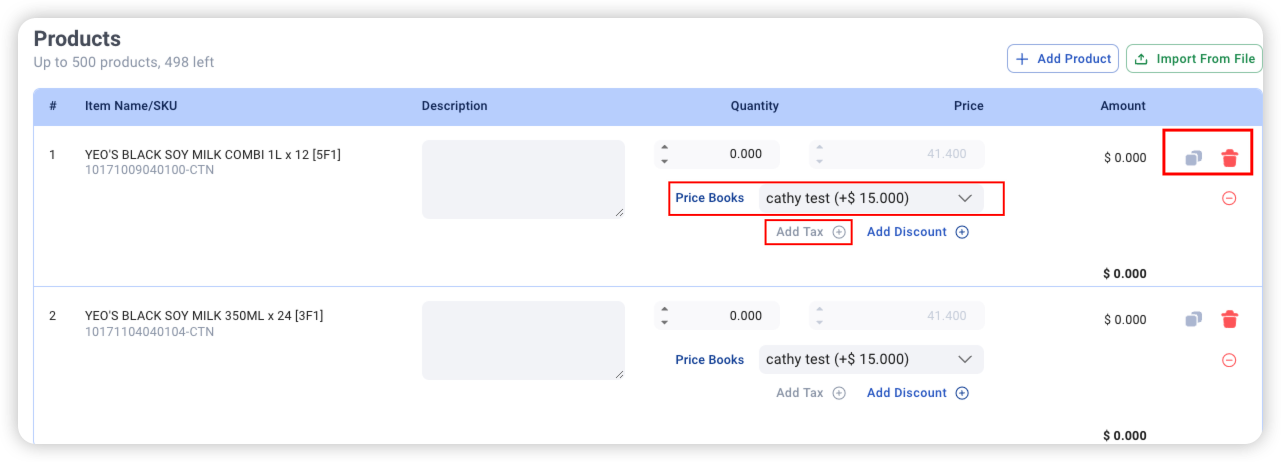
4. Ensure that respective details are entered before creating the invoice: Item Note, Order QTY, Unit Price, Discount (%/$).
To edit the Tax and Pricebooks, please refer to Configuration.
💡 Utilise the duplicate and delete action icons to increase your efficiency!
Main Page
No | Fields/Functions | Description |
1 | Invoices | Direct users to the main Invoices page. |
2 | Create New Invoice | Enable users to create a new invoice in the portal. For more information, see Creating New Invoice. |
3 | Filter & Search | Enable users to search for a particular invoice with specific criteria, such as:
|
4 | Export Invoice List | Download all/filtered invoices list in .csv format. |
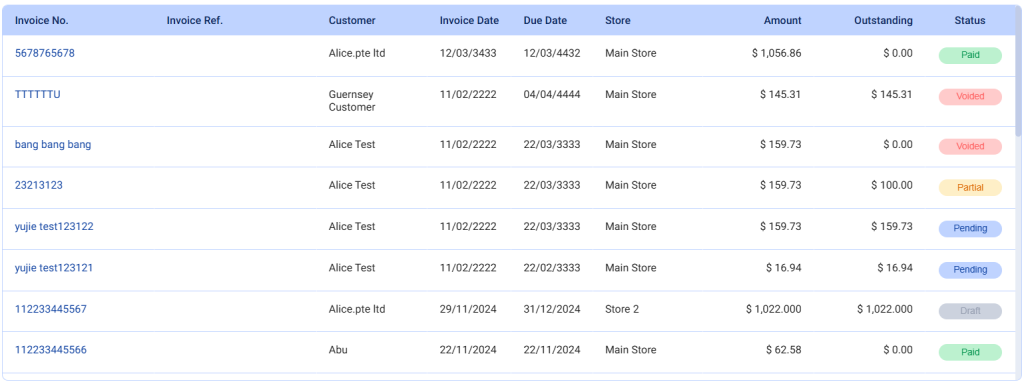
5 | Invoices List | Shows the entire list of invoices existing in the portal based on the filter/search criteria applied by users, such as:
|
Invoice Details
No | Fields/Functions | Description |
1 | Invoice Number* | Enter an invoice number that uniquely identifies this invoice or leave blank to use a running number. 💡 This field supports special characters – . _ ~ : / ? # [] @ ! $ & ‘ () * + =,” |
2 | Invoice Date* / Due Date* | Invoice Date : Enter the date from when this invoice is valid. Due Date : Enter the date of when this invoice is due for settlement. |
3 | Store* | Enter and/or select the store that holds the products tagged to this invoice. |
4 | Invoice Reference | Enter a reference for the invoice. 💡 This field could be used by users to identify their invoices more distinctly (eg. related quotation number/ customer’s PO number) |
5 | Tax type* | Shows list of Tax Types which are registered into BACKEND PORTAL. Users can select Tax Type accordingly. |
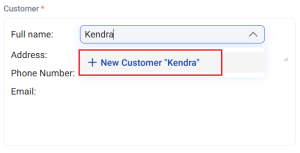
6 | Customer* | Enter and/or select the customer to be tagged to this invoice. 💡 Click on + New Customer directly if the customer is not created in backend. Fill in the details to create a new customer. |
7 | Sales Person* | Enter and/or select the Sales Person tagged to this invoice. 💡By default, this field will always display the user who is currently logged into the Backend Portal. |
The Backend Portal’s Bulk Import feature is used to:
- Add line items into a new invoice
- Overwrite existing line items in an existing draft invoice
💡Only invoices with Draft status have line items that can be edited. For more information, see Manage Invoice Statuses.
Step | Description |
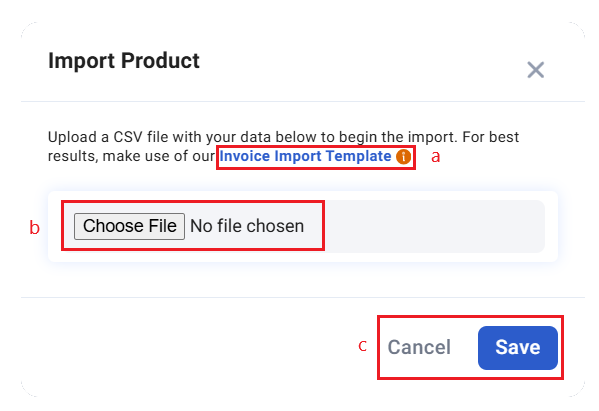
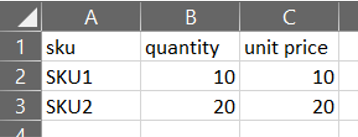
a | Click to download the excel (.csv) invoice import template. 💡There is a limit of 500 products that can uploaded each time using the Bulk Import feature Open the downloaded invoice_import_template.csv, and remove the sample data at Rows 2 and 3. Ensure only Row 1 headers (sku, quantity, unit price) are in the sheet.
Input the quotation products’ sku, quantity and unit price in individual rows. |
b | Click Choose File to upload the saved excel file in the Import Modal. Click on Begin Import to upload the file to the invoice or Click Close to exit the Import Modal back to the invoice. |
c | Click to Save to start importing, click Cancel to cancel importing. |
Users can fully edit an invoice with draft status or partially edit an invoice with pending/partial status.
Paid and voided invoices cannot be edited.
Step | Description |
1 | Select the invoice from the invoices list in the main Invoices page. |
2 | Click on the Edit button on the top right of the page. |
3 | Users can edit invoice details in the editable Invoice page displayed. 💡All quotation fields are editable for draft invoices. 💡Only the Due Date field is editable for pending/partial invoices. |
There are different statuses an invoice can have. Unlike quotations, invoice statuses cannot be manually changed.

- For Draft invoices, refer to Invoice: Draft Status.
- For Pending invoices, refer to Invoice: Pending Status.
- For Partial invoices, refer to Invoice: Partial Status.
- For Paid invoices, refer to Invoice: Paid Status.
- For Voided invoices, refer to Invoice: Voided Status.
Users can email existing invoices to customers.
Step | Description |
1 | Select the invoice from the invoices list in the main Invoices page. |
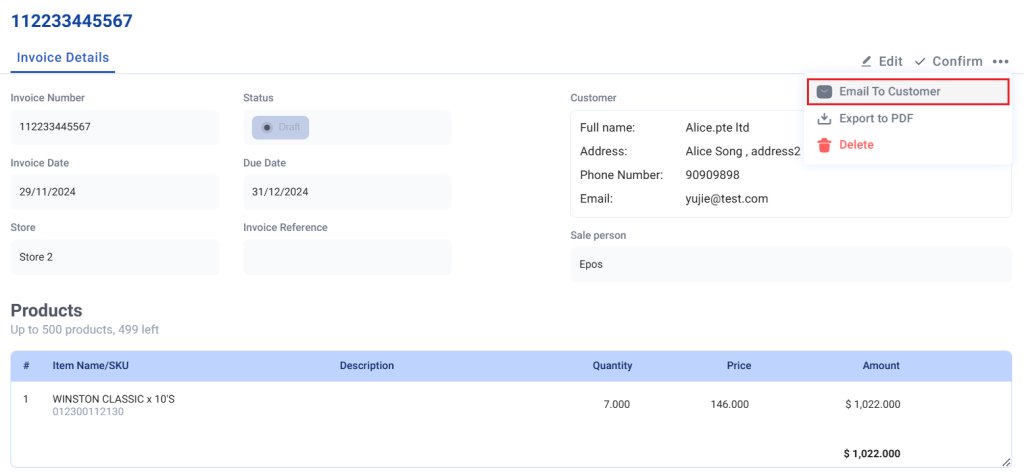
2 | Click on the Email To customer button on the top right of the page.
|
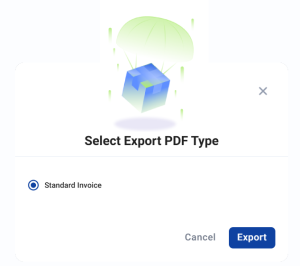
3 | A pop-up will prompt the user to email the invoice to the customer. 💡Select Standard Invoice to email a PDF version of the invoice or select Invoice with PayNow QR Code to email an invoice PDF with a dynamic Paynow QR. Click on X to skip emailing the invoice to the customer or click on Confirm to forward the quotation to the customer’s email address. |
💡To display the QR code, go to backend to select “Manual Completion” in the payment method.
Perform the following steps to create a new customer while creating an invoice:
1. To create an invoice, navigate to the V5 Backend Sales module and fill in the required details. If the customer is not found during the search, click + New Customer to add a new customer.
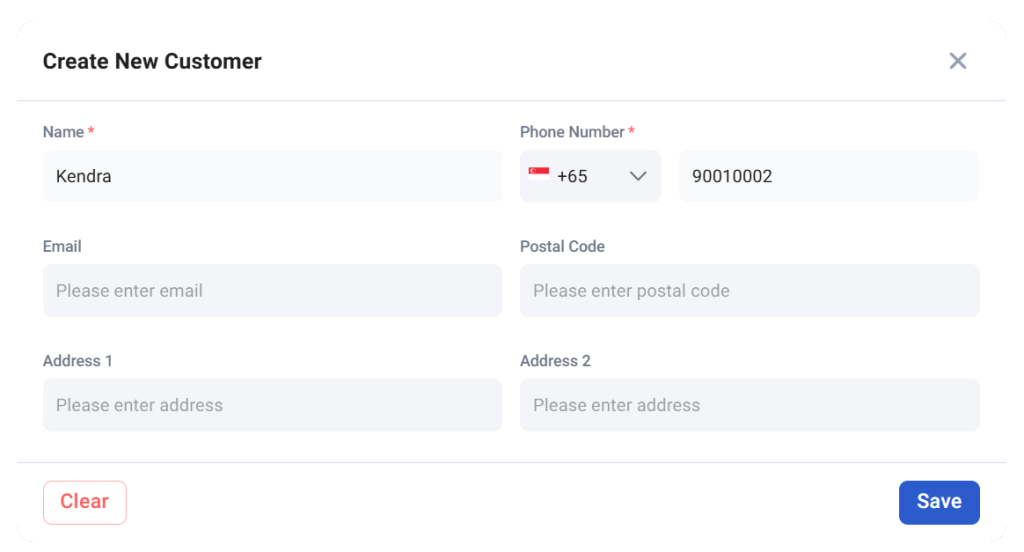
2.Fill in the relevant fields to create a new customer profile.
3.Click Save to proceed with creating the customer profile.
4.Click Yes to confirm adding the newly created customer.
5.The newly added customer’s name can now be entered into the customer list, with their details saved in the system for future use.
Users can export any invoice as a pdf file.
Step | Description |
1 | Select the invoice from the invoices list in the main Invoices page. |
2 | Click on the Export to PDF button on the top right of the page. |
3 | A PDF version of the invoice will automatically be downloaded into the user’s computer.
|
Refer to the attached sample of a invoice PDF:
Was this article helpful?
YesNo
