No products in the cart.
⬇ Explore the functionalities of the product page by toggling between tabs below.⬇
This section provides details related to the Quotation Main Page in the backend portal.
Quotations Main Page
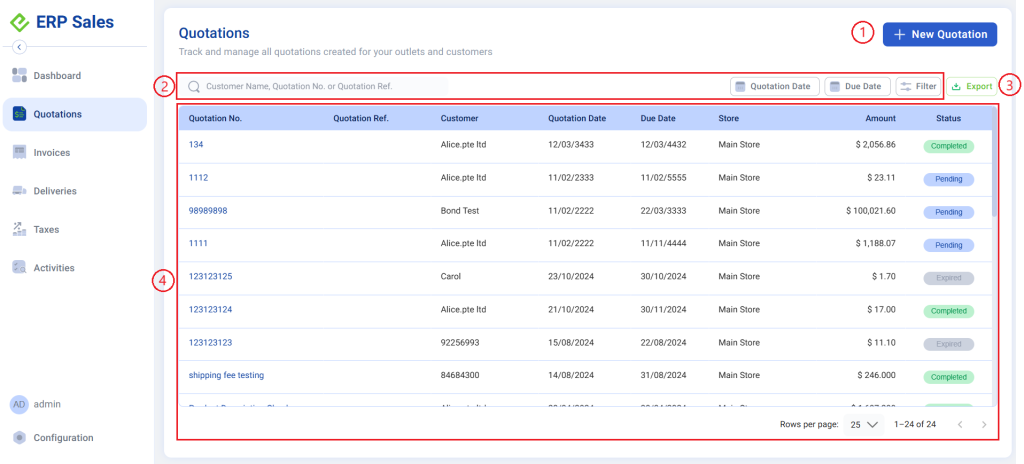
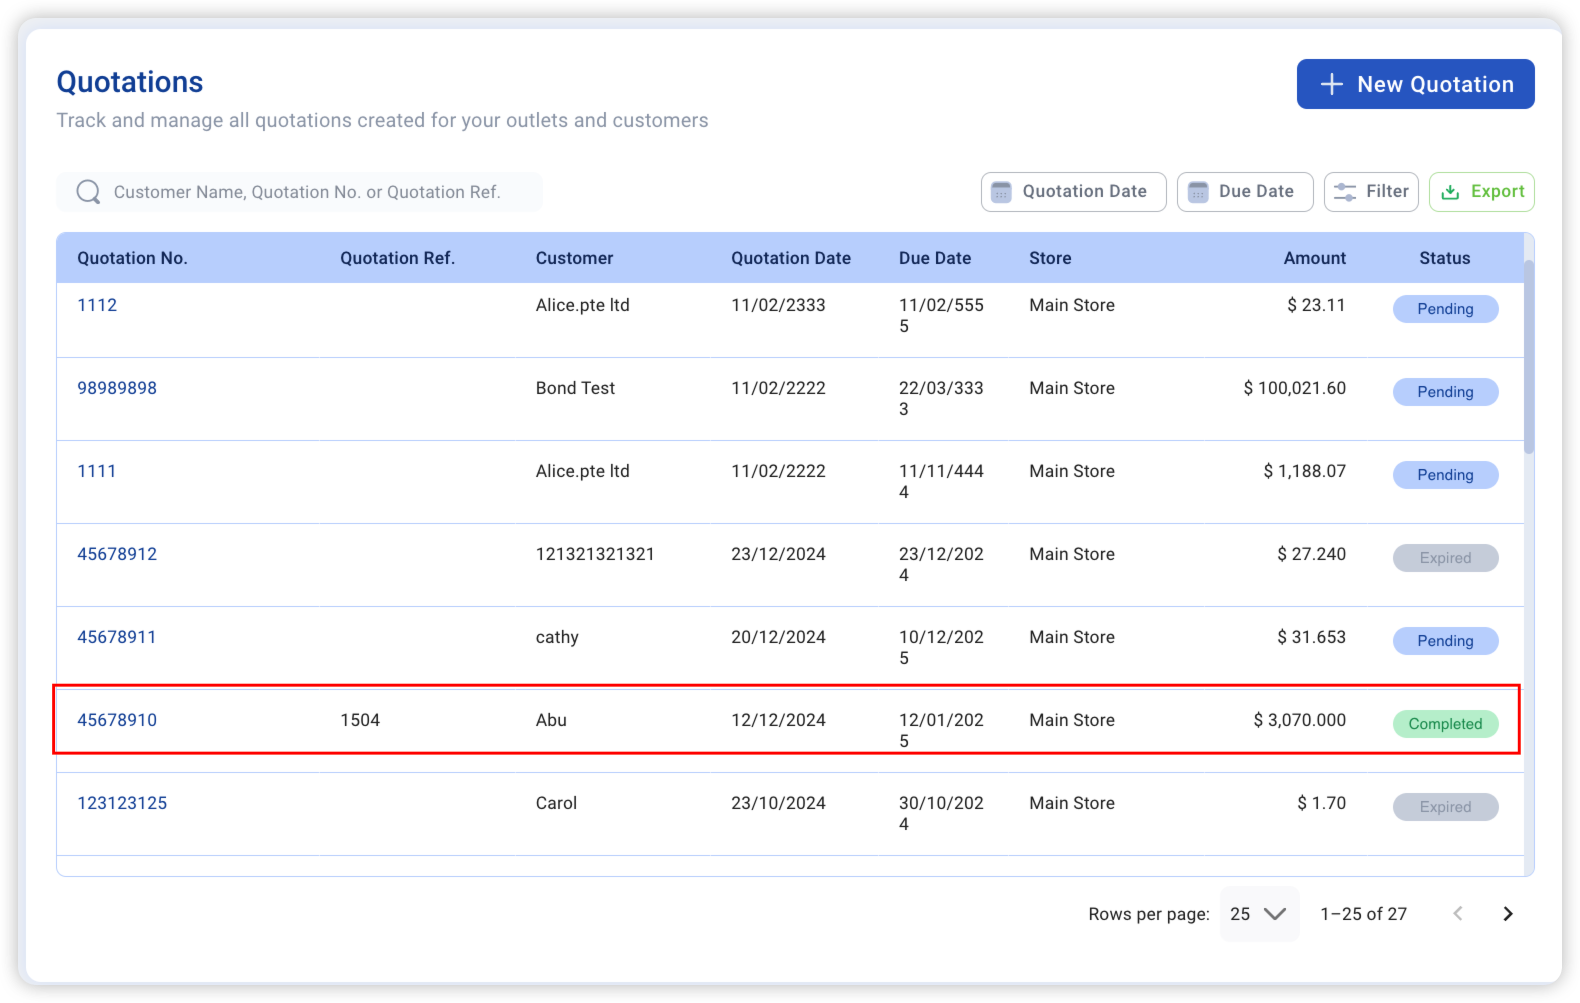
The Quotations main page is where all created quotations will be listed.
| No | Fields/Functions | Description |
| 1 | Create New Quotation | Enable users to create a new quotation in the portal. For more information, see “Creating New Quotation”. |
| 2 | Filter & Search | Enable users to search for a particular quotation with specific criteria, such as:
|
| 3 | Export Quotation List | Download all/filtered quotations list in .csv format. |
| 4 | Quotation List | Shows the entire list of quotations existing in the portal based on the filter/search criteria applied by users, such as:
|
Perform the following steps to create a new quotation.
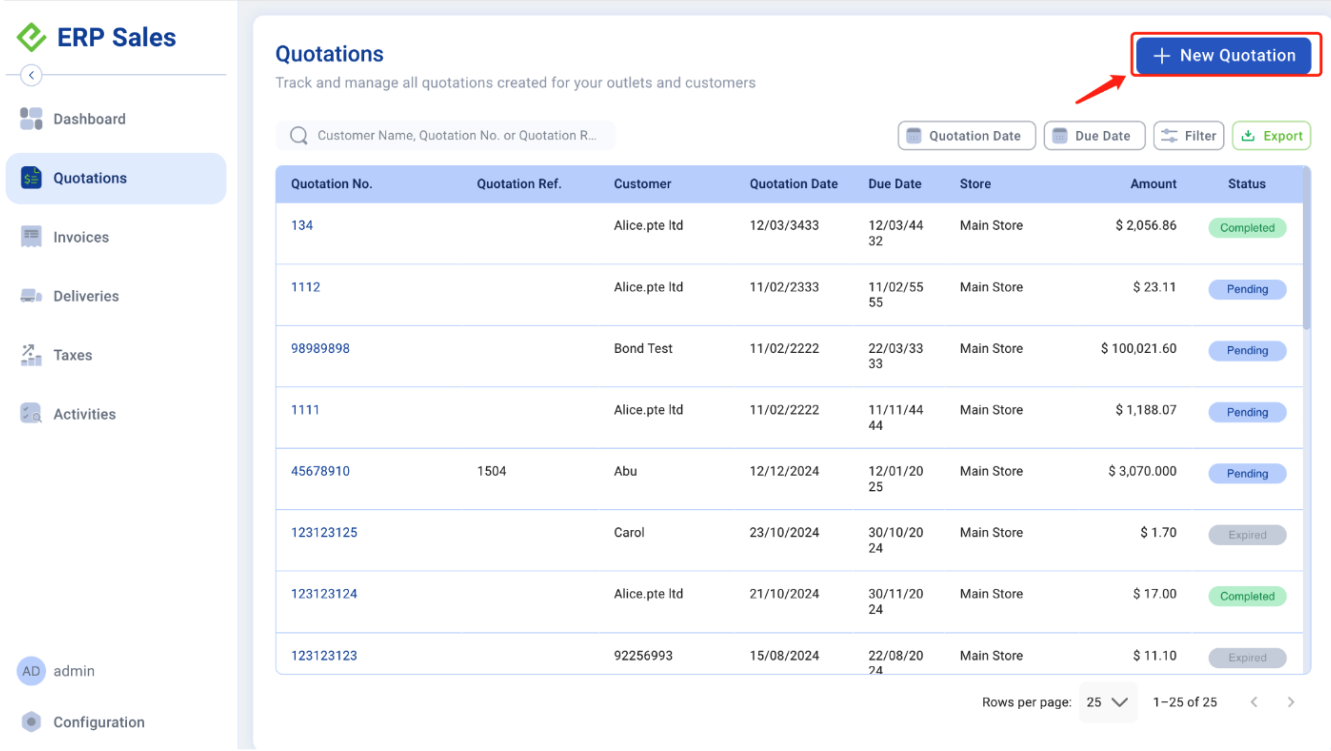
1. To access the Invoices main page, click on the Sales Panel and click on Quotations.
Click on “New Quotation” to Create a New Invoice.
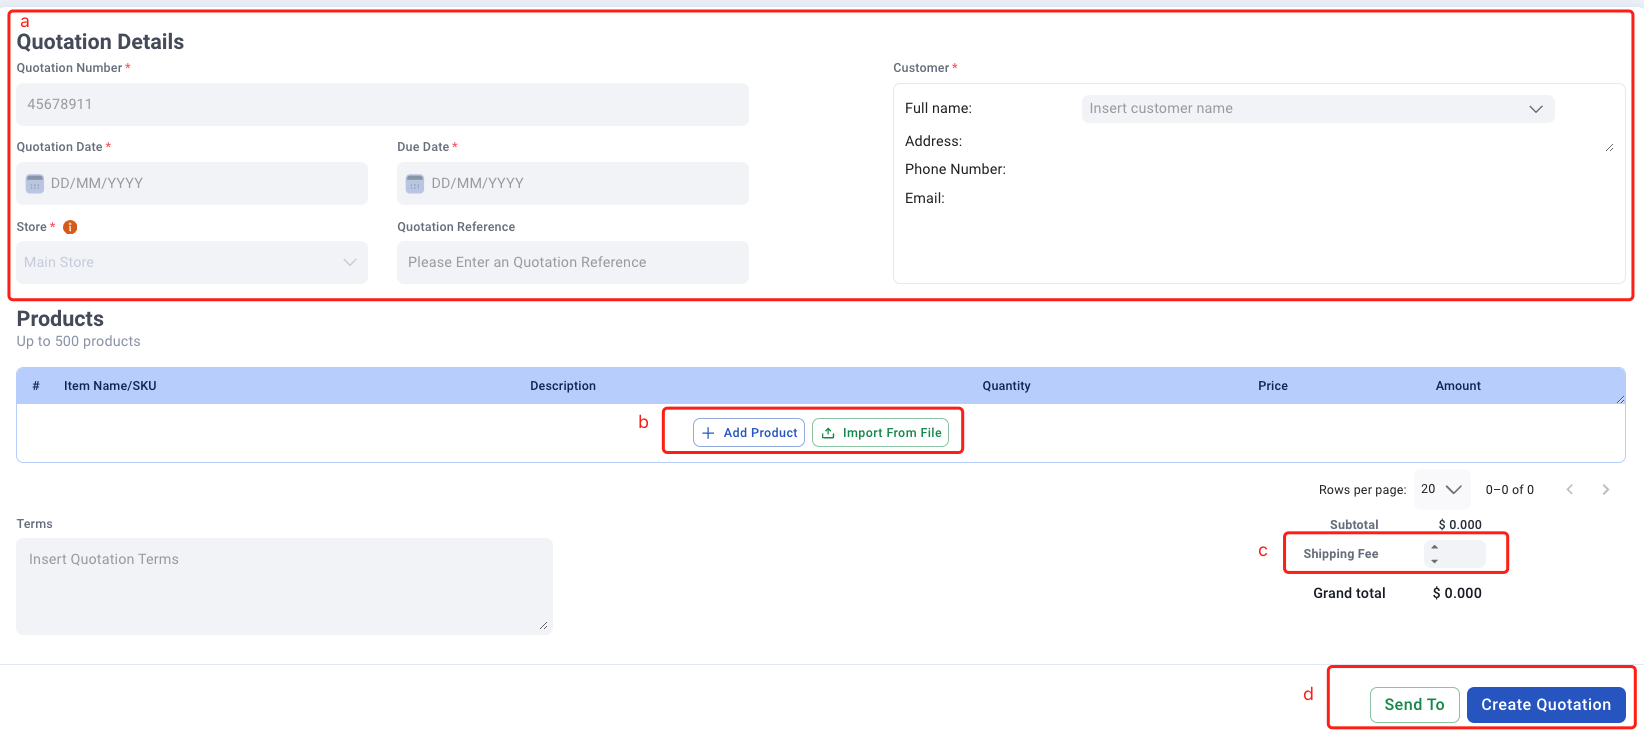
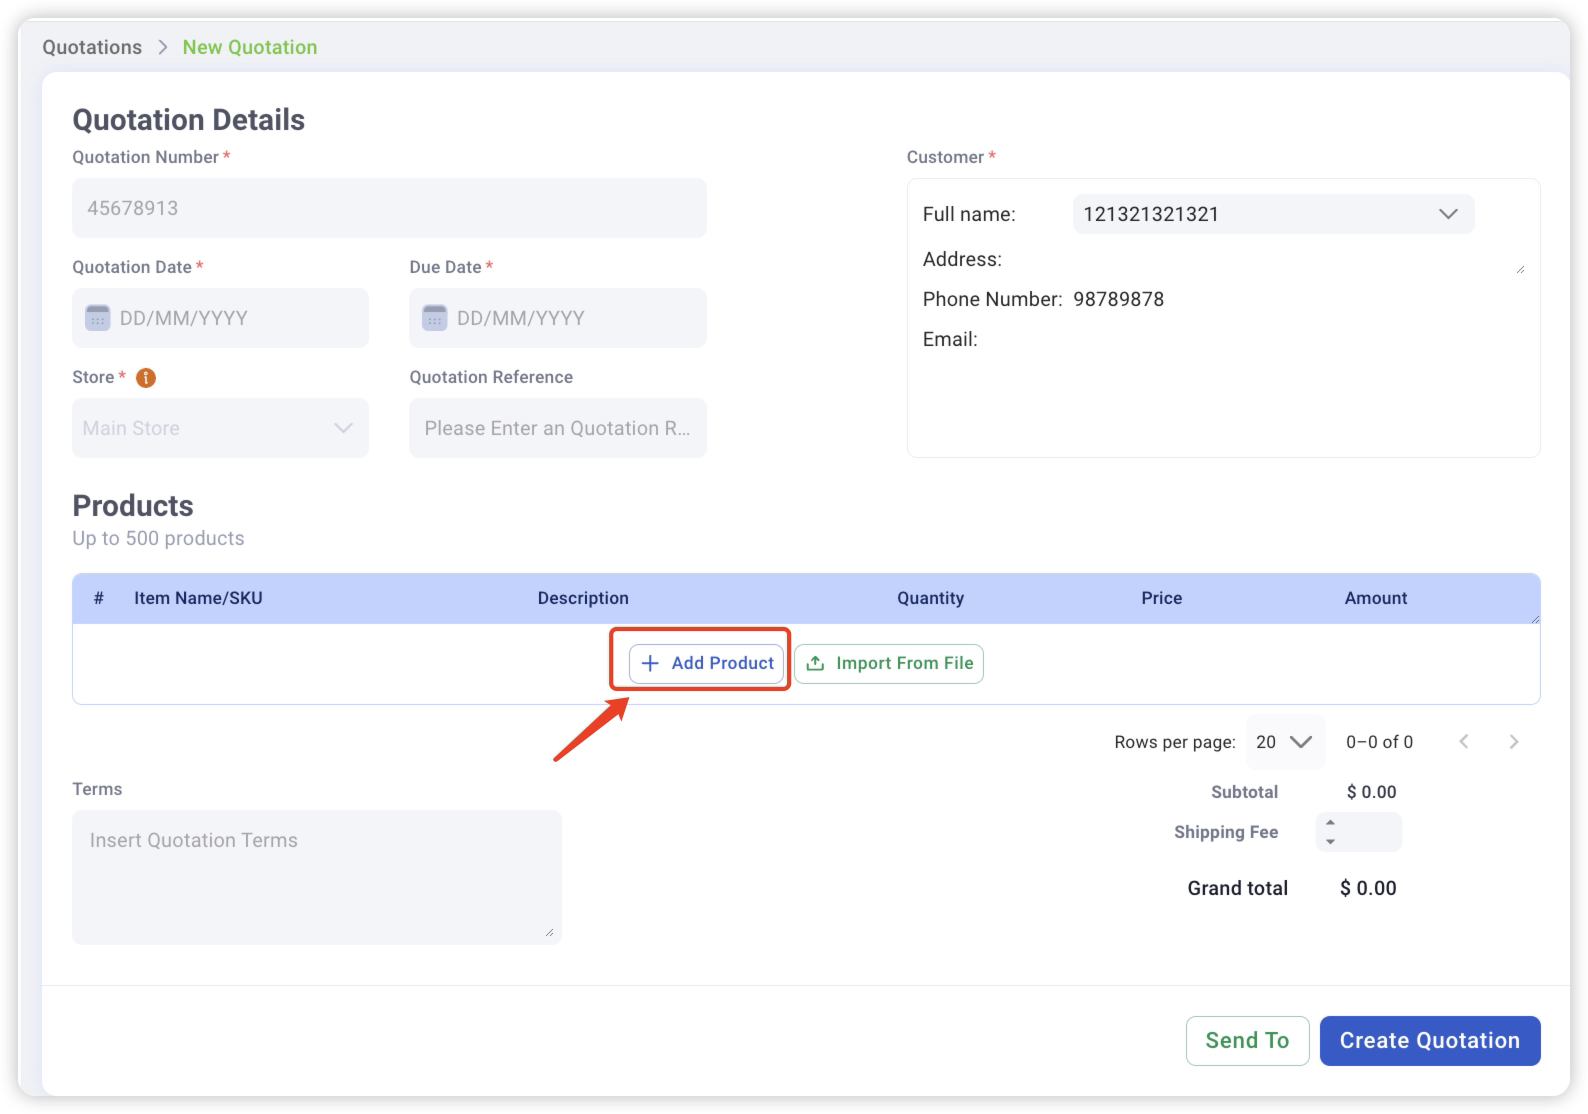
2. Fill in the relevant details to create invoice.
💡 Optional fields can be skipped and left blank
Fields/Function | Description |
a. Quotation Details | Input all the mandatory fields. |
b. Add Products / Import From File | Add Products: Click to add products individually |
c.Shipping fee | Fill in the shipping fee |
d. Send to / Create Quotation | Send to: Allow user to email the newly created quotation to the customer. Create Quotation: The button will be enabled after all the mandatory fields have been filled in. |
💡 Utilise the duplicate and delete action icons to increase your efficiency!
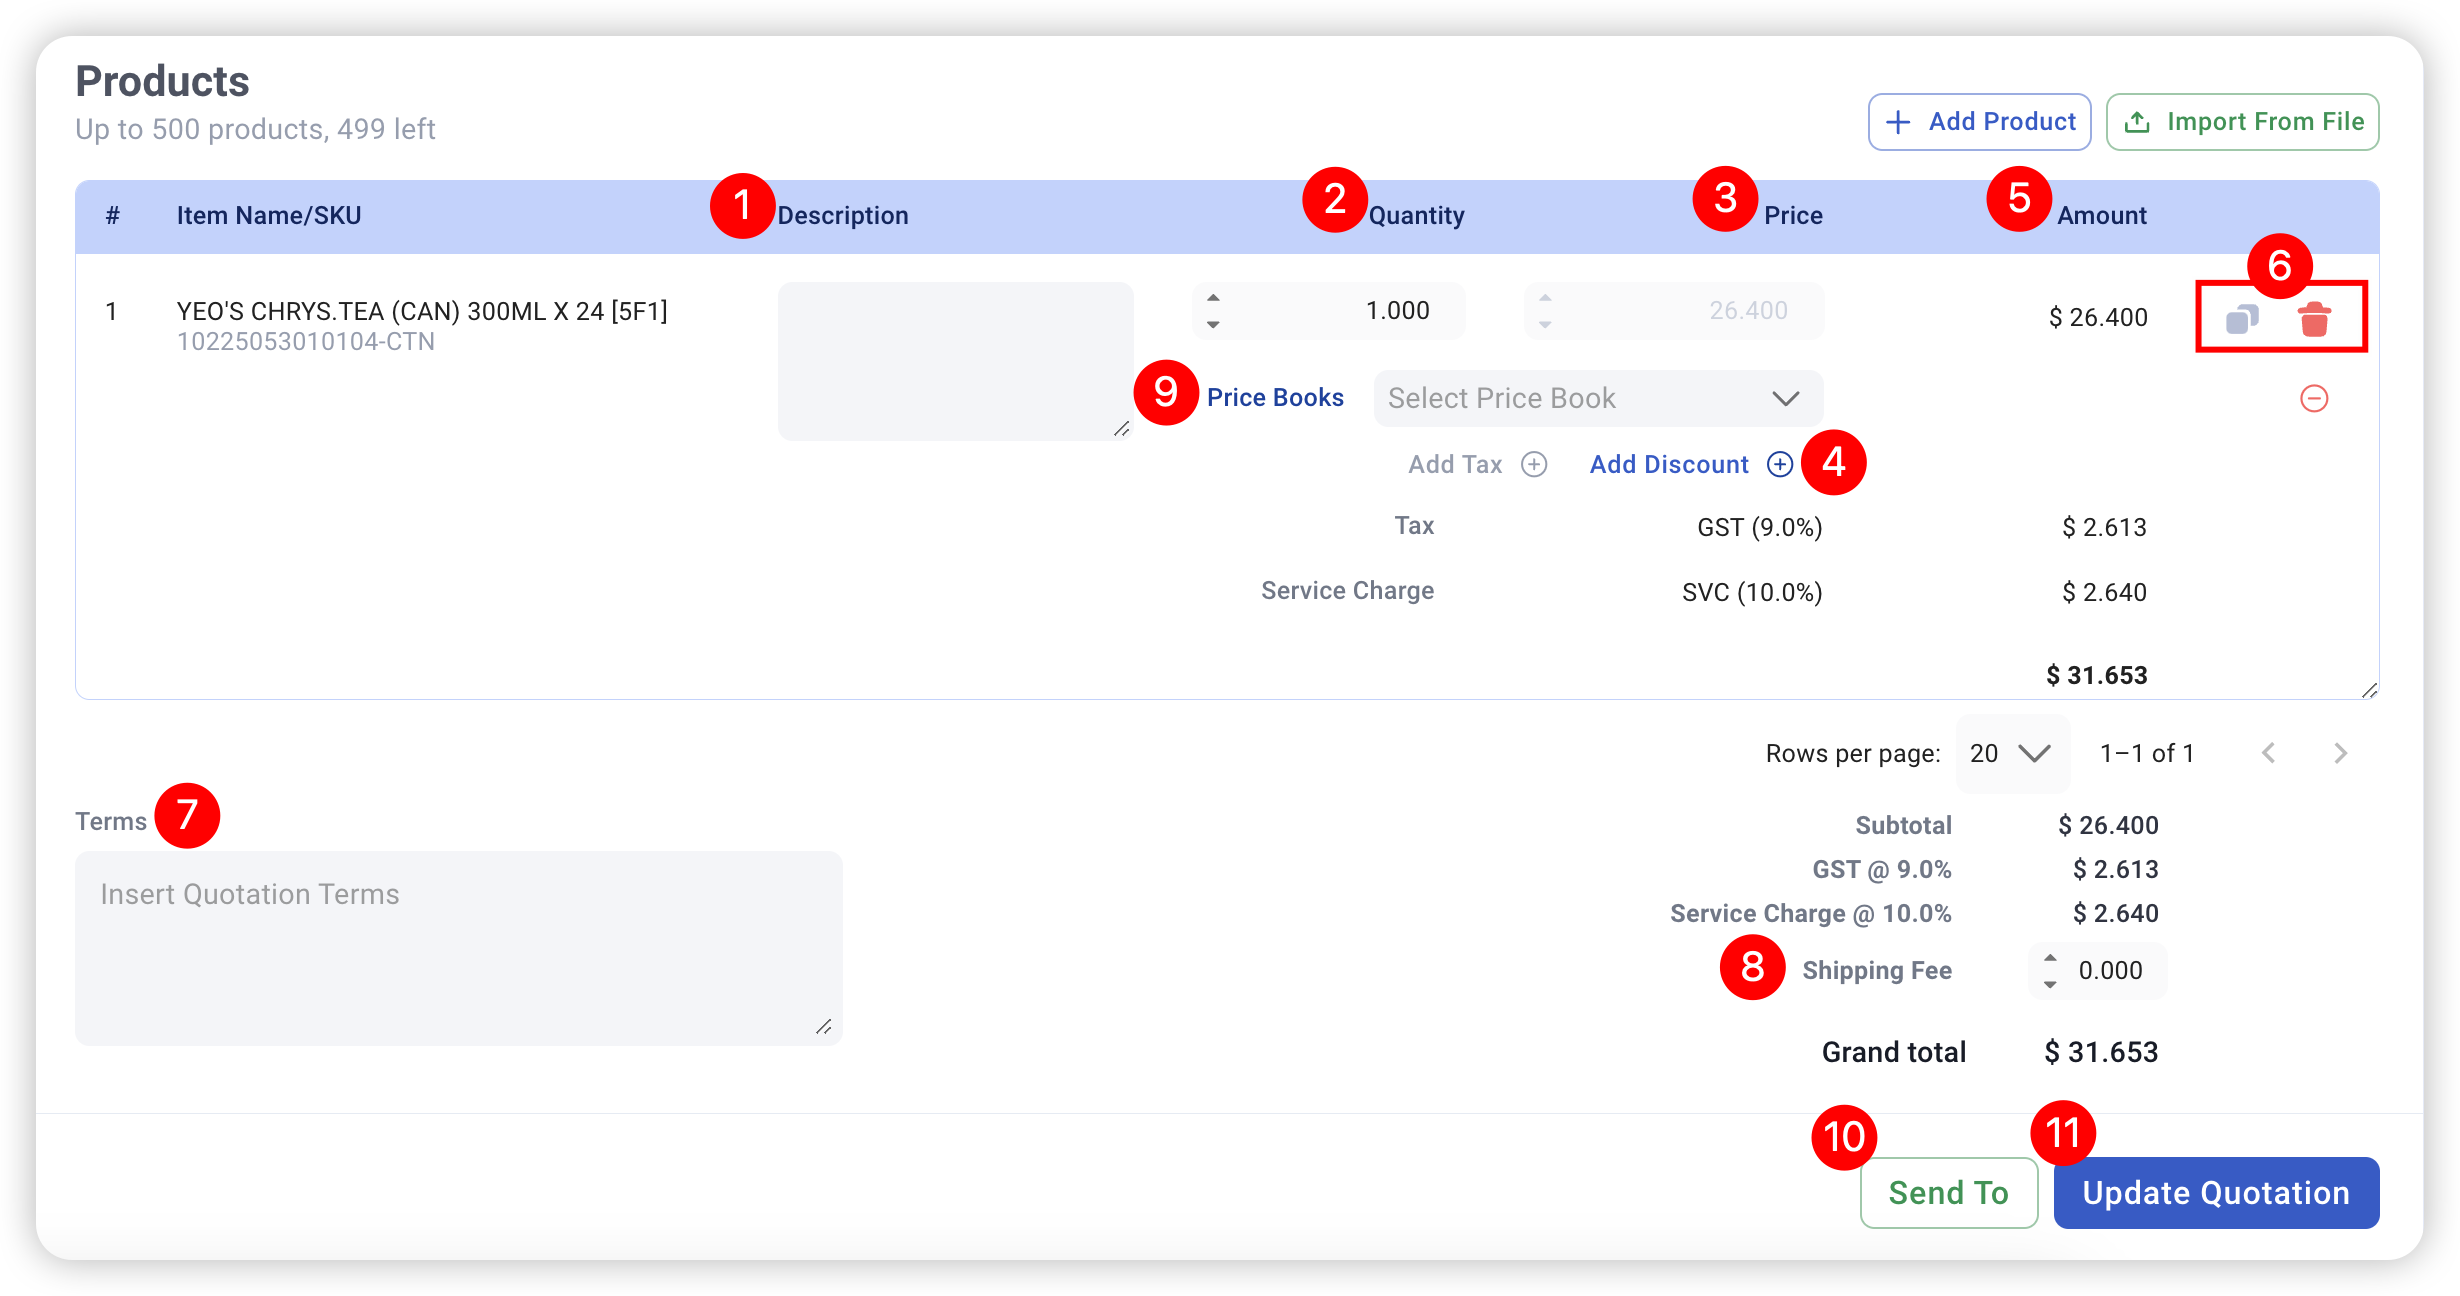
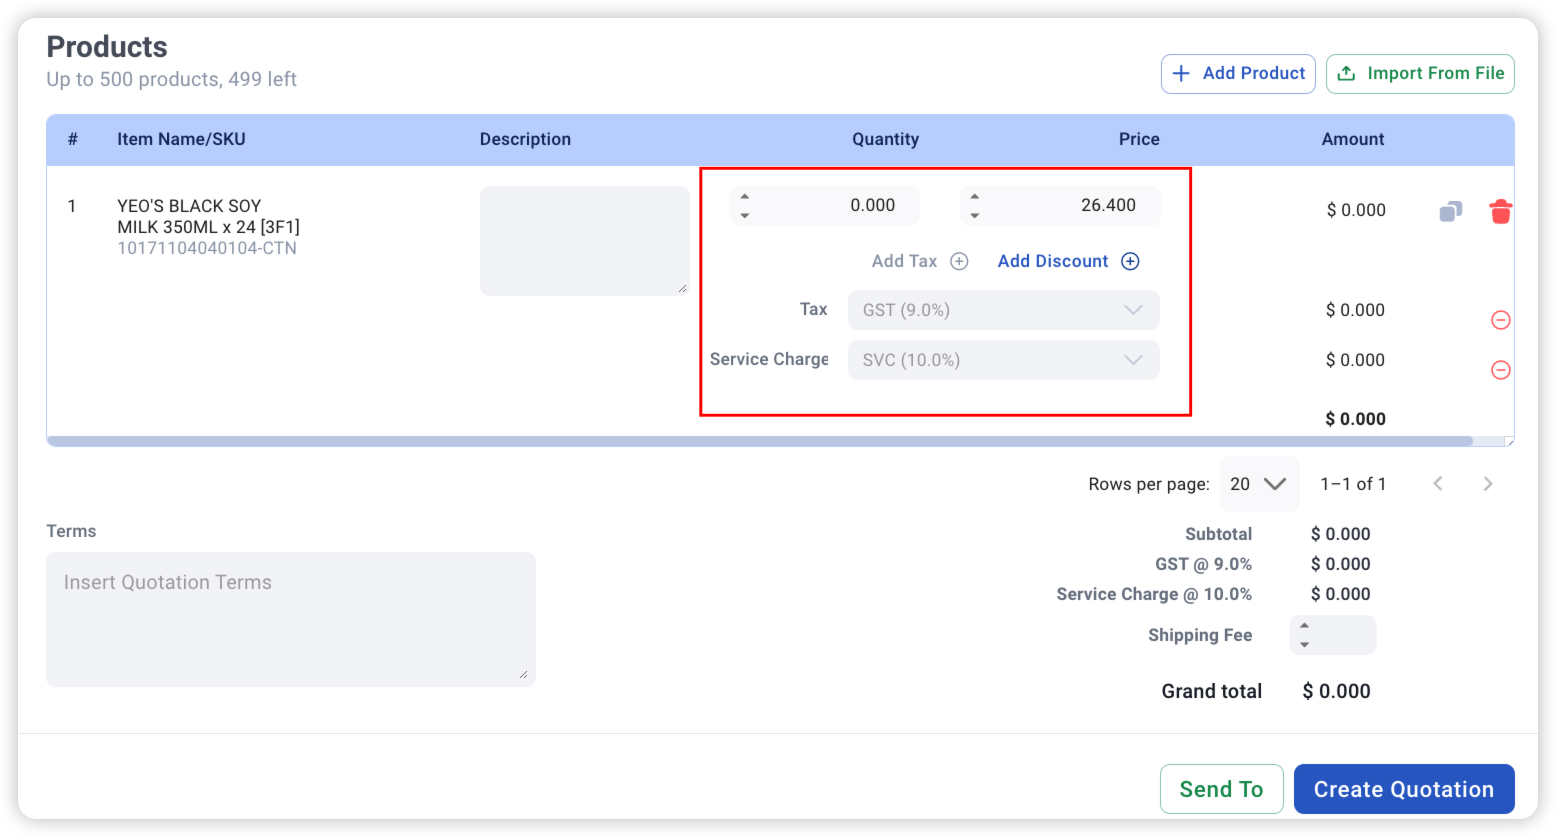
3. Ensure that respective details are entered before creating the invoice: Item Note, Order QTY, Unit Price, Discount (%/$).
1. Add notes per line item
2. Indicate Qty ordered
3. Indicate Unit Price
4. Discount: Can select % or $ discount for each line item (Default = %)
5. Auto calculate the amount for line item: (Discounted Unit Price x Order Qty)
6. Duplicate line item in Quote & Delete line item from Quote
7. Add terms/notes for each Quotation (eg. Payment Terms)
8. Shipping/Delivery cost can be input by user
9. Add Pricing Books
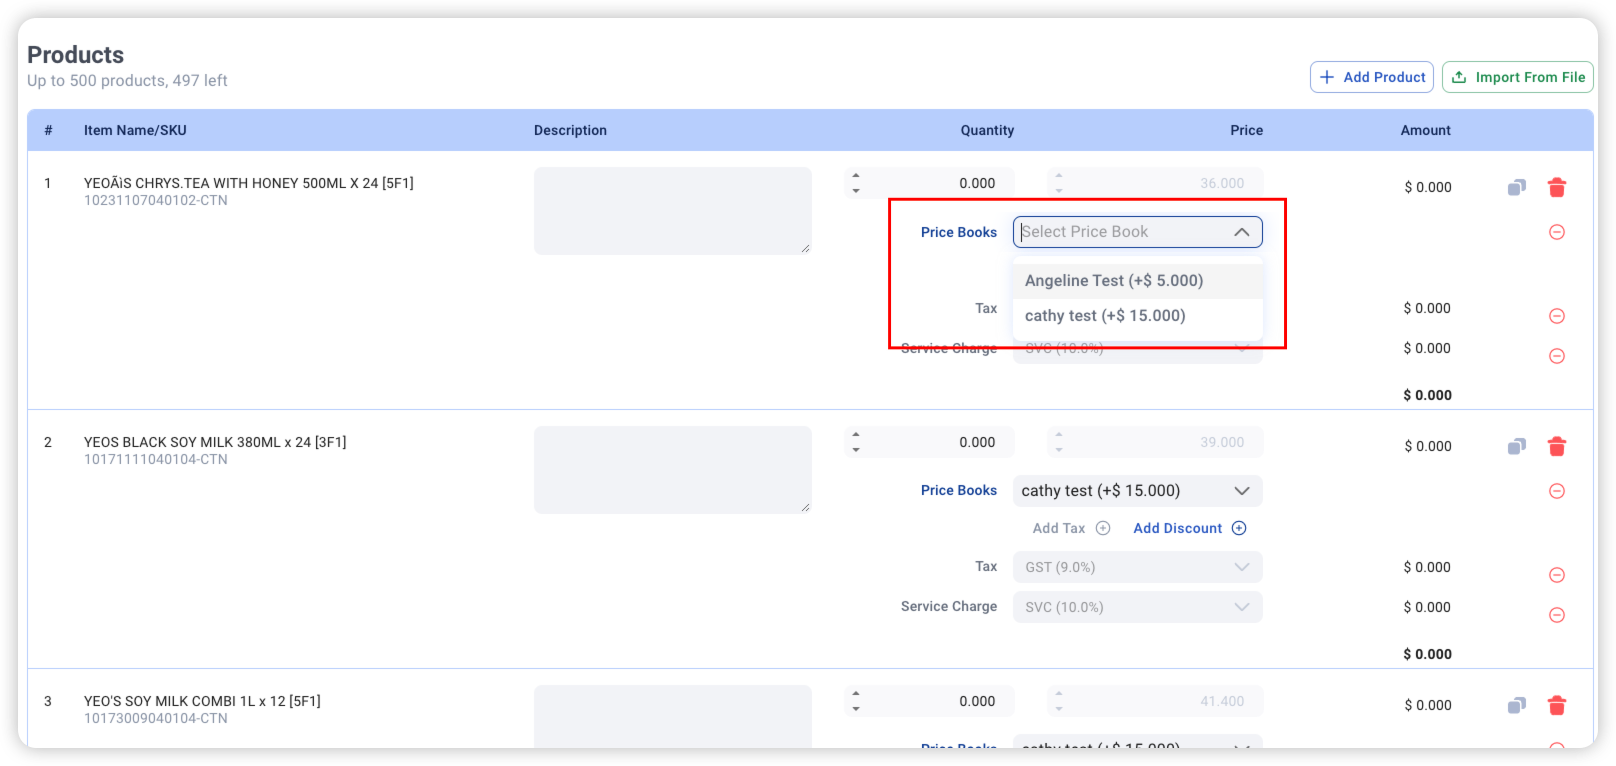
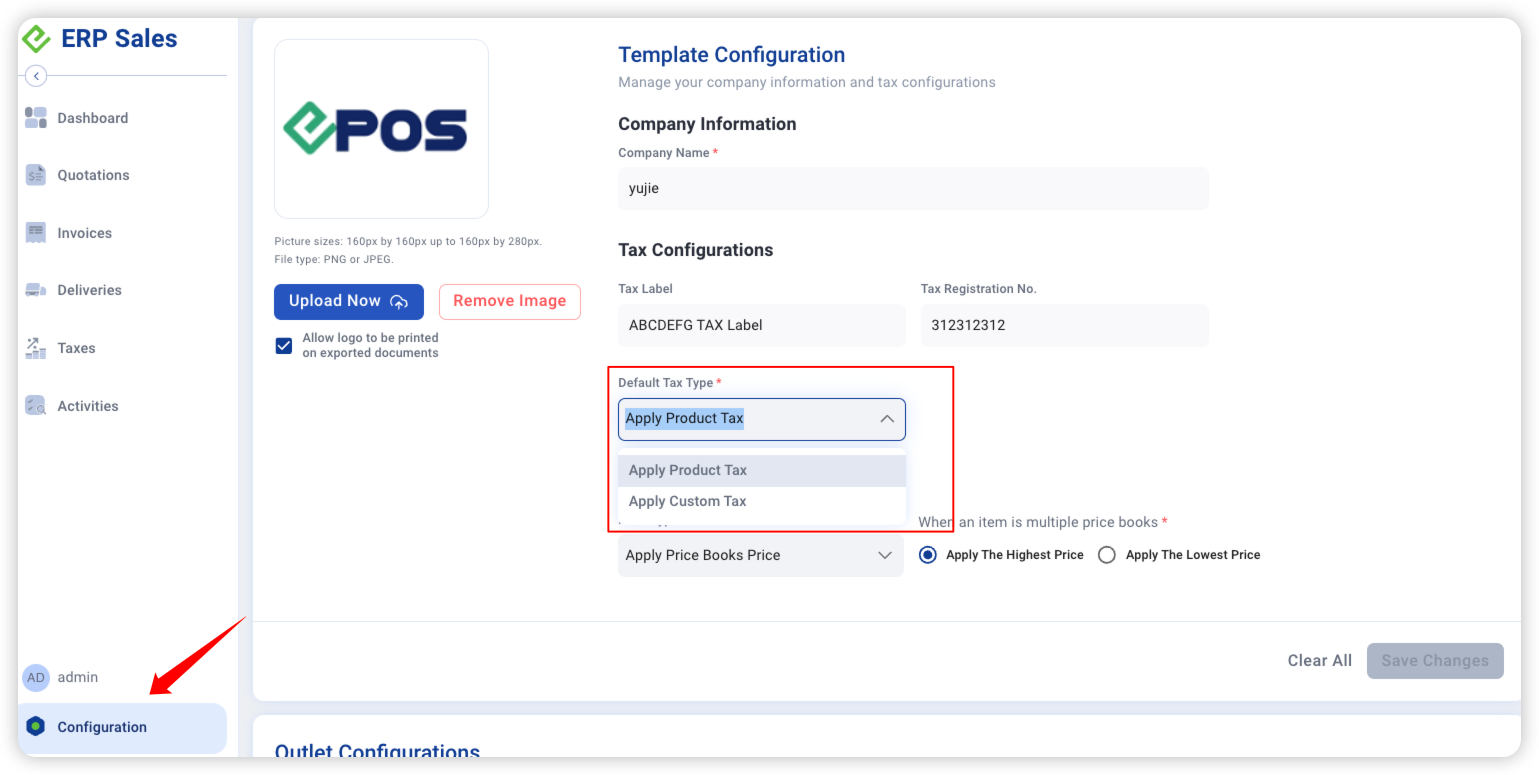
When ‘Apply Price Books Price’ is selected in “Configuration” , system auto-applies the highest/lowest price from the price book for each line item.
(can change & remove the applied price book if needed)
10. Quotation can be sent to customers via email
11. Create Quotation (will appear in Main Quotes page after created)
Order Qty & Unit Price will be auto-filled if Importing from File used
To edit the Tax and Pricebooks, please refer to Configuration.
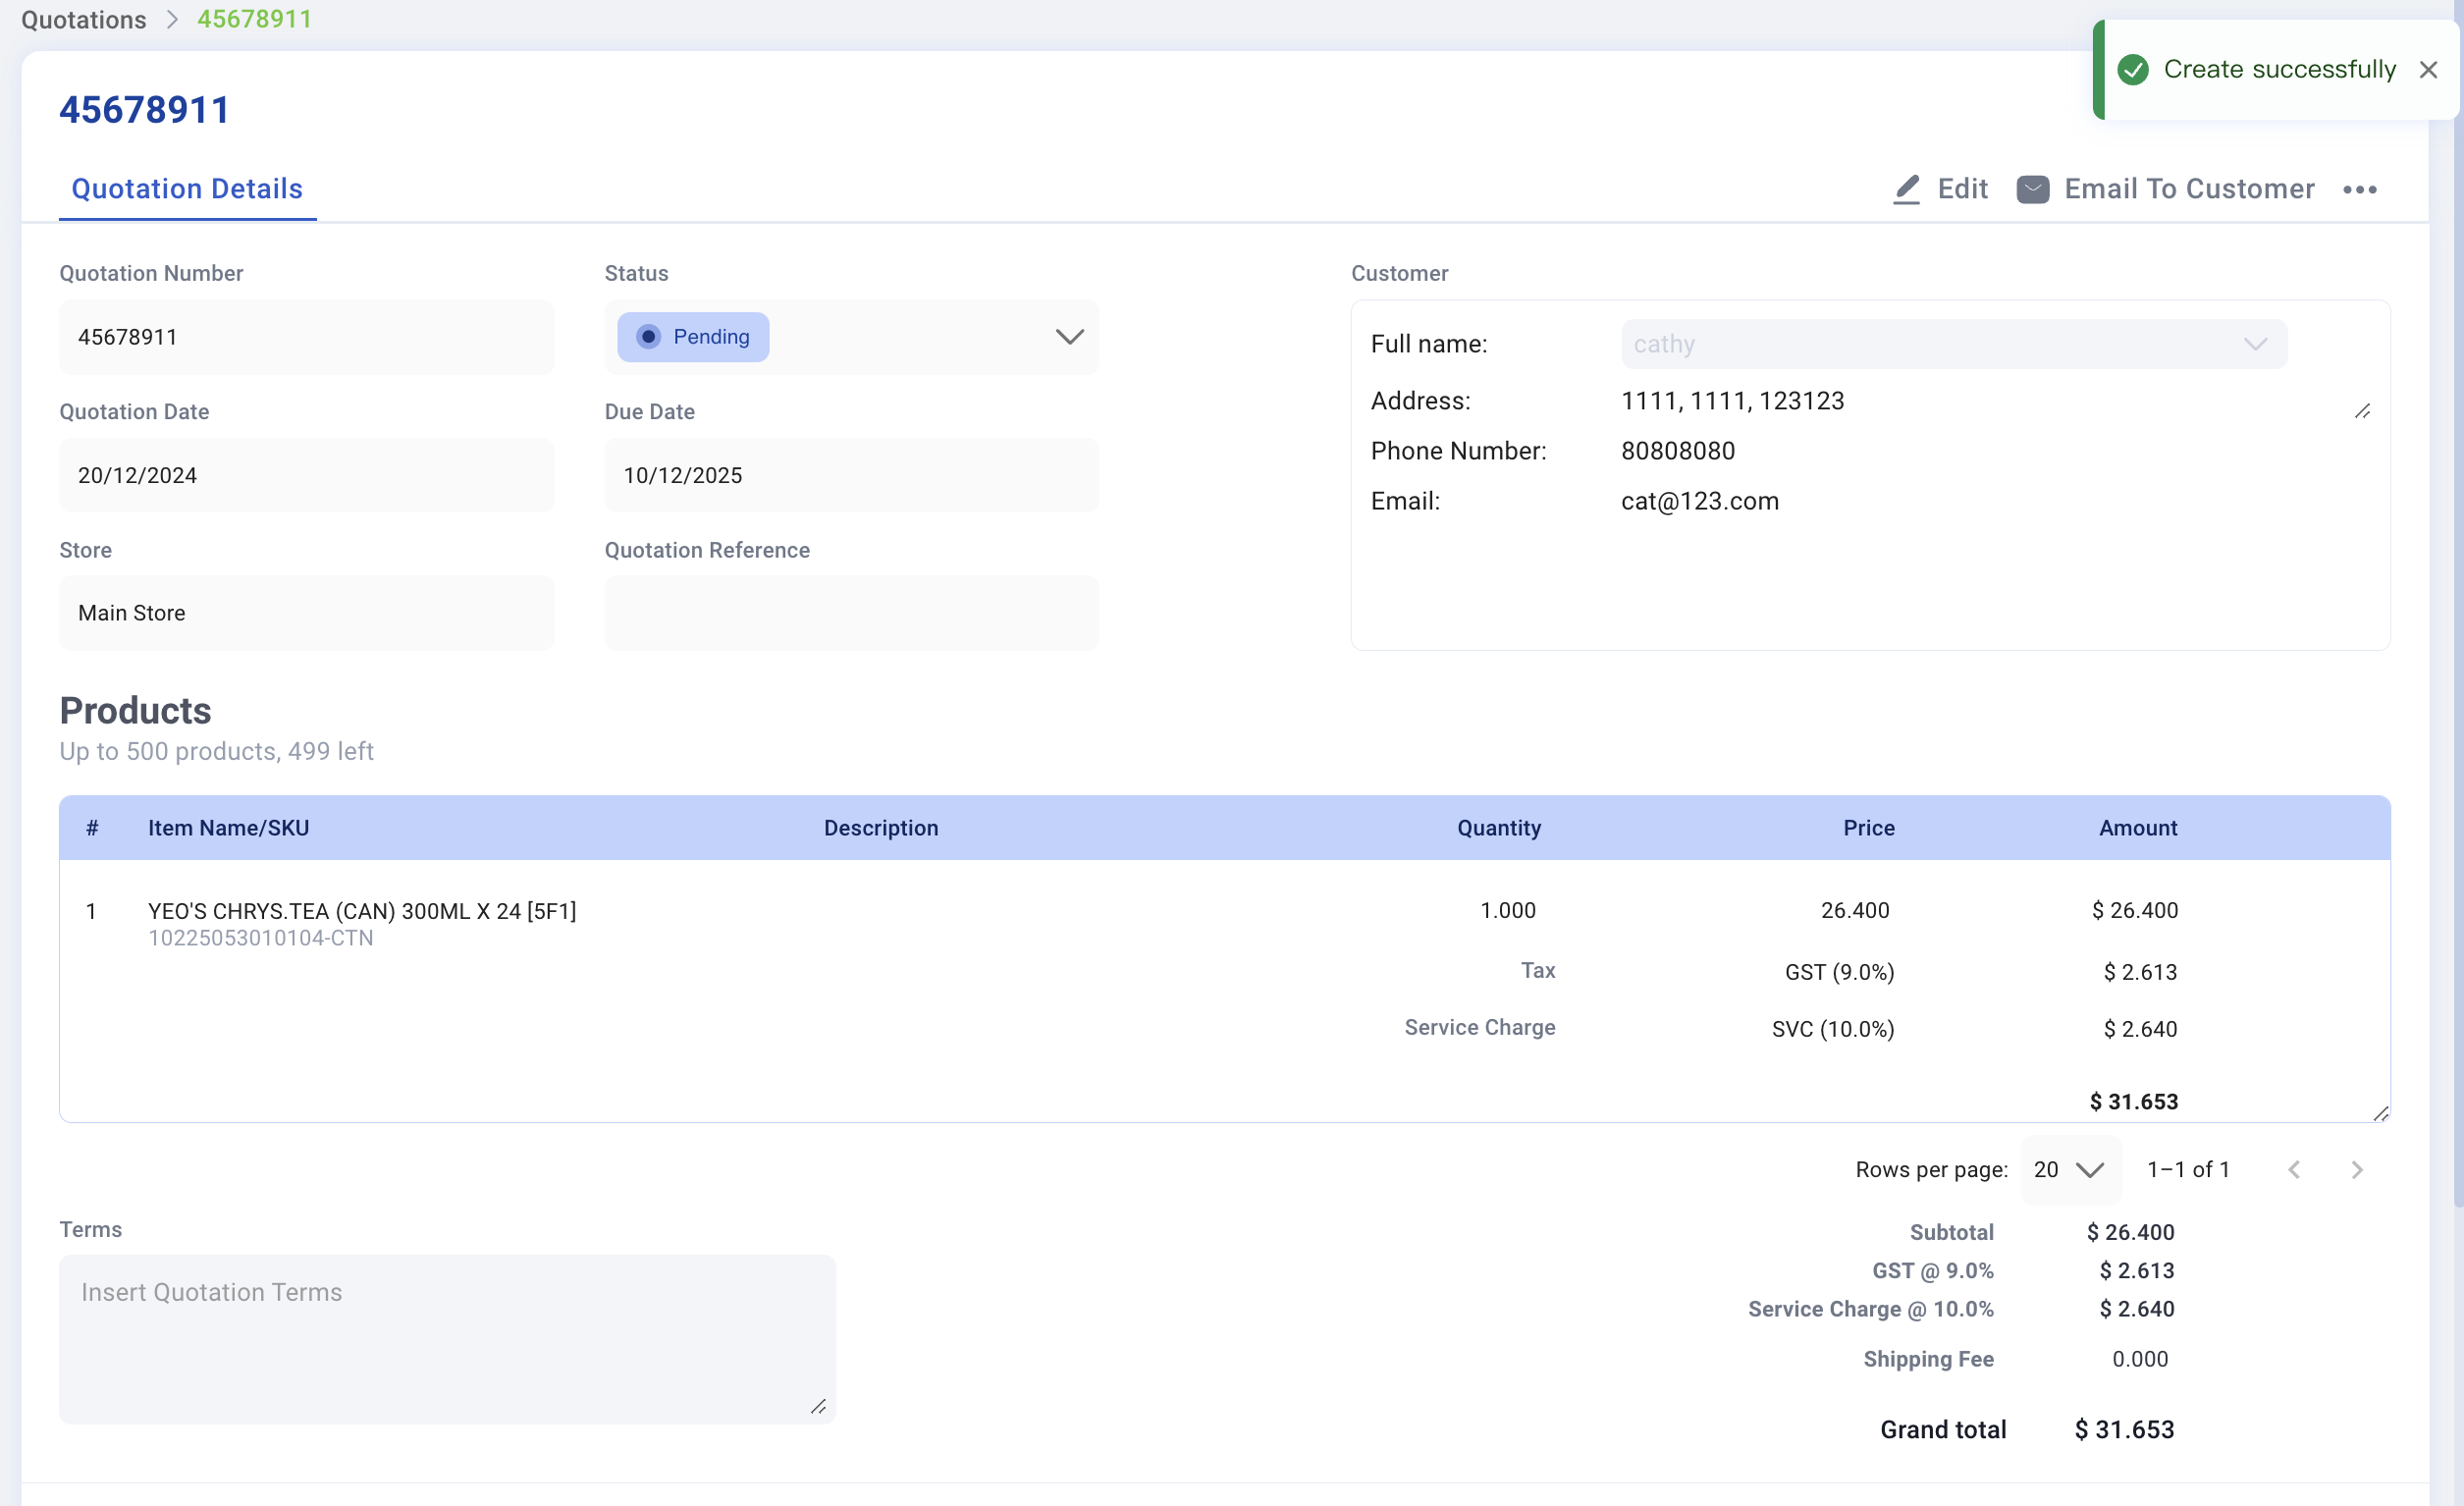
4. Quotation will be created successfully and now be listed in the quotations list in the Quotations page once “Created successfully” notification is shown at the top right corner.
💡 Once a quotation is successfully created, it cannot be deleted from the Backend Portal.
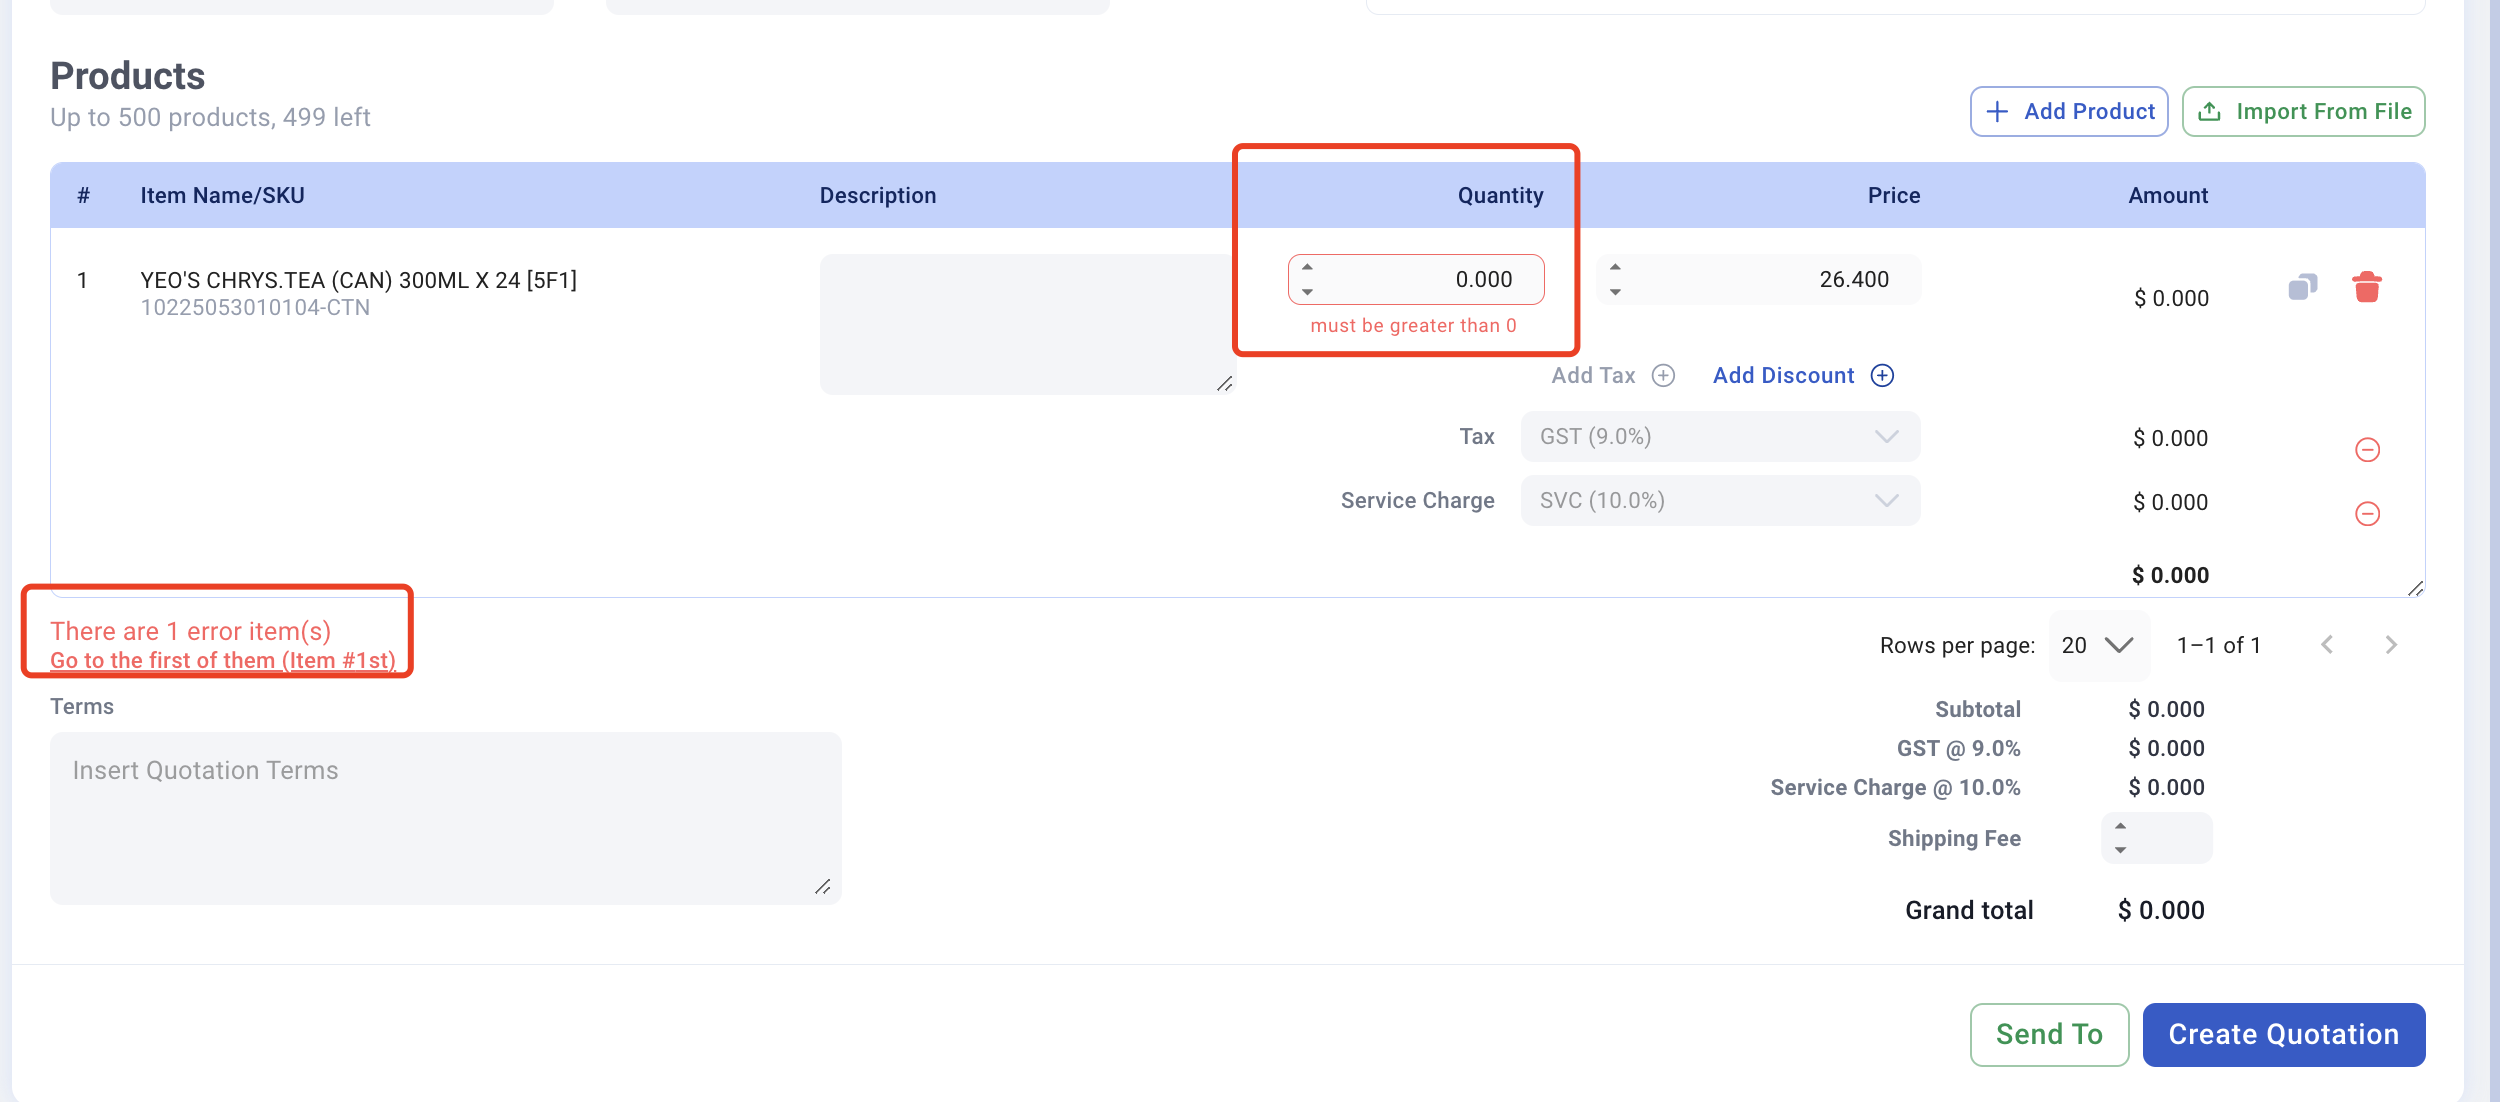
💡Be careful with the error message
Product Classes
Only products from certain product classes are able to be added to new quotations/invoices. Refer to the following table for addable product classes:
| Product Class | Addable to Quotations/Invoices? |
| Normal | YES |
| Composite | YES |
| Addon | NO |
| Package | YES |
| Serial Number | NO |
| Weight Scale | YES |
💡 While add-on products cannot be added to quotations, any linked normal products in add-on groups can be added to quotations/invoices. For more information, see Add-ons.
Composite products will display all their component products in corresponding quantities when added to a quotation/invoice.
Normal, Package and Weight Scale products will appear as individual line items.
The Order Qty for each single component product in the composite will depend on the quantity of composite product entered by the users. For more information, see Composite Products.
1. Add Products Individually
a. Click on “New Quotation”
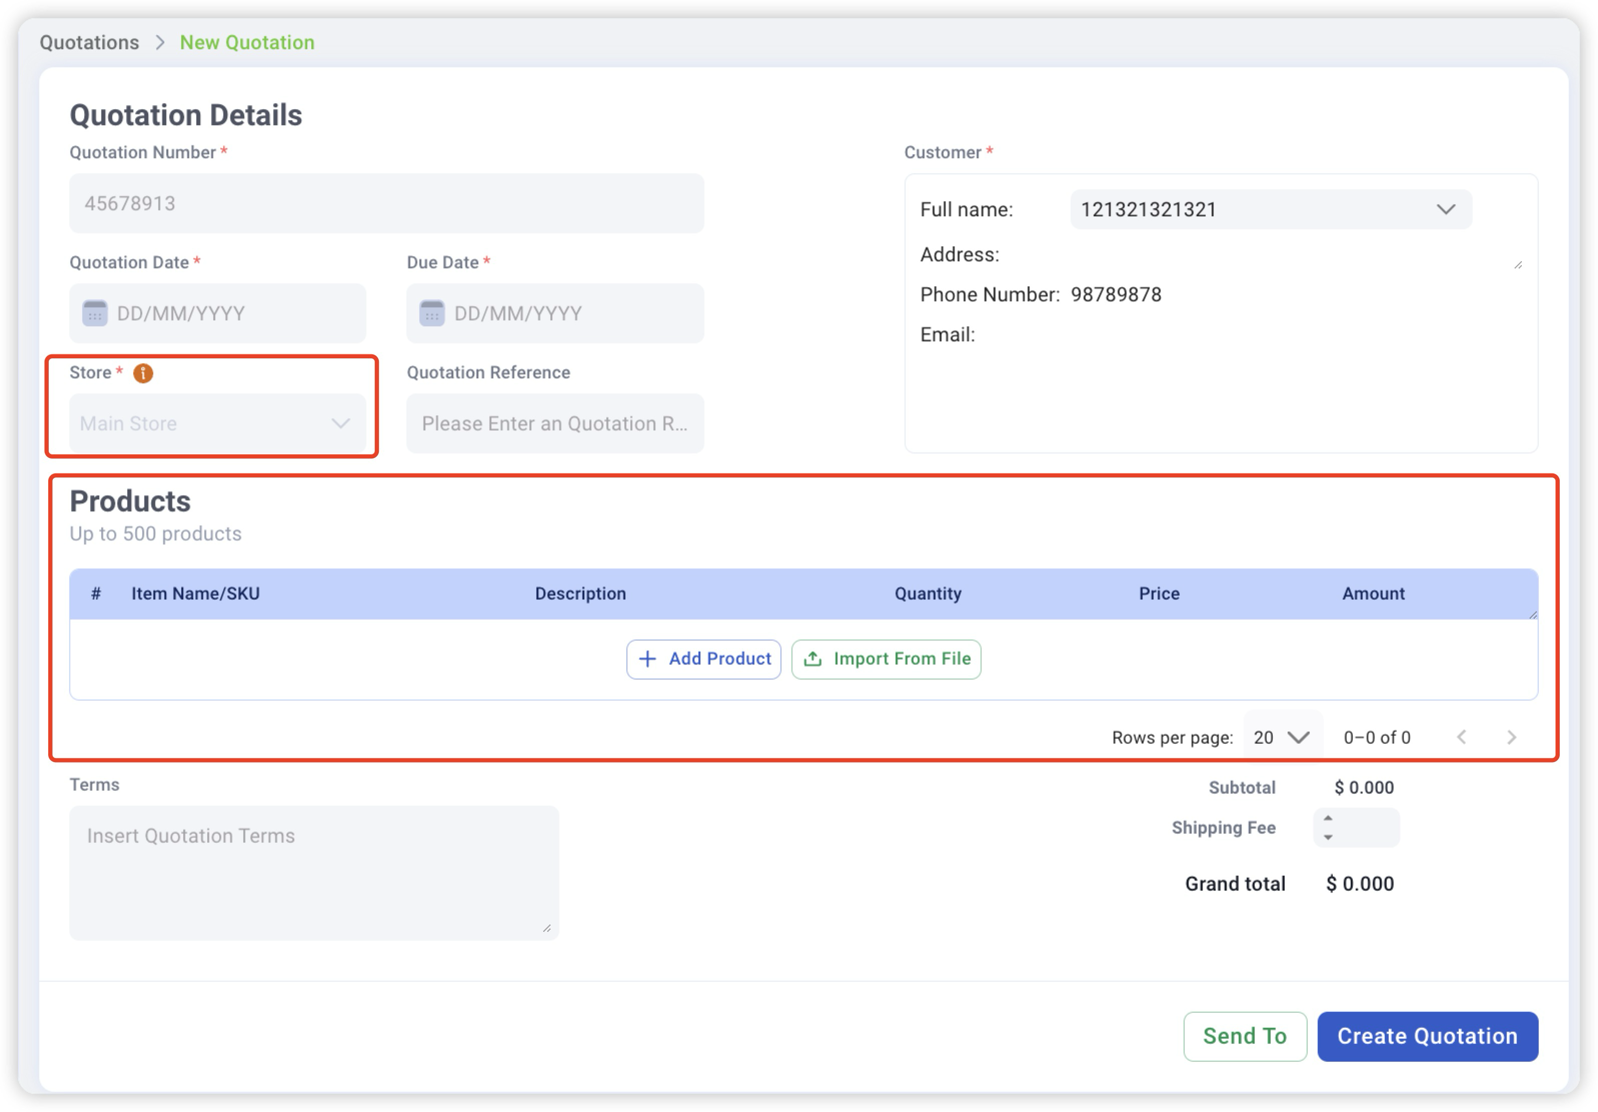
b. Before choosing your store, you cannot see the Product list 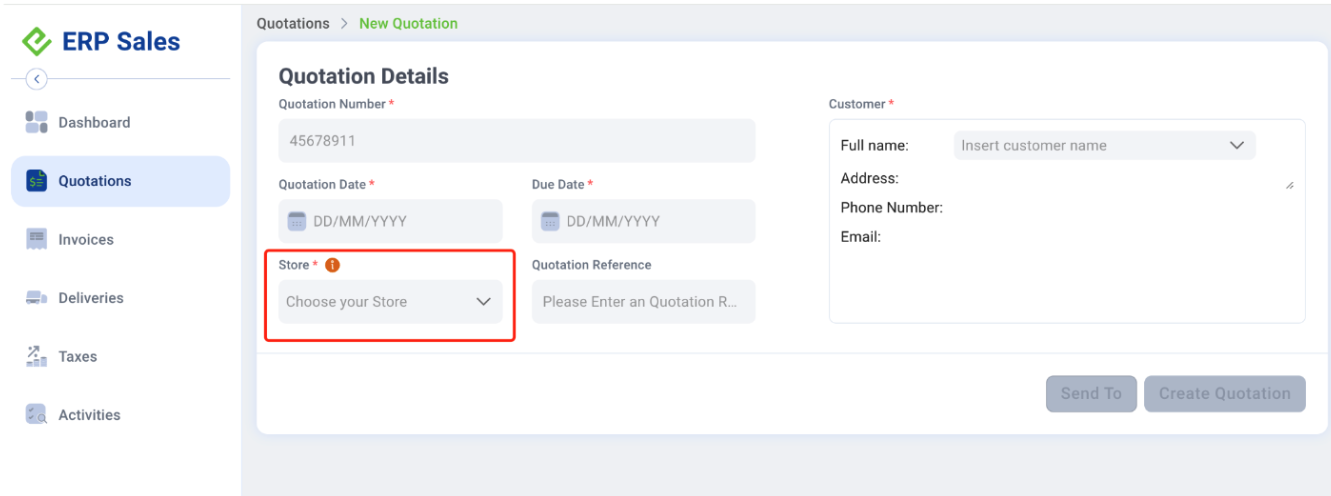
c. Click on “Add Product”
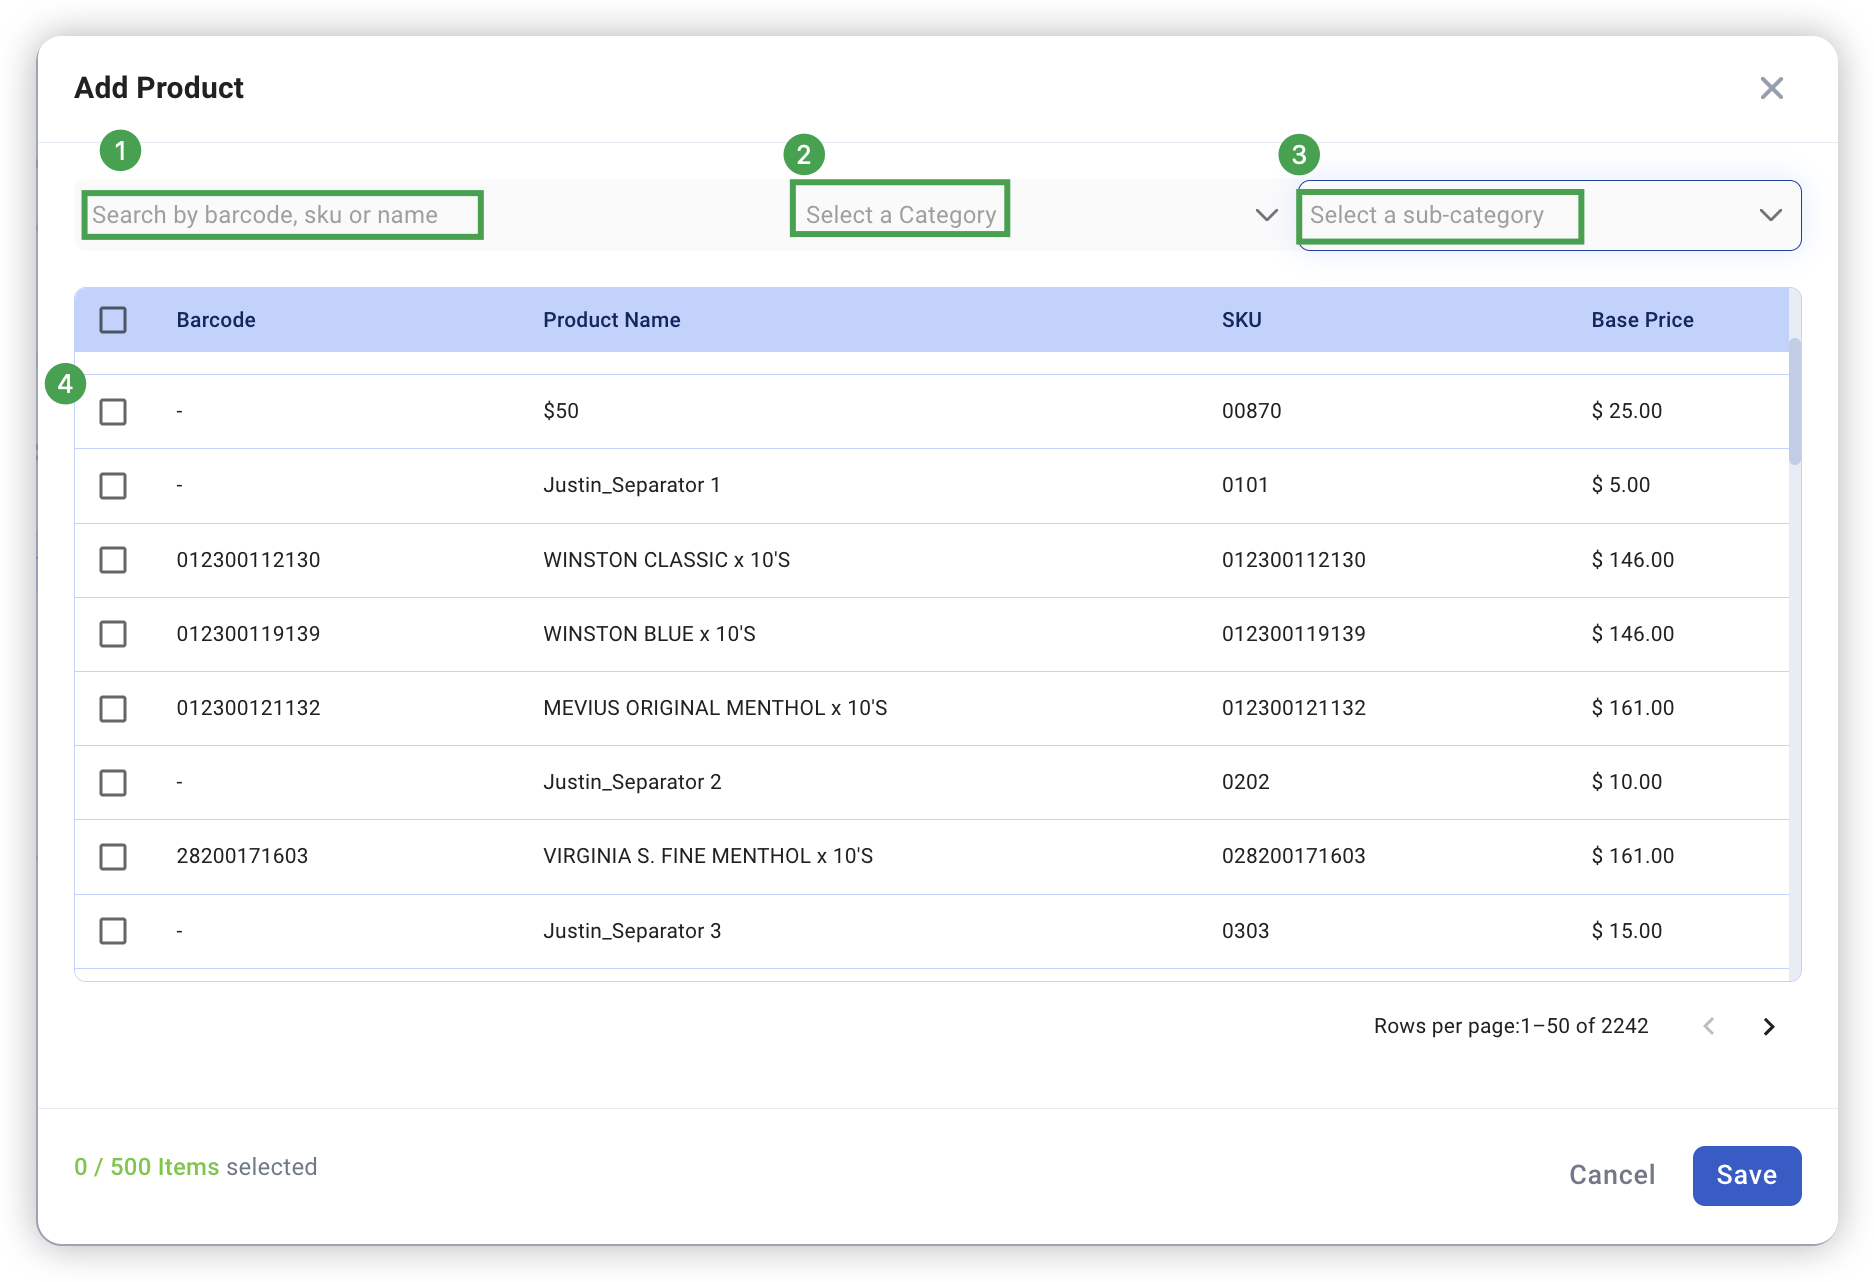
d. The window of “Add Product” would pop up
- Seach by barcode, sku, or name
- Select by Category
- Select by sub-category
- Select by checking in the boxes
e. Fill in the mandatory fields
💡 Utilise the duplicate and delete action icons to increase your efficiency!
The Products section in the Create New Quotation page will vary according to the chosen Tax Type.
- No Tax: Display default value $0.00 [For No Tax]
- Tax Inclusive:
No | Fields/Functions | Description |
1 | Tax Type* | Select Tax Inclusive for the Tax Type. |
2 | Tax Rate* | Enter a suitable tax rate for each line item. 💡 By default, this field will display 9% for all line items. |
3 | Tax Amount | Display the total Tax amount for that line item. 💡This field is calculated by: [(Unit Price – Discount) / (100% + Tax rate %)] x Tax rate % x Order Qty |
4 | Amount | Display the sum total for the line item. 💡[For Tax Inclusive Quotations/Invoices] This field is calculated by: (Order Qty x Unit Price) – Discount |
5 | Tax Total | Display the total tax amount for all line items [For Tax Inclusive Quotations/Invoices] |
– | Total | Total : Display the quotation/invoice grand total 💡This field is calculated by: (Subtotal + Shipping Fee) |
- Tax Exclusive:
No | Fields/Functions | Description |
1 | Tax Type* | Select Tax Exclusive for the Tax Type. |
2 | Tax Rate* | Enter a suitable tax rate for each line item. 💡 By default, this field will display 7% for all line items. |
3 | Tax Total | Display the total tax amount for all line items [For Tax Exclusive Quotations/Invoices] |
– | Total | Total : Display the quotation/invoice grand total 💡This field is calculated by: (Subtotal + Tax Total + Shipping Fee) |
2. Bulk Import Products
The Backend Portal’s ERP Sales Bulk Import feature is used to:
- Add line items into a new quotation
- Overwrite existing line items in an existing quotation
a. Click on “+ New Quotation” to go to the “Quotation Details” page
b. Before choosing your store, you cannot see the Product list 
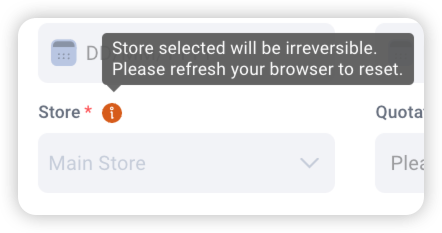
c. Choose your store, remember that the store selected will be irreversible. After this you can see the “Products” list
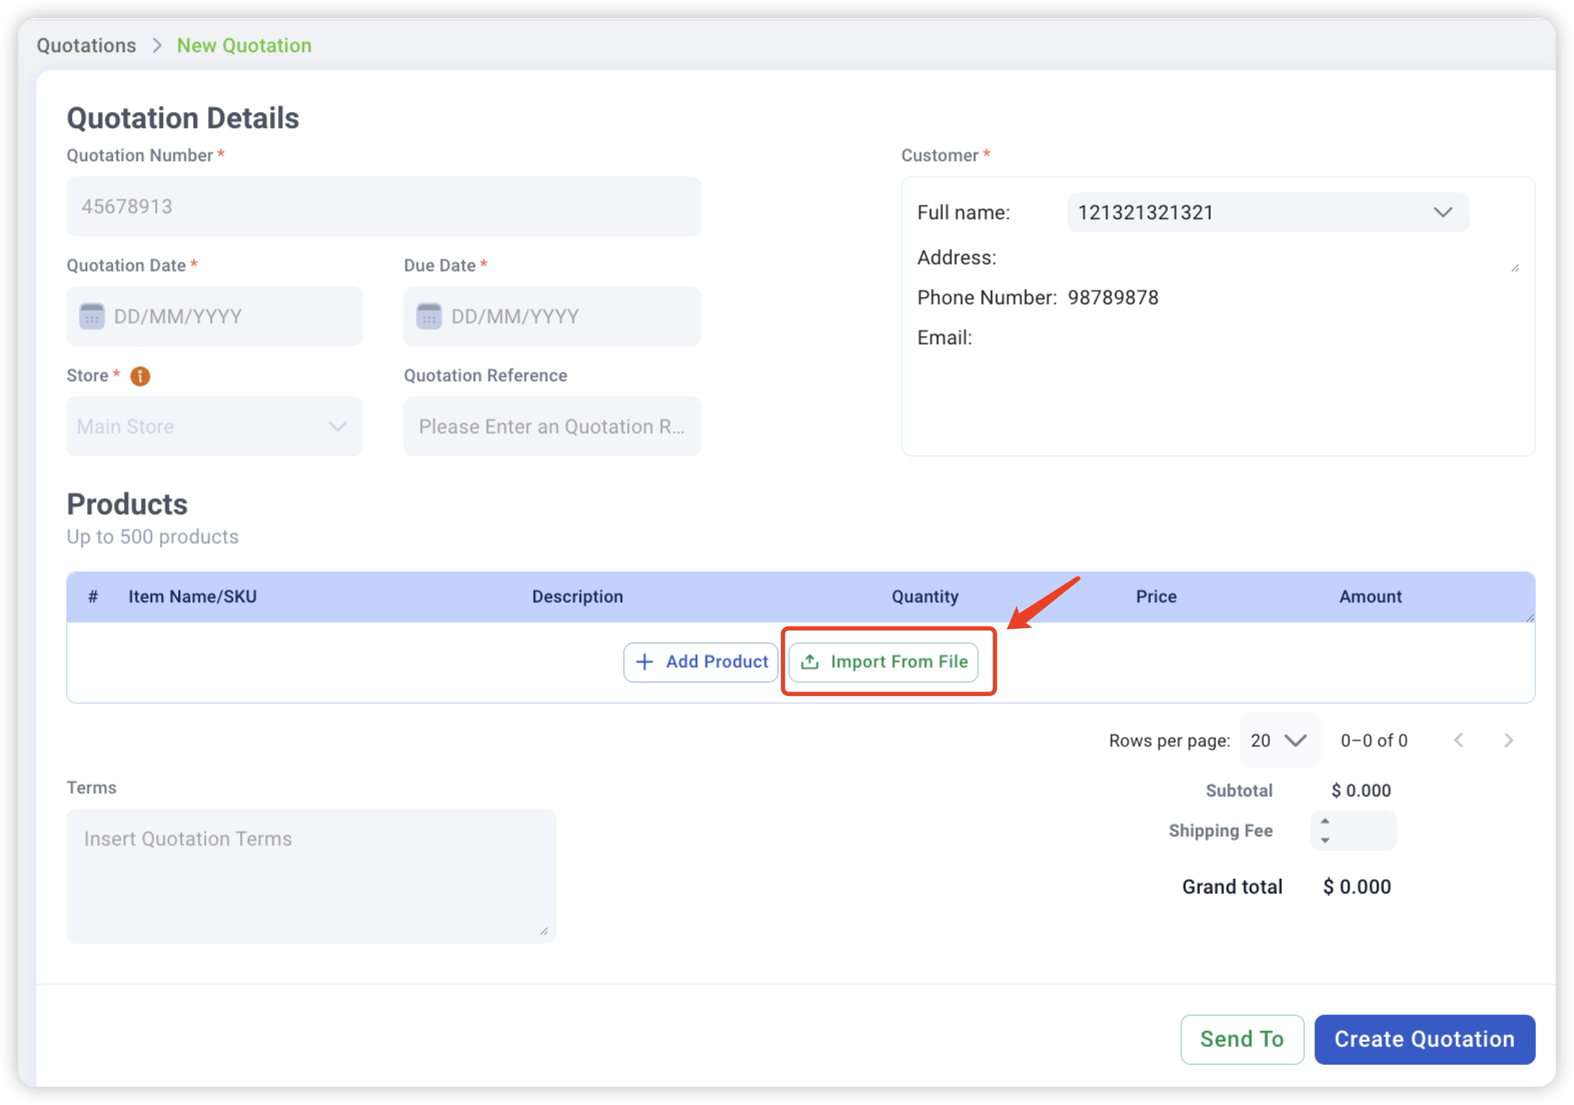
d. Click on “Import From File” to start the bulk import
Note that there is a limit of 500 products that can uploaded each time using the Bulk Import feature
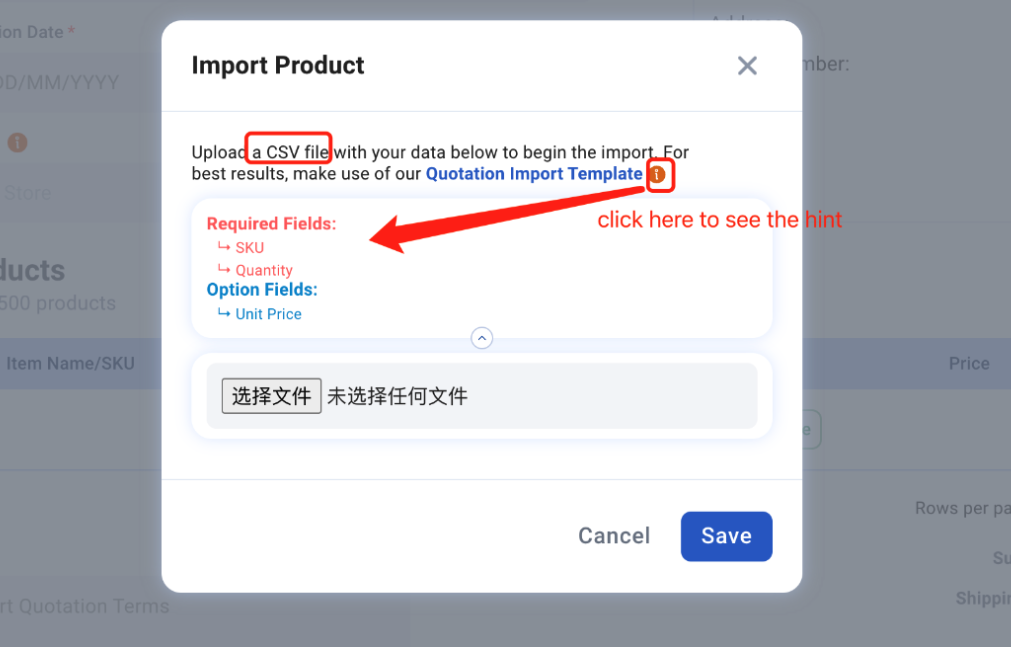
e. Click on “Quote Import Template” to download the csv file
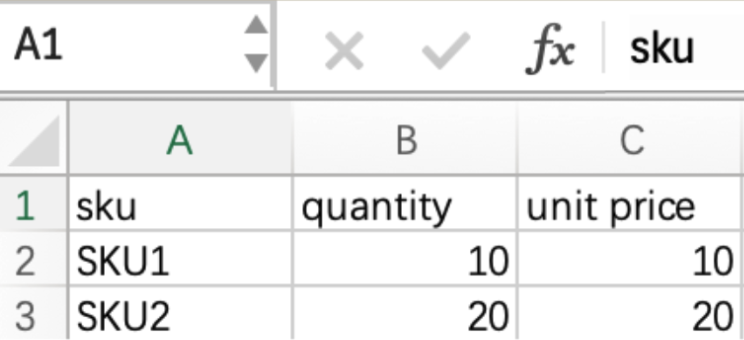
f. Open the downloaded quote_import_template.csv, and remove the sample data at Rows 2 and 3. Ensure only Row 1 headers (sku, quantity, unit price) are in the sheet.
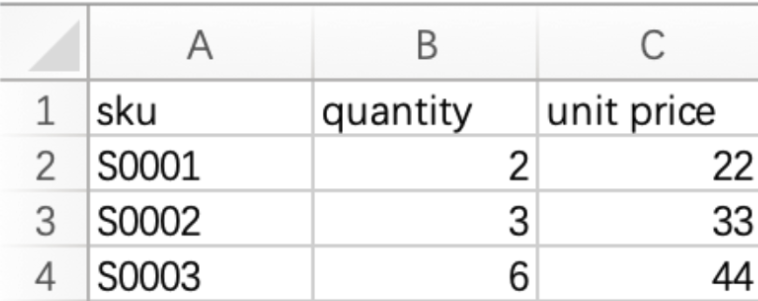
g. Input the quotation products’ sku, quantity and unit price in individual rows.
💡For more information on product sku/quantity/unit price, see 1 Products of the EPOS V5 BACKEND MANUAL.
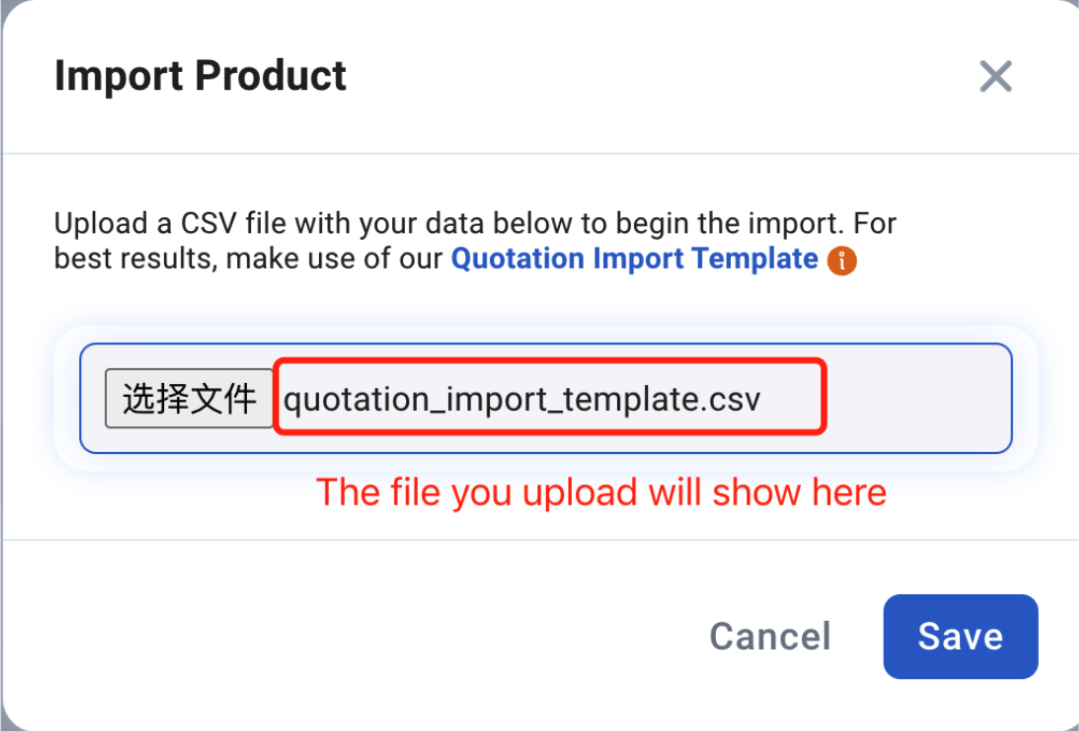
h. Click on “Save” to upload the file to the quotation or click “Cancel” to exit the “Import Product” back to the quotation
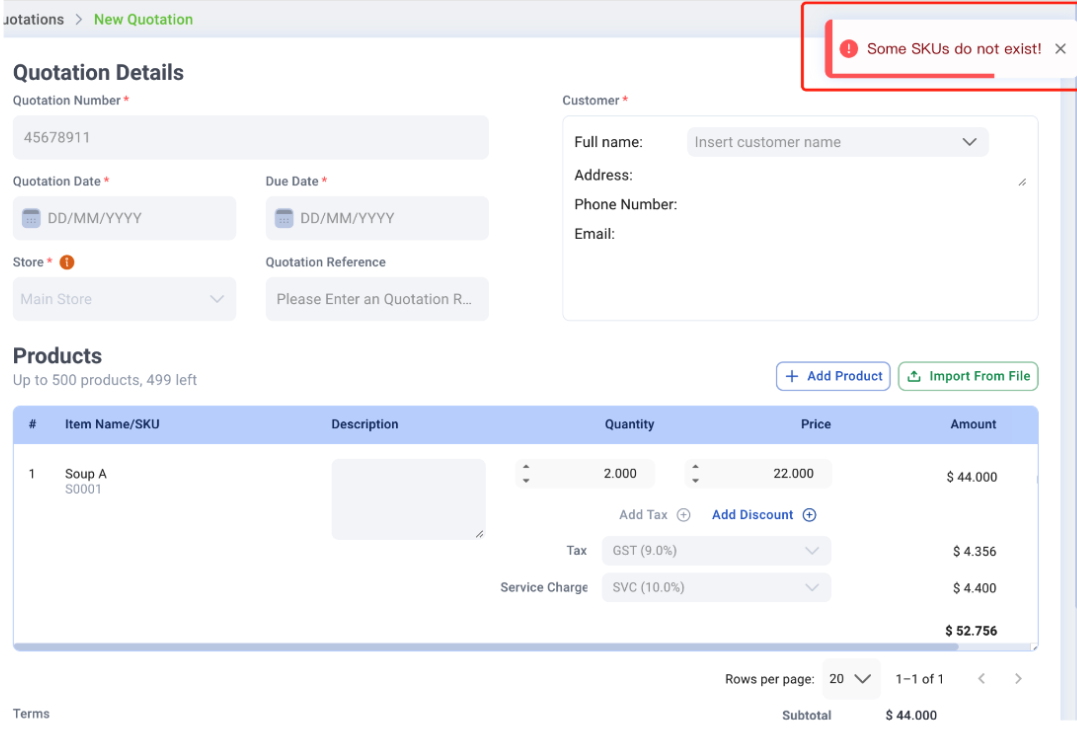
💡Error messages:
If incorrect product sku are input into the template excel, there will be an error message displayed for the incorrect line item in the quotation after bulk import.
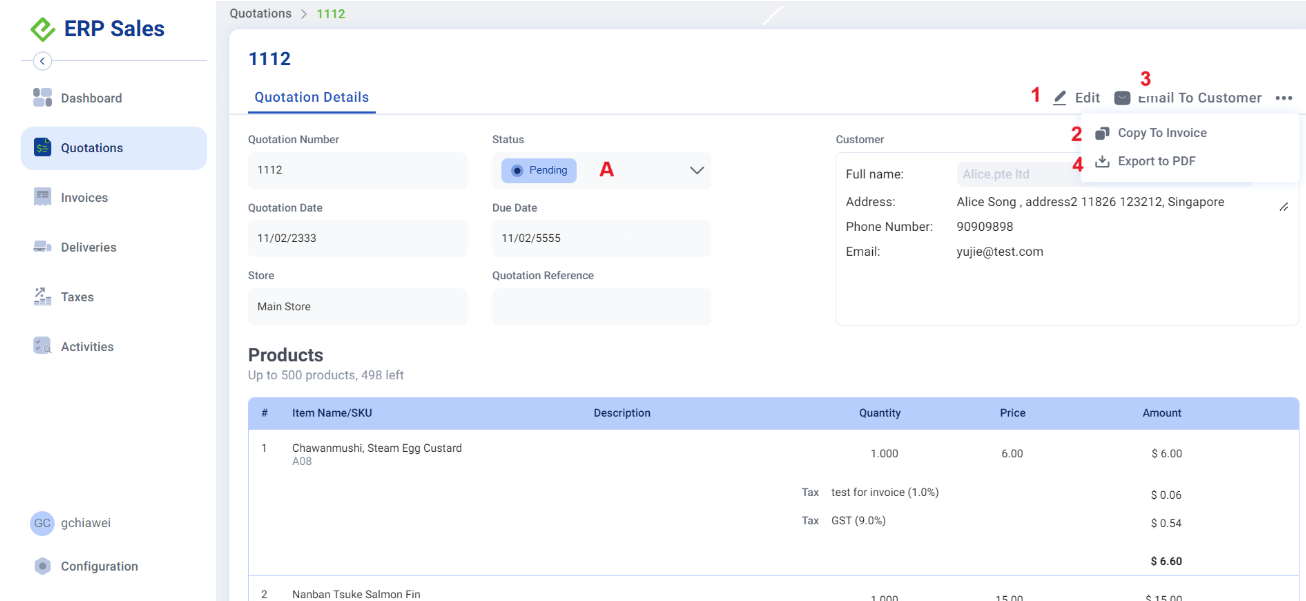
- User can edit a created Quotation
- A Quotation can be copied to an Invoice
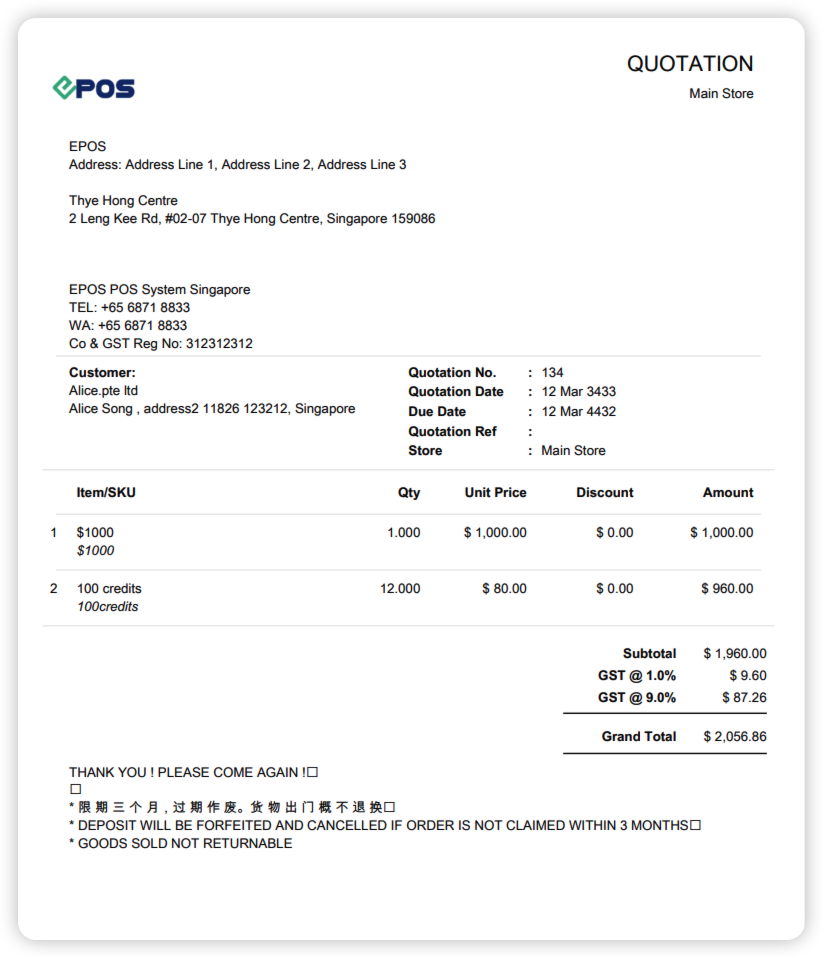
- A Quotation can be emailed to customer directly from user’s backend
- A Quotation can be exported to PDF
[A] A Quotation will have a Status
The 3 Statuses will be manually triggered by the User.
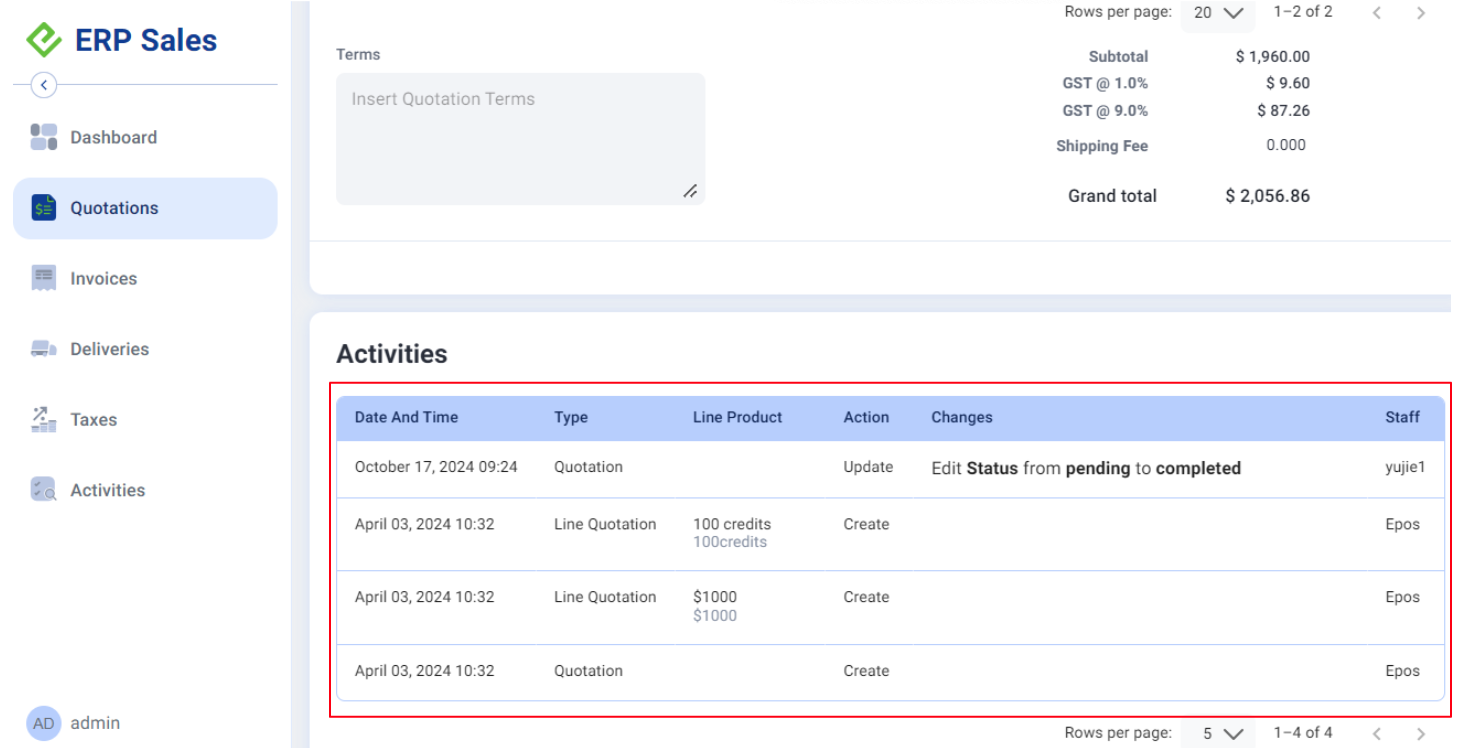
History of changes for Quotation are displayed under the Activities.
- Allows User to track:
- When changes were made
- What type of changes
- Who made the changes
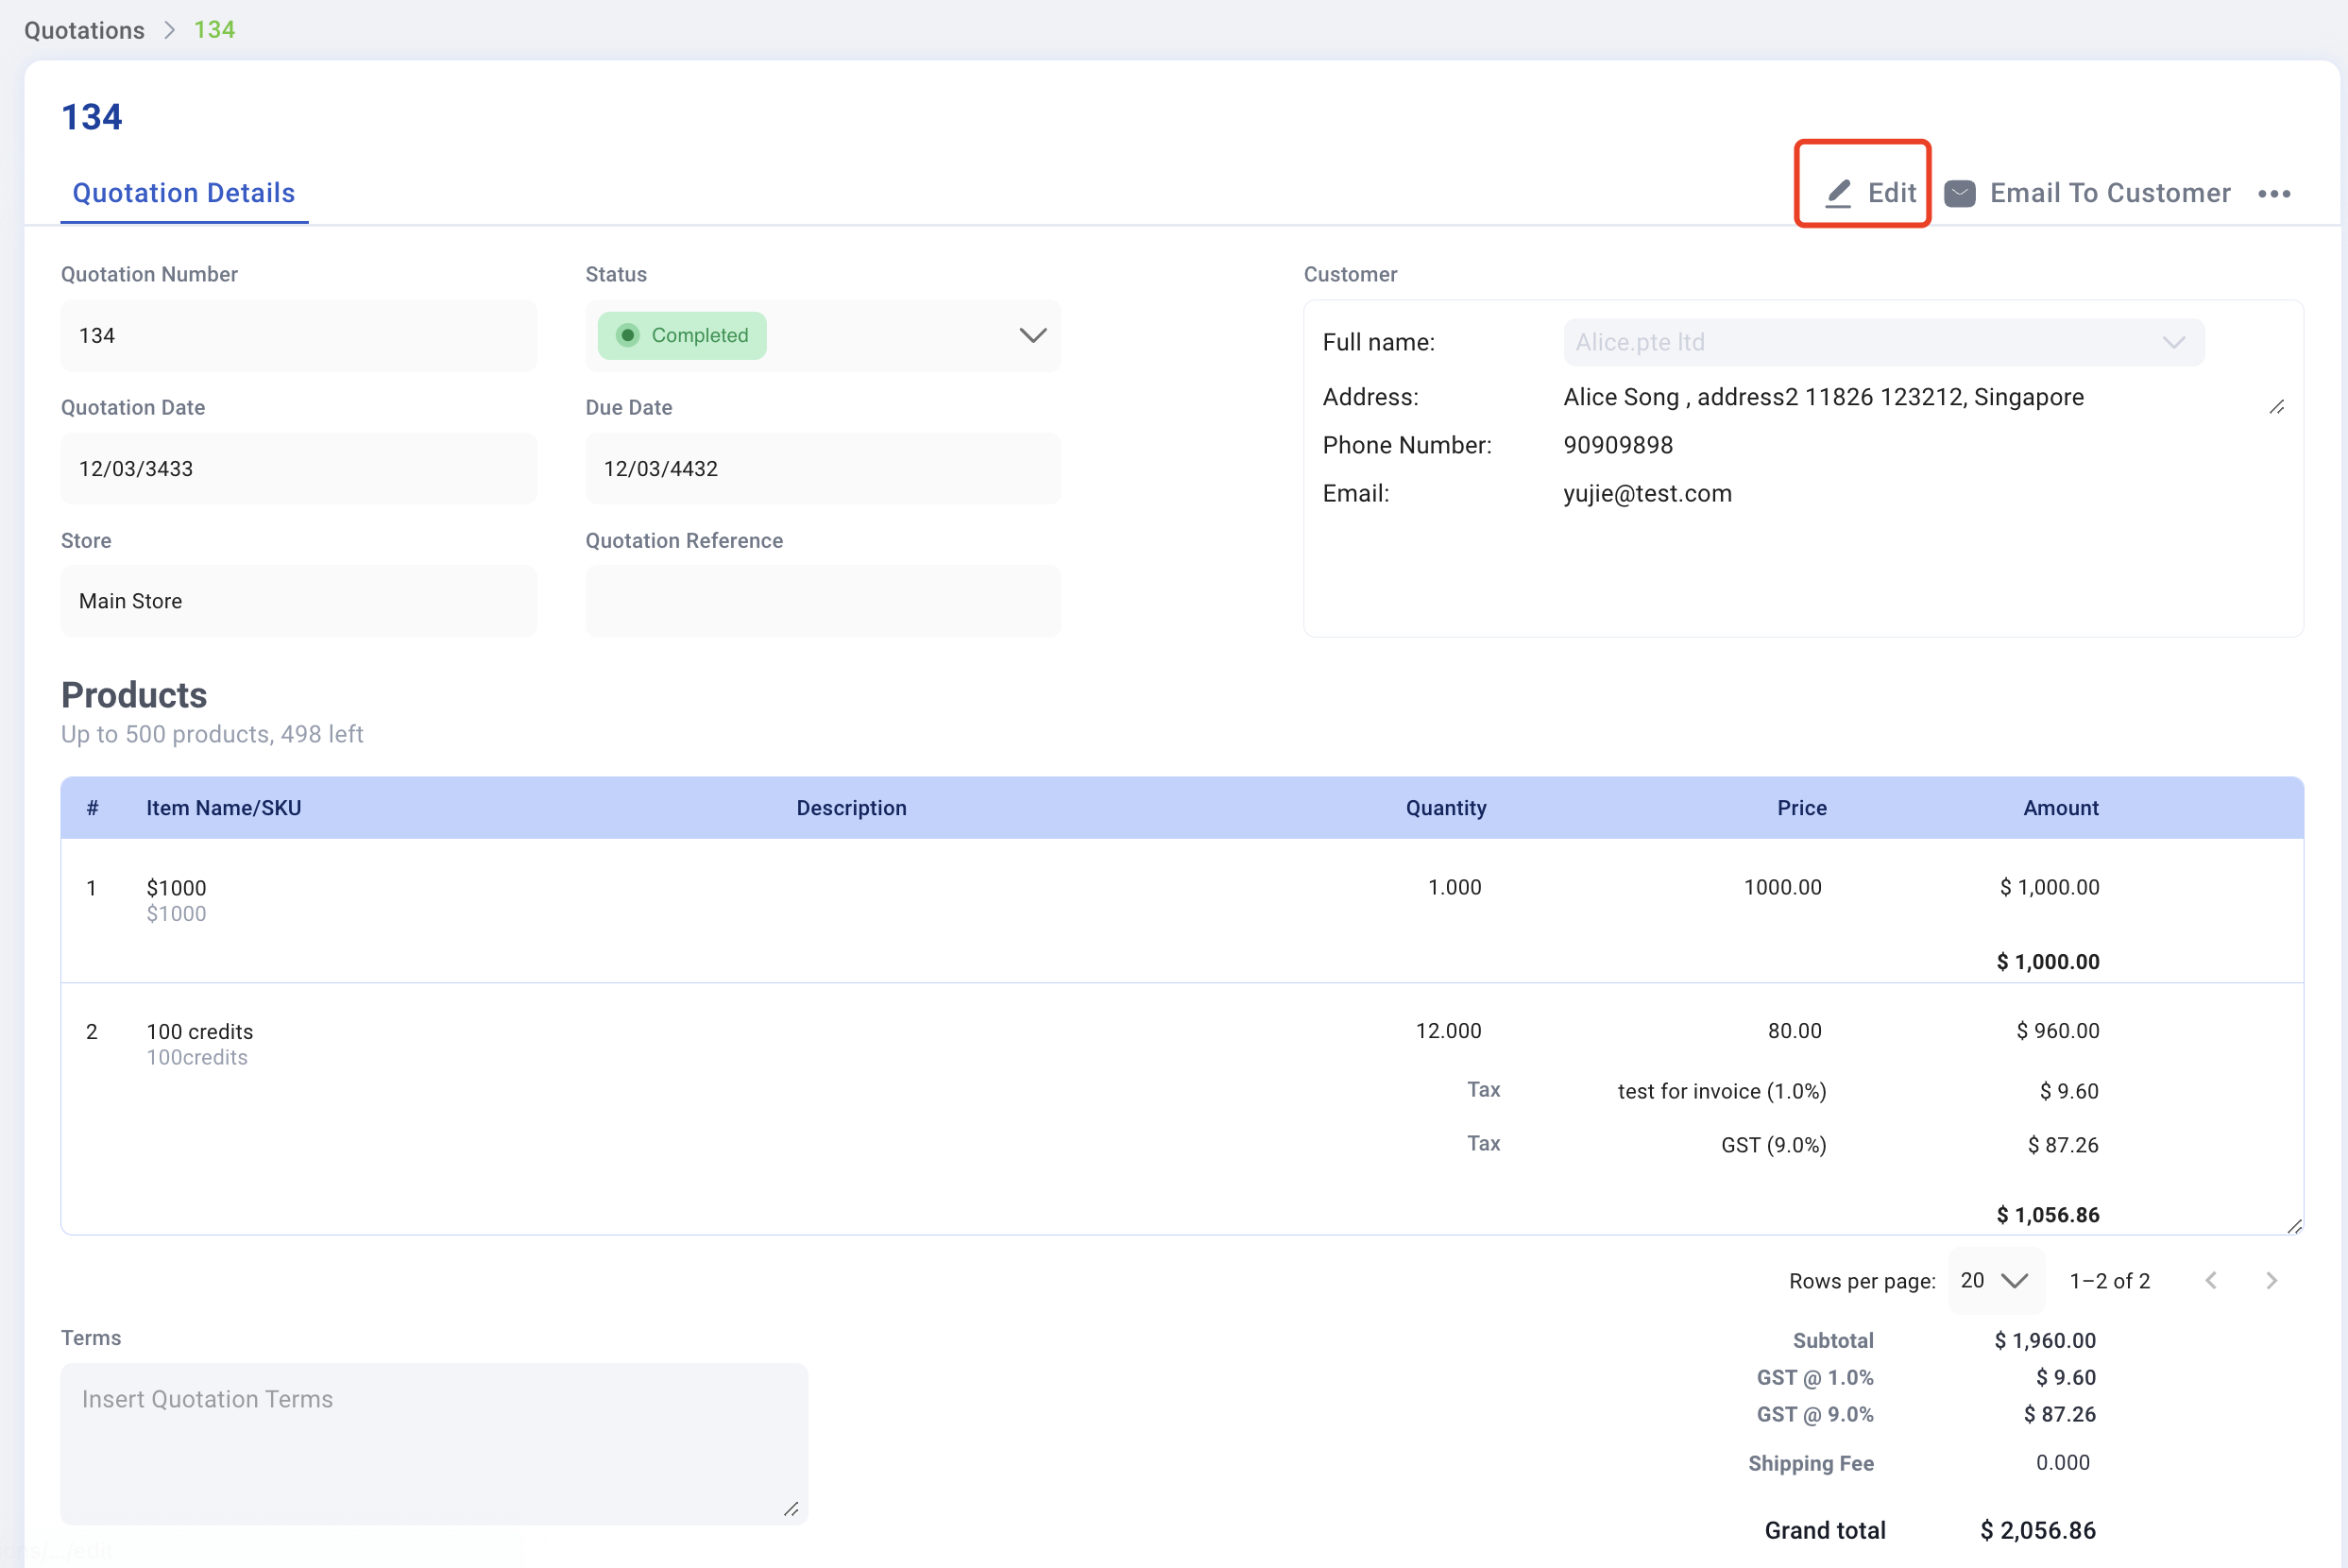
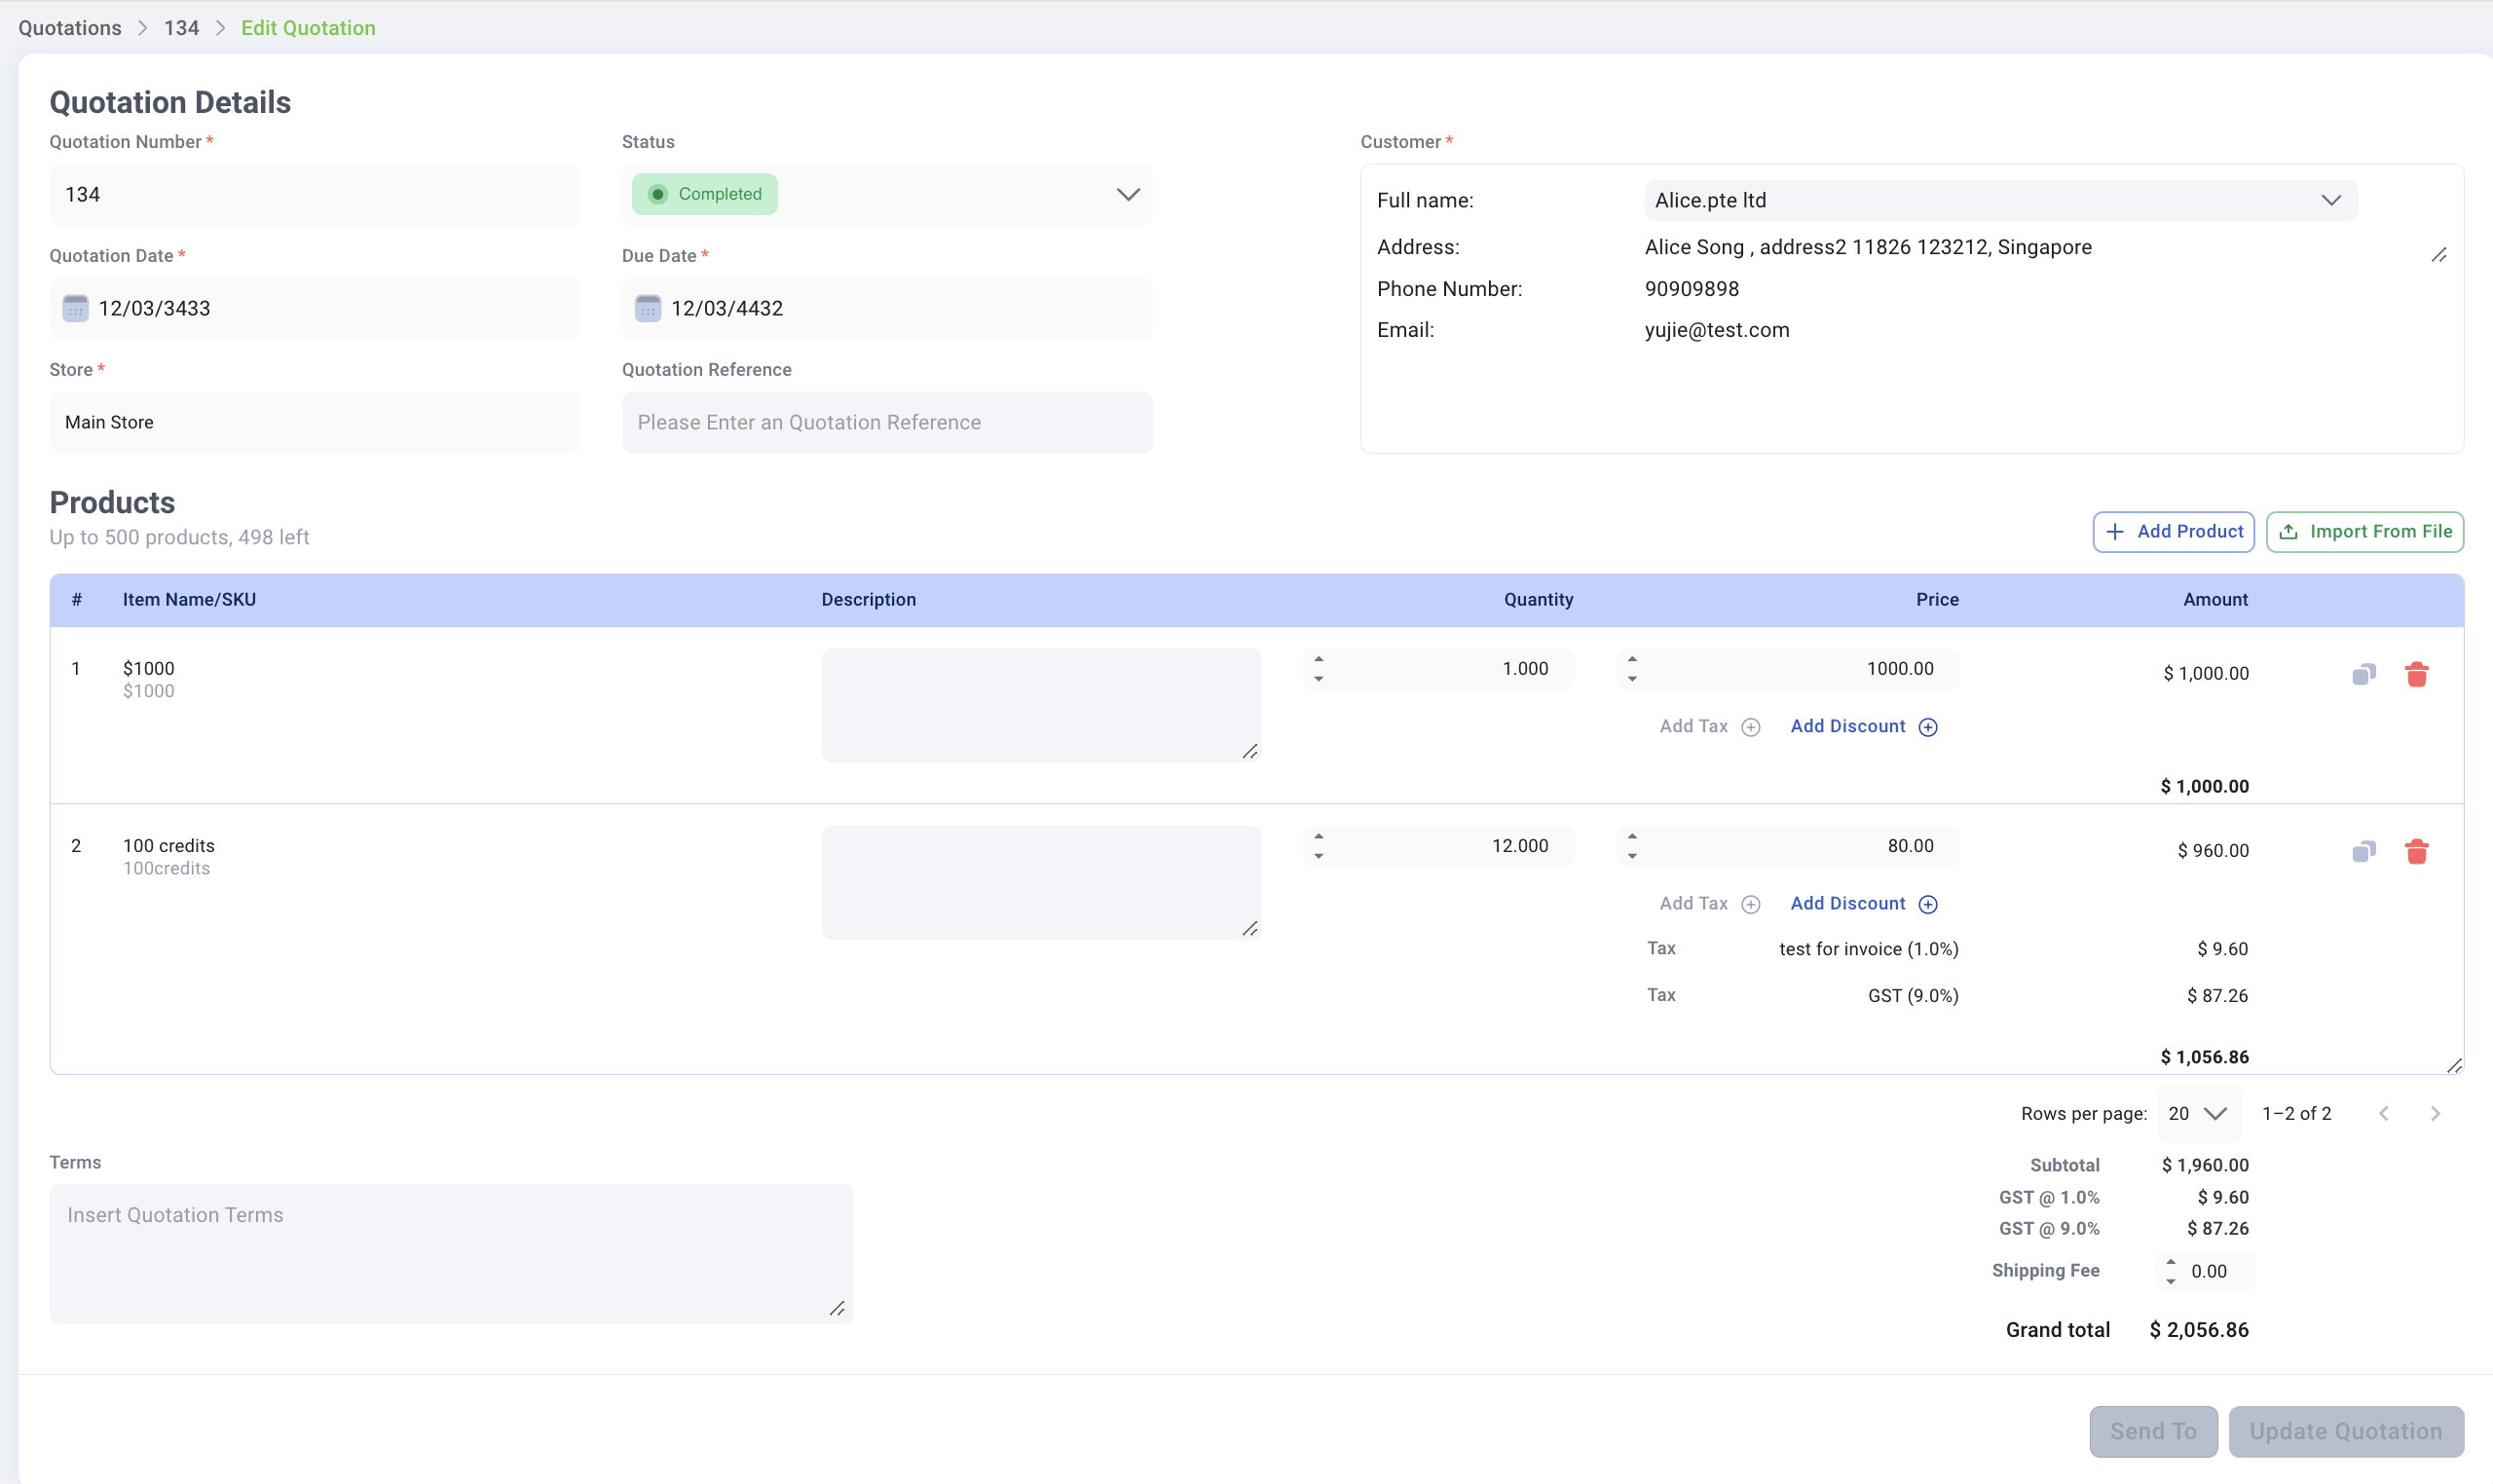
Users can edit a quotation with pending status.
Step | Description |
1 | Select the quotation from the main Quotation page. 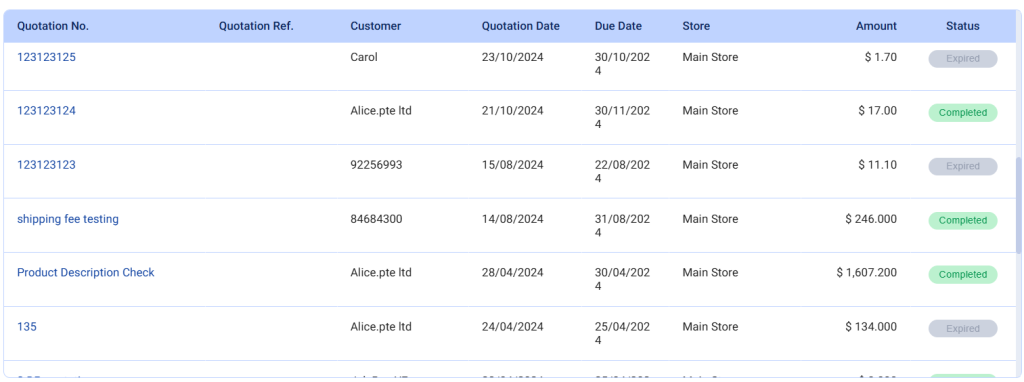
|
2 | |
3 | Users can edit quotation details. |
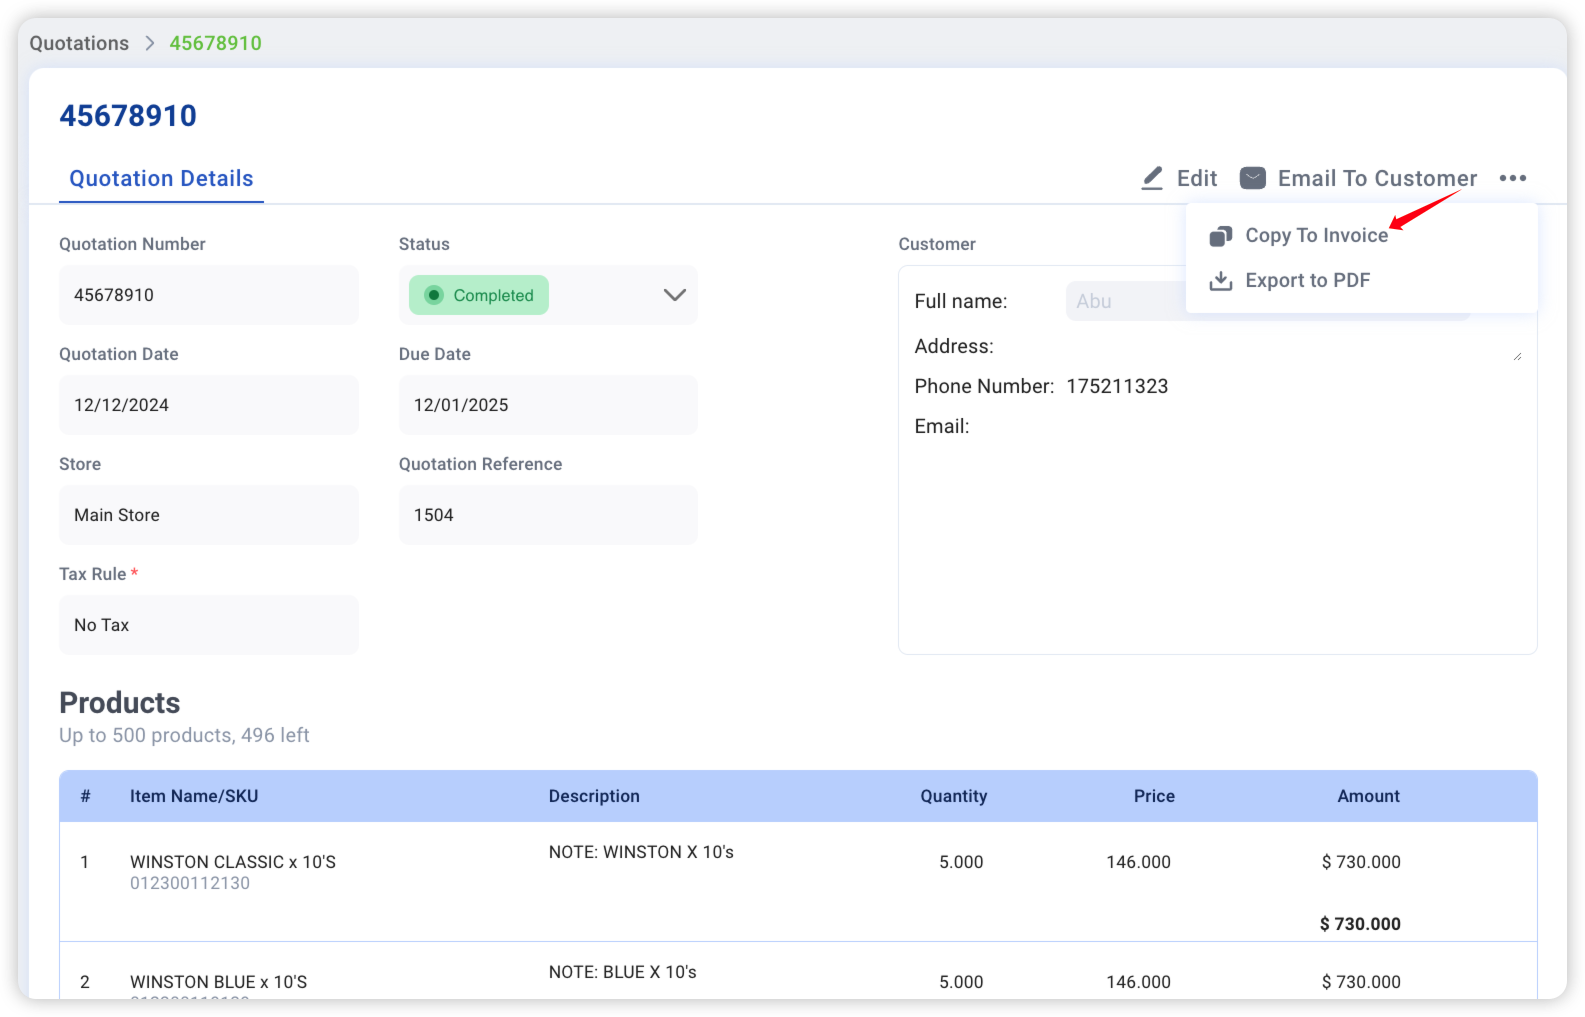
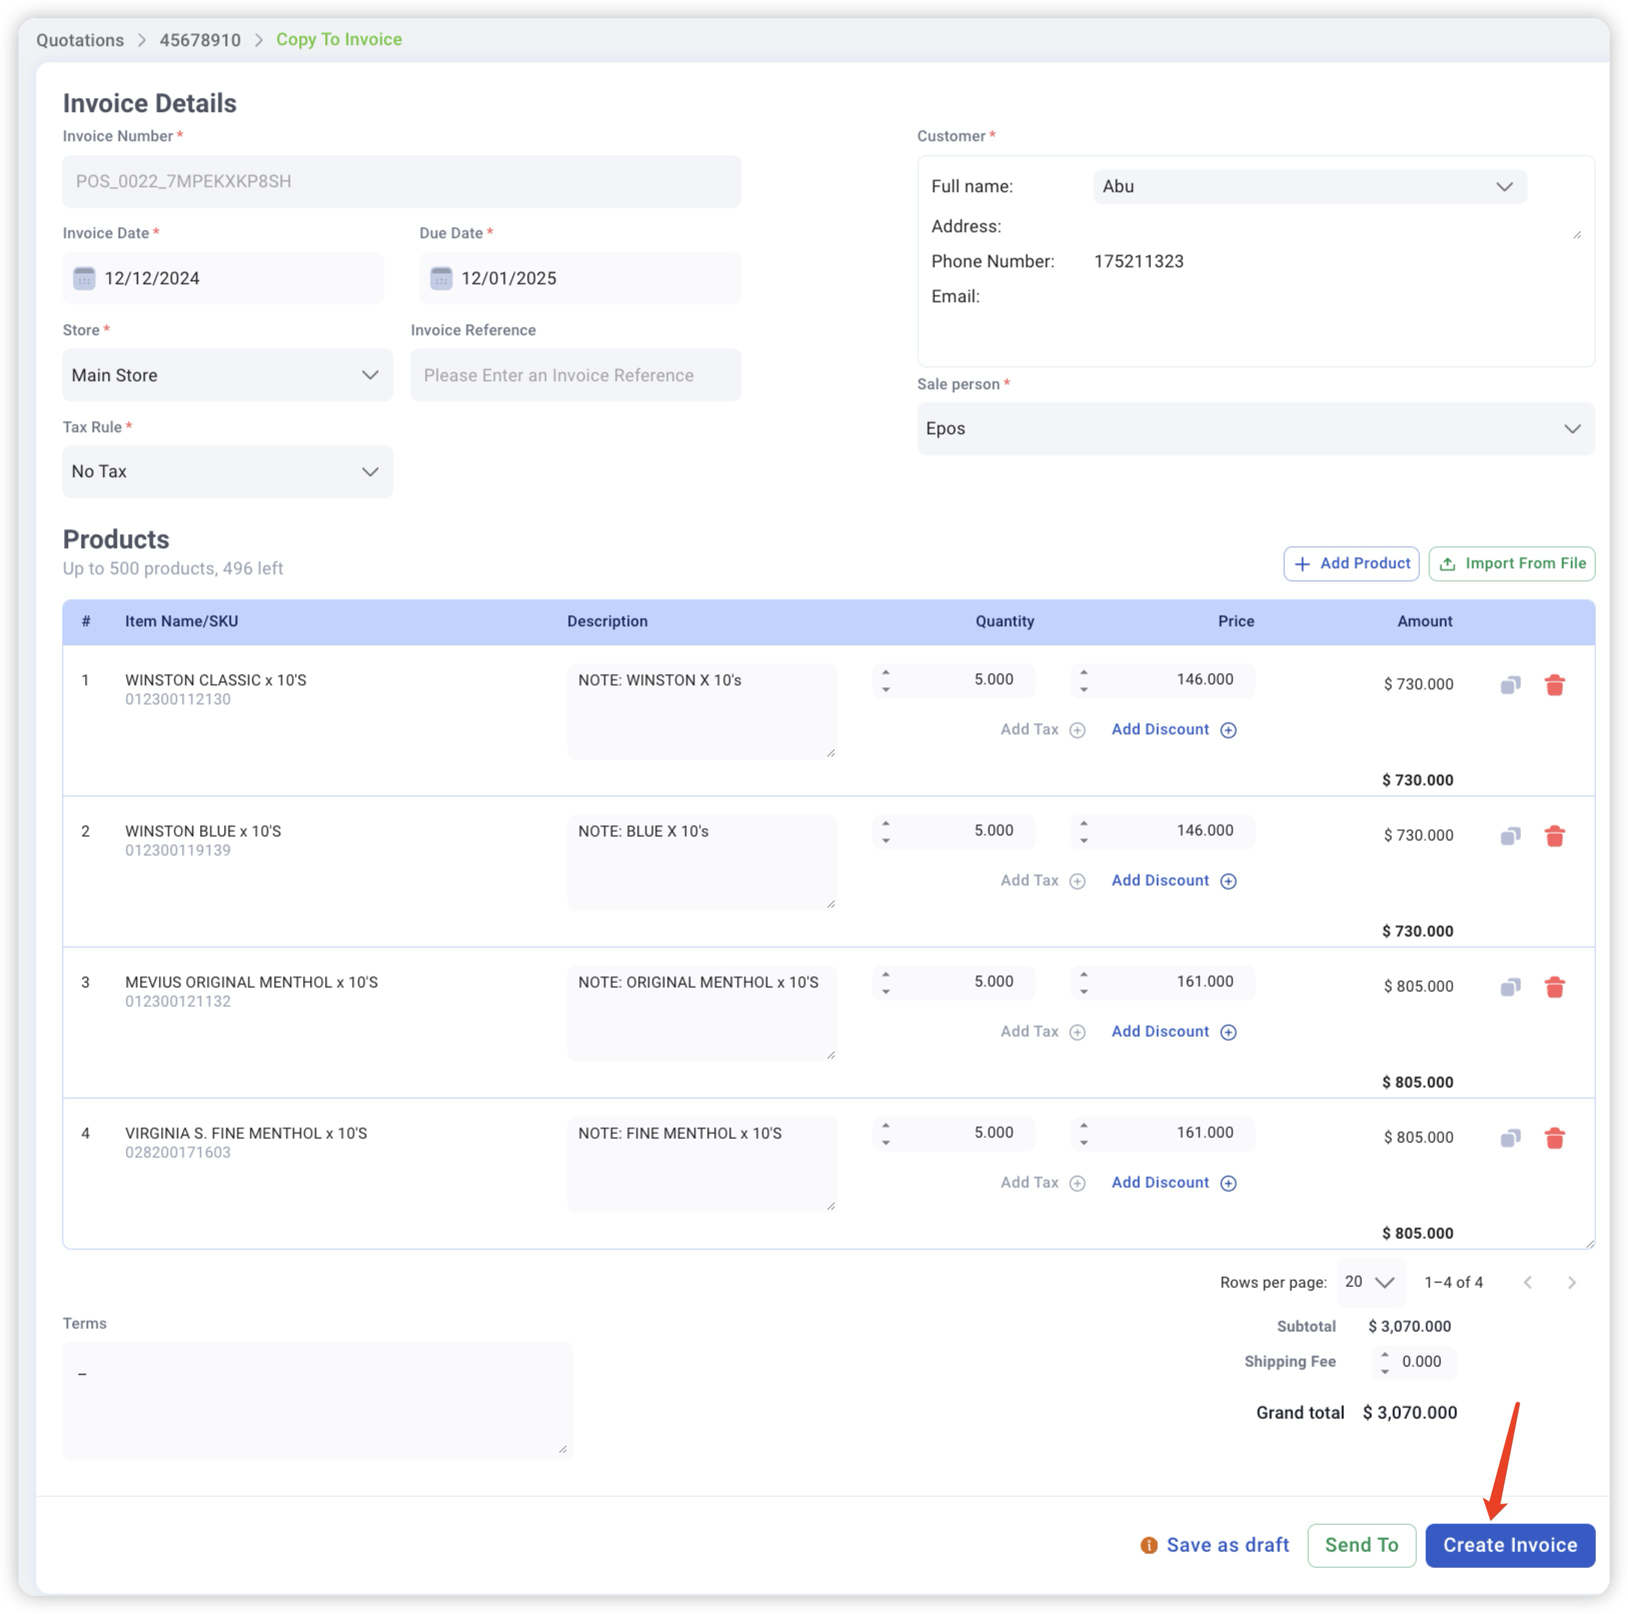
User can directly convert a quotation into an invoice without having to create a new invoice from scratch.
1. Click on any quotation. For example, “45678910”
2. Click the three dots and click on “Copy To Invoice”
3. User will be directed to the “Copy To Invoice” Page. Click on “Create Invoice”, and it’ll be created successfully
💡Make sure all the details are filled correctly, you may save the invoice as draft if you’d like to edit it further. Invoices are non-editable once created.
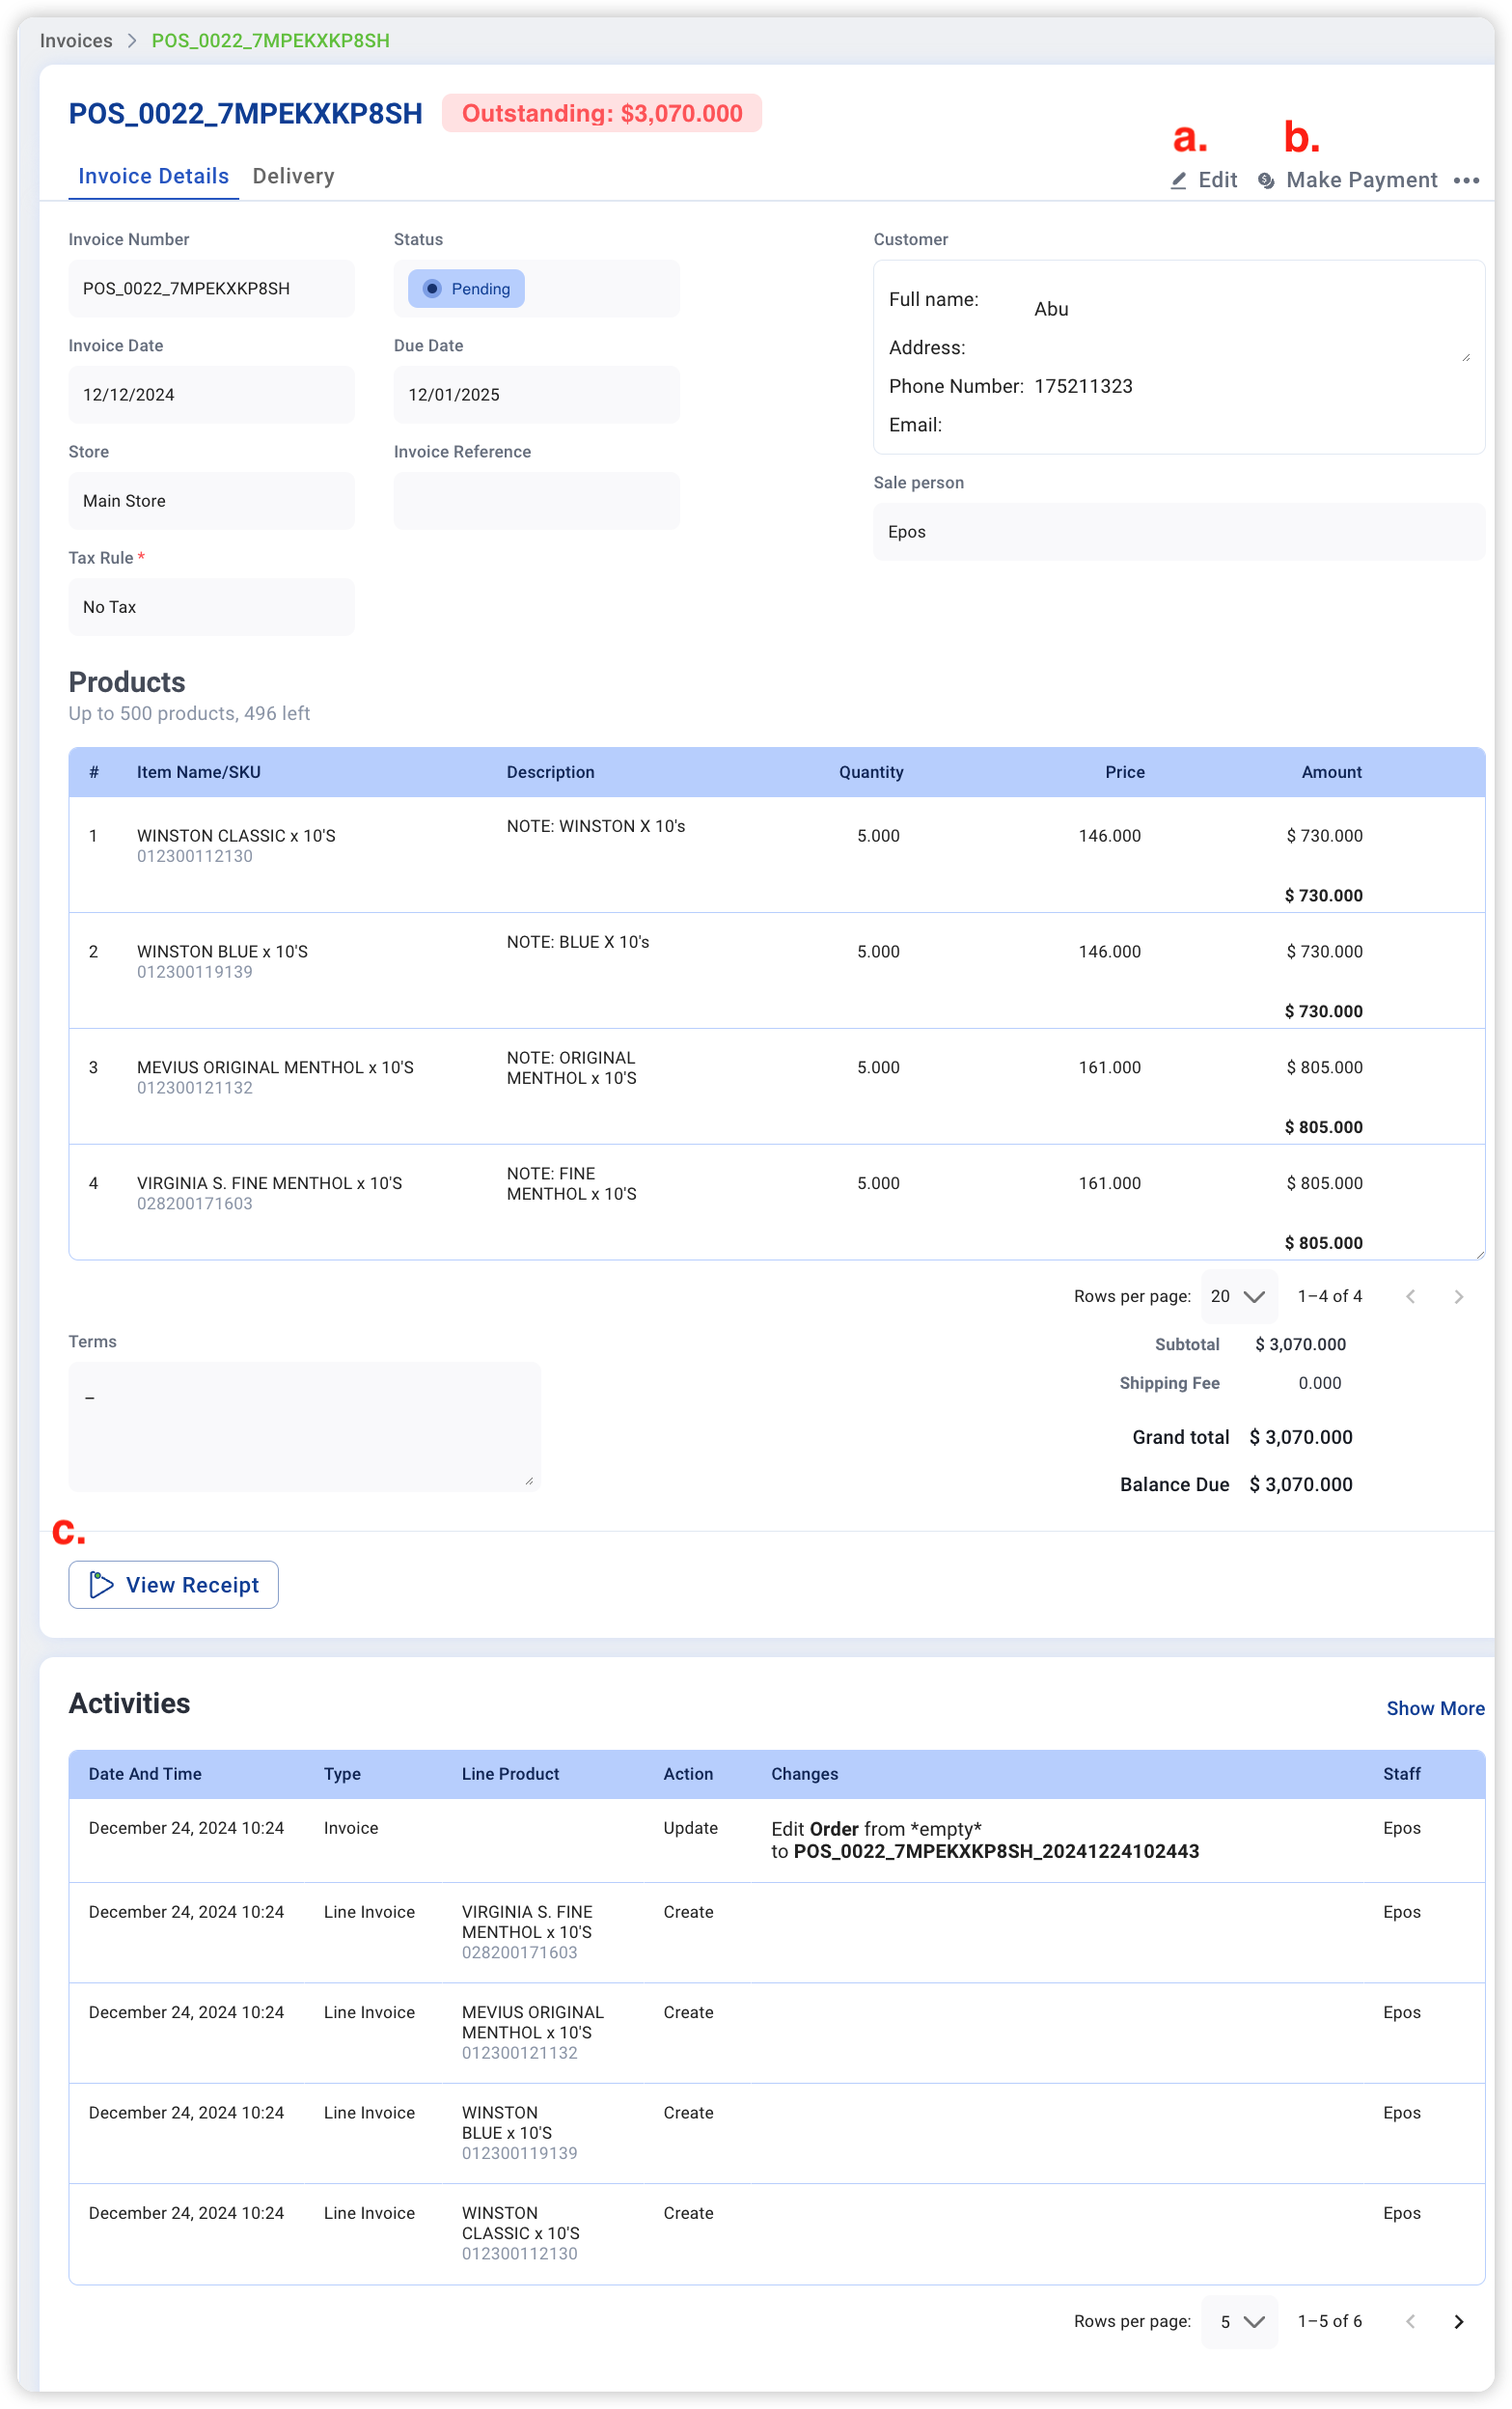
4. You’ll be directed to invoice page
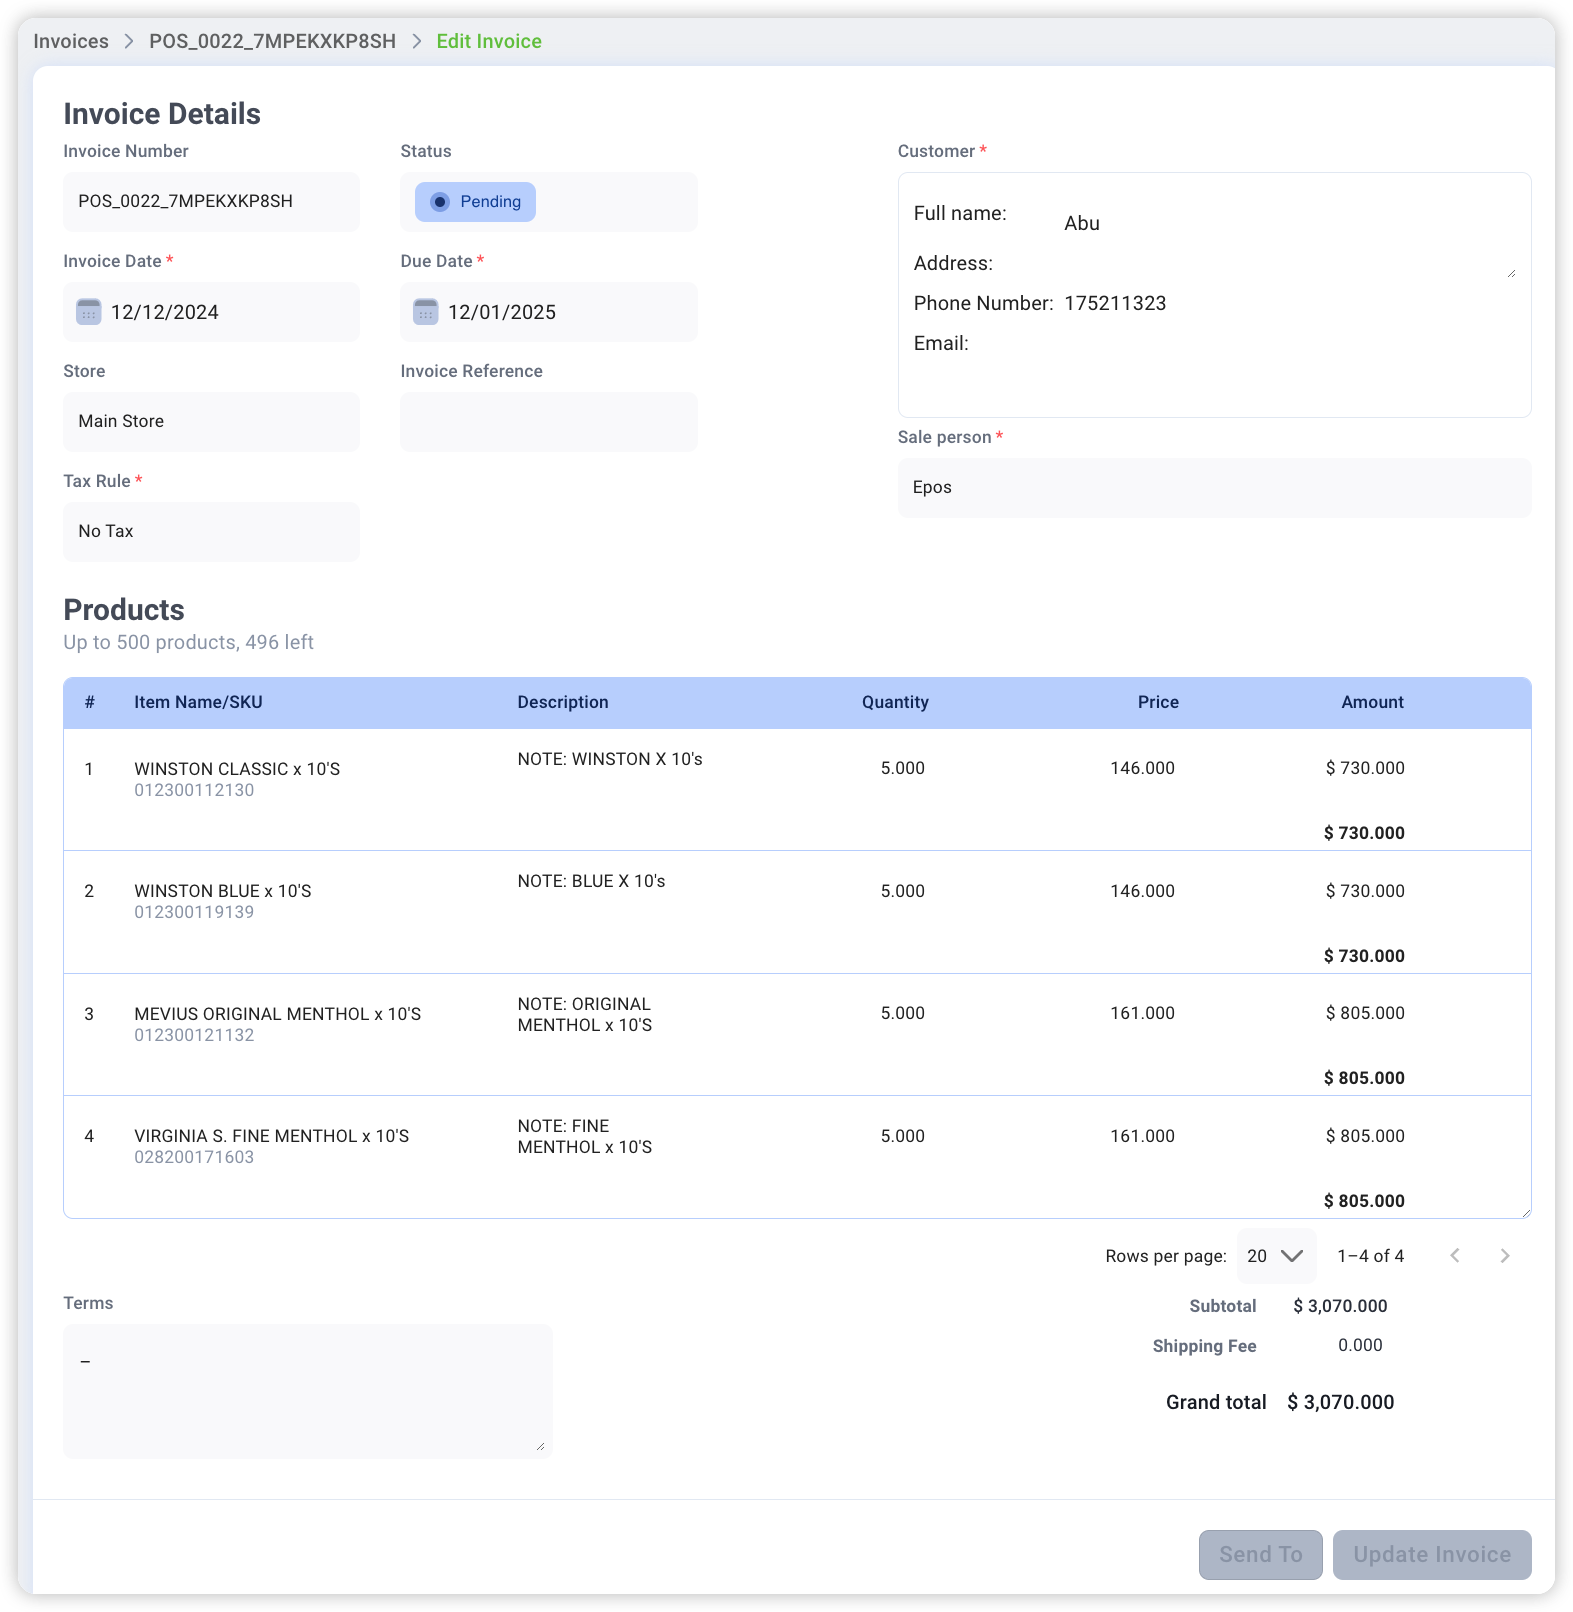
a. Edit:
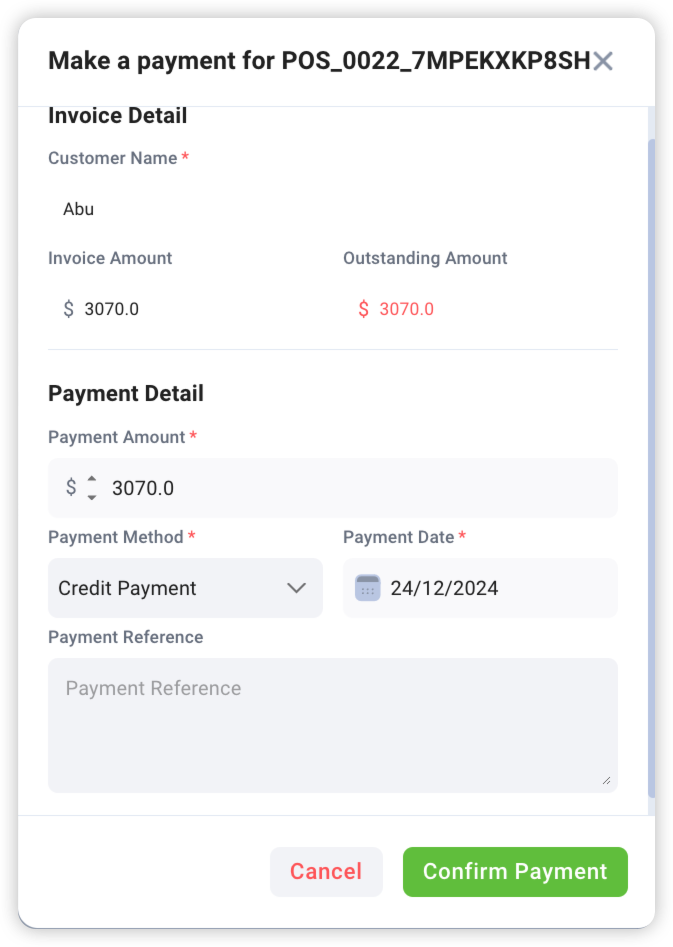
b. Make Payment:
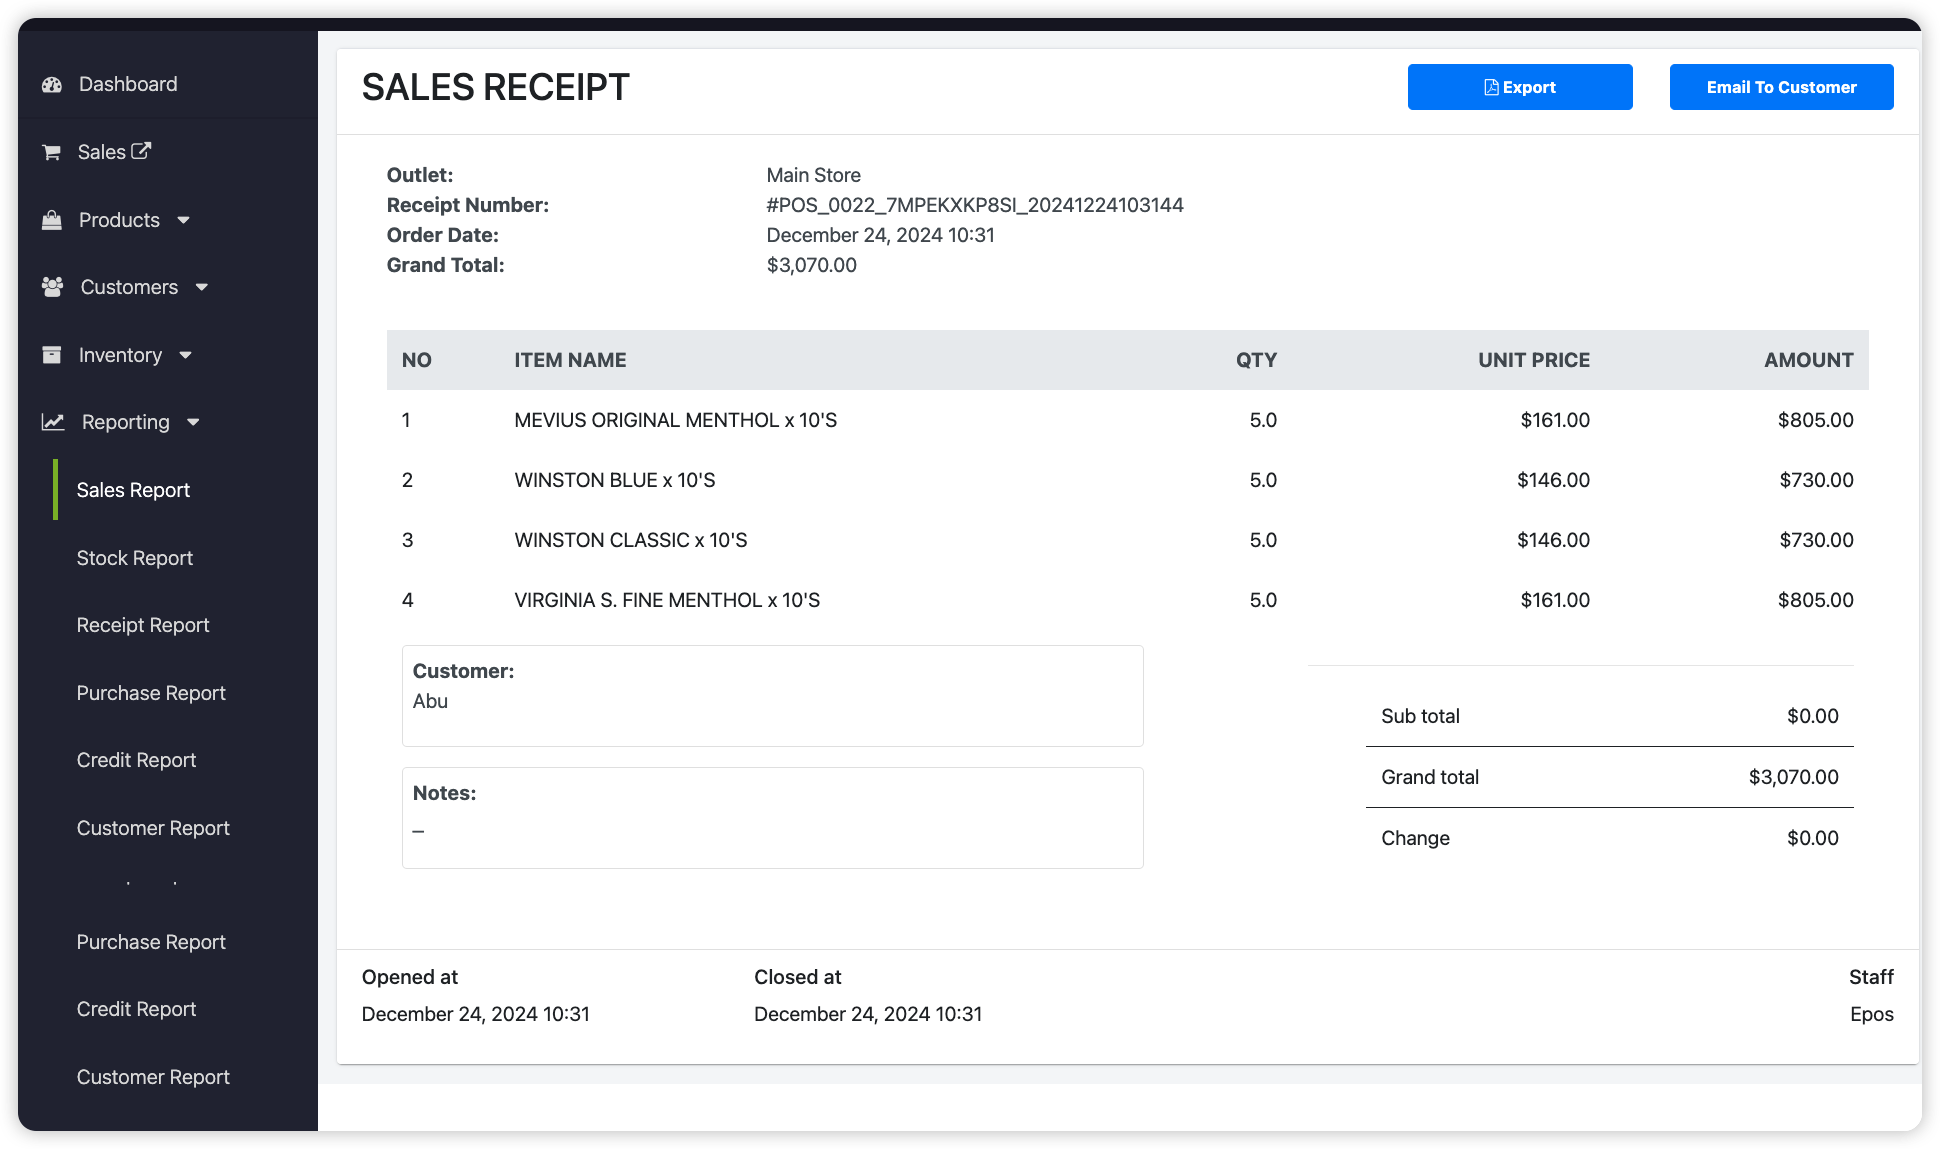
c. View Receipt: Click on it, you’ll be directed to the Sales Report page at the backend
5. Error Messages
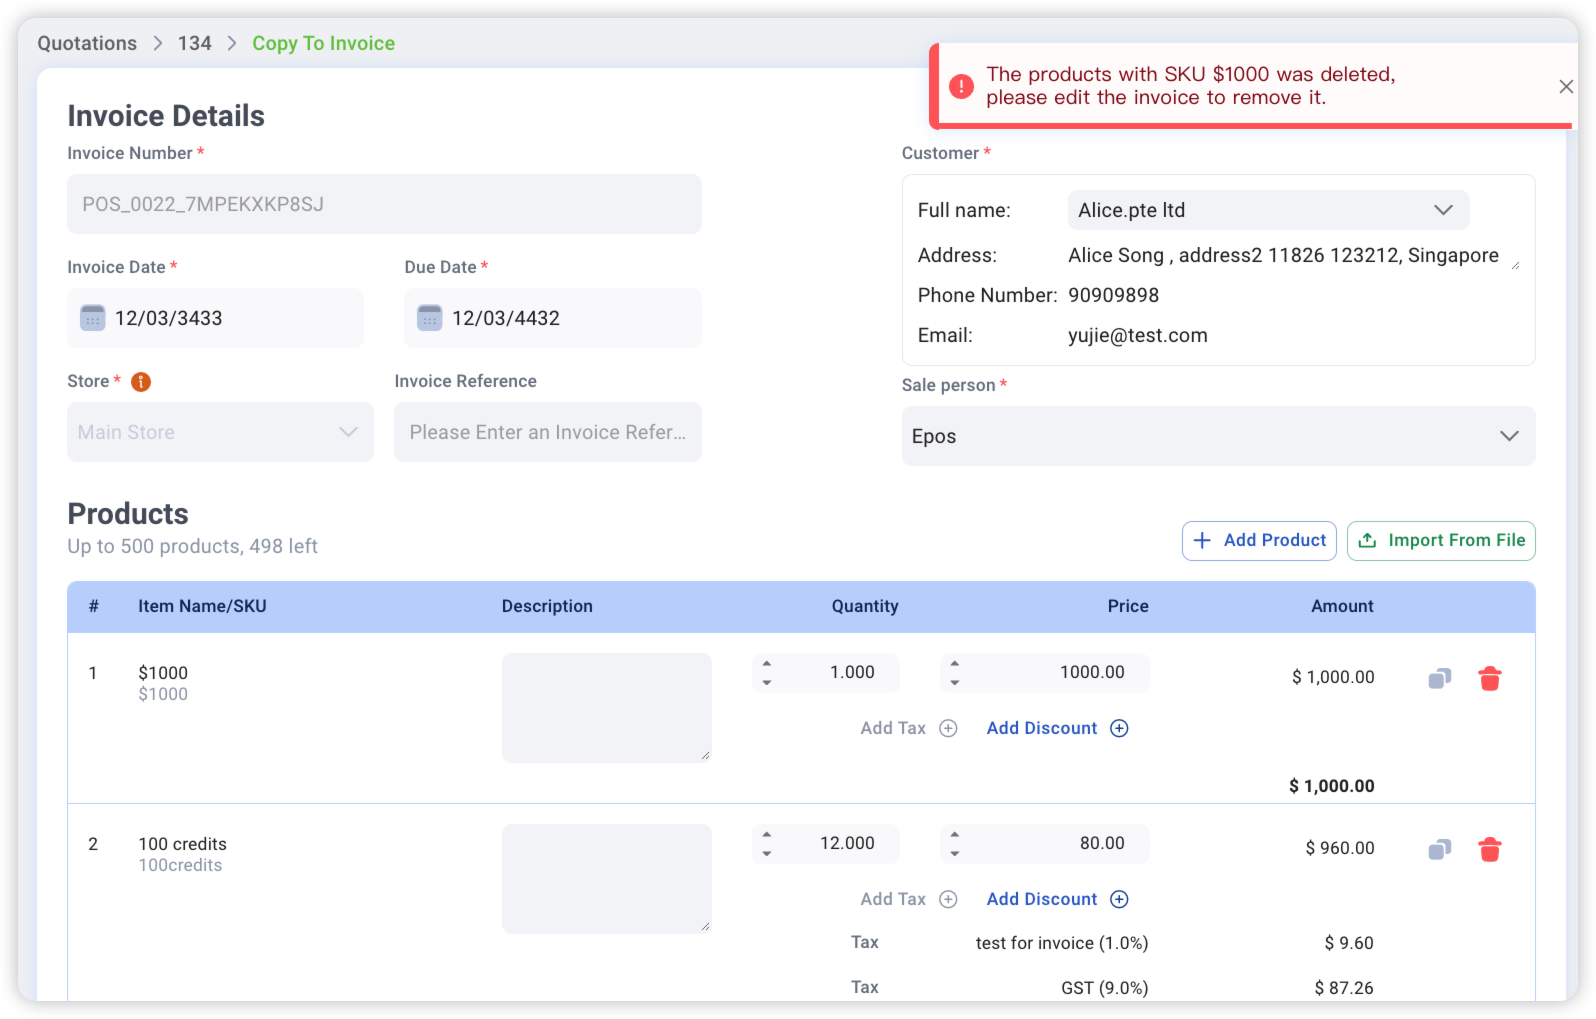
a. The products were deleted, need to edit the invoice to remove it
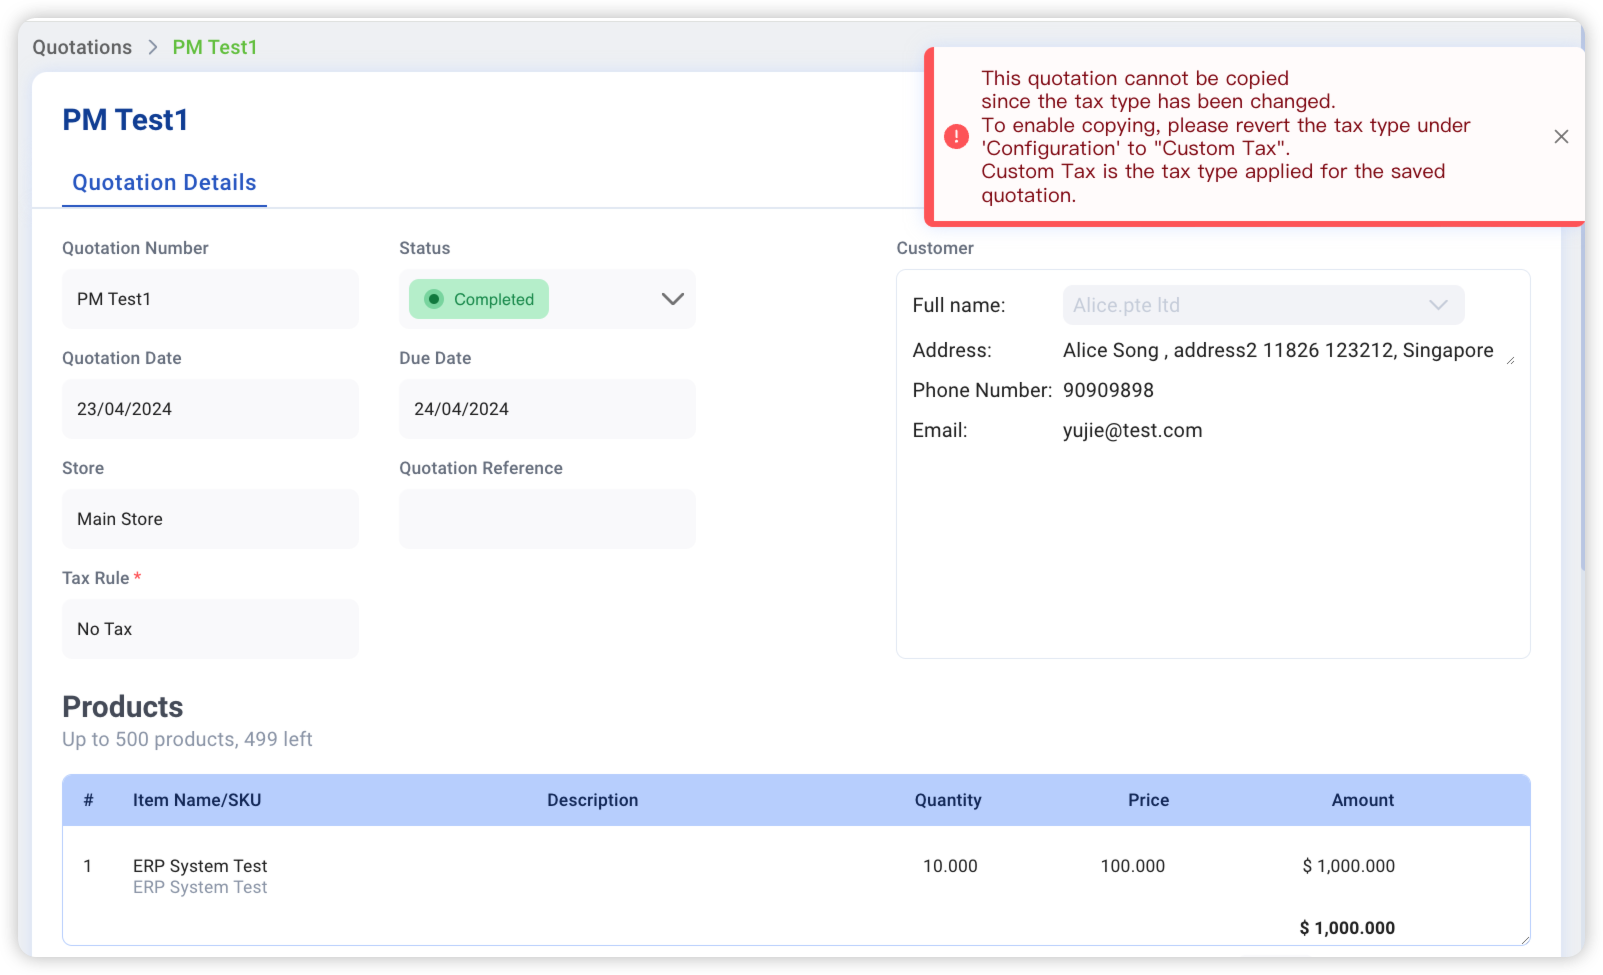
b. Need to do change with the tax type
You can edit it in “Configuration”
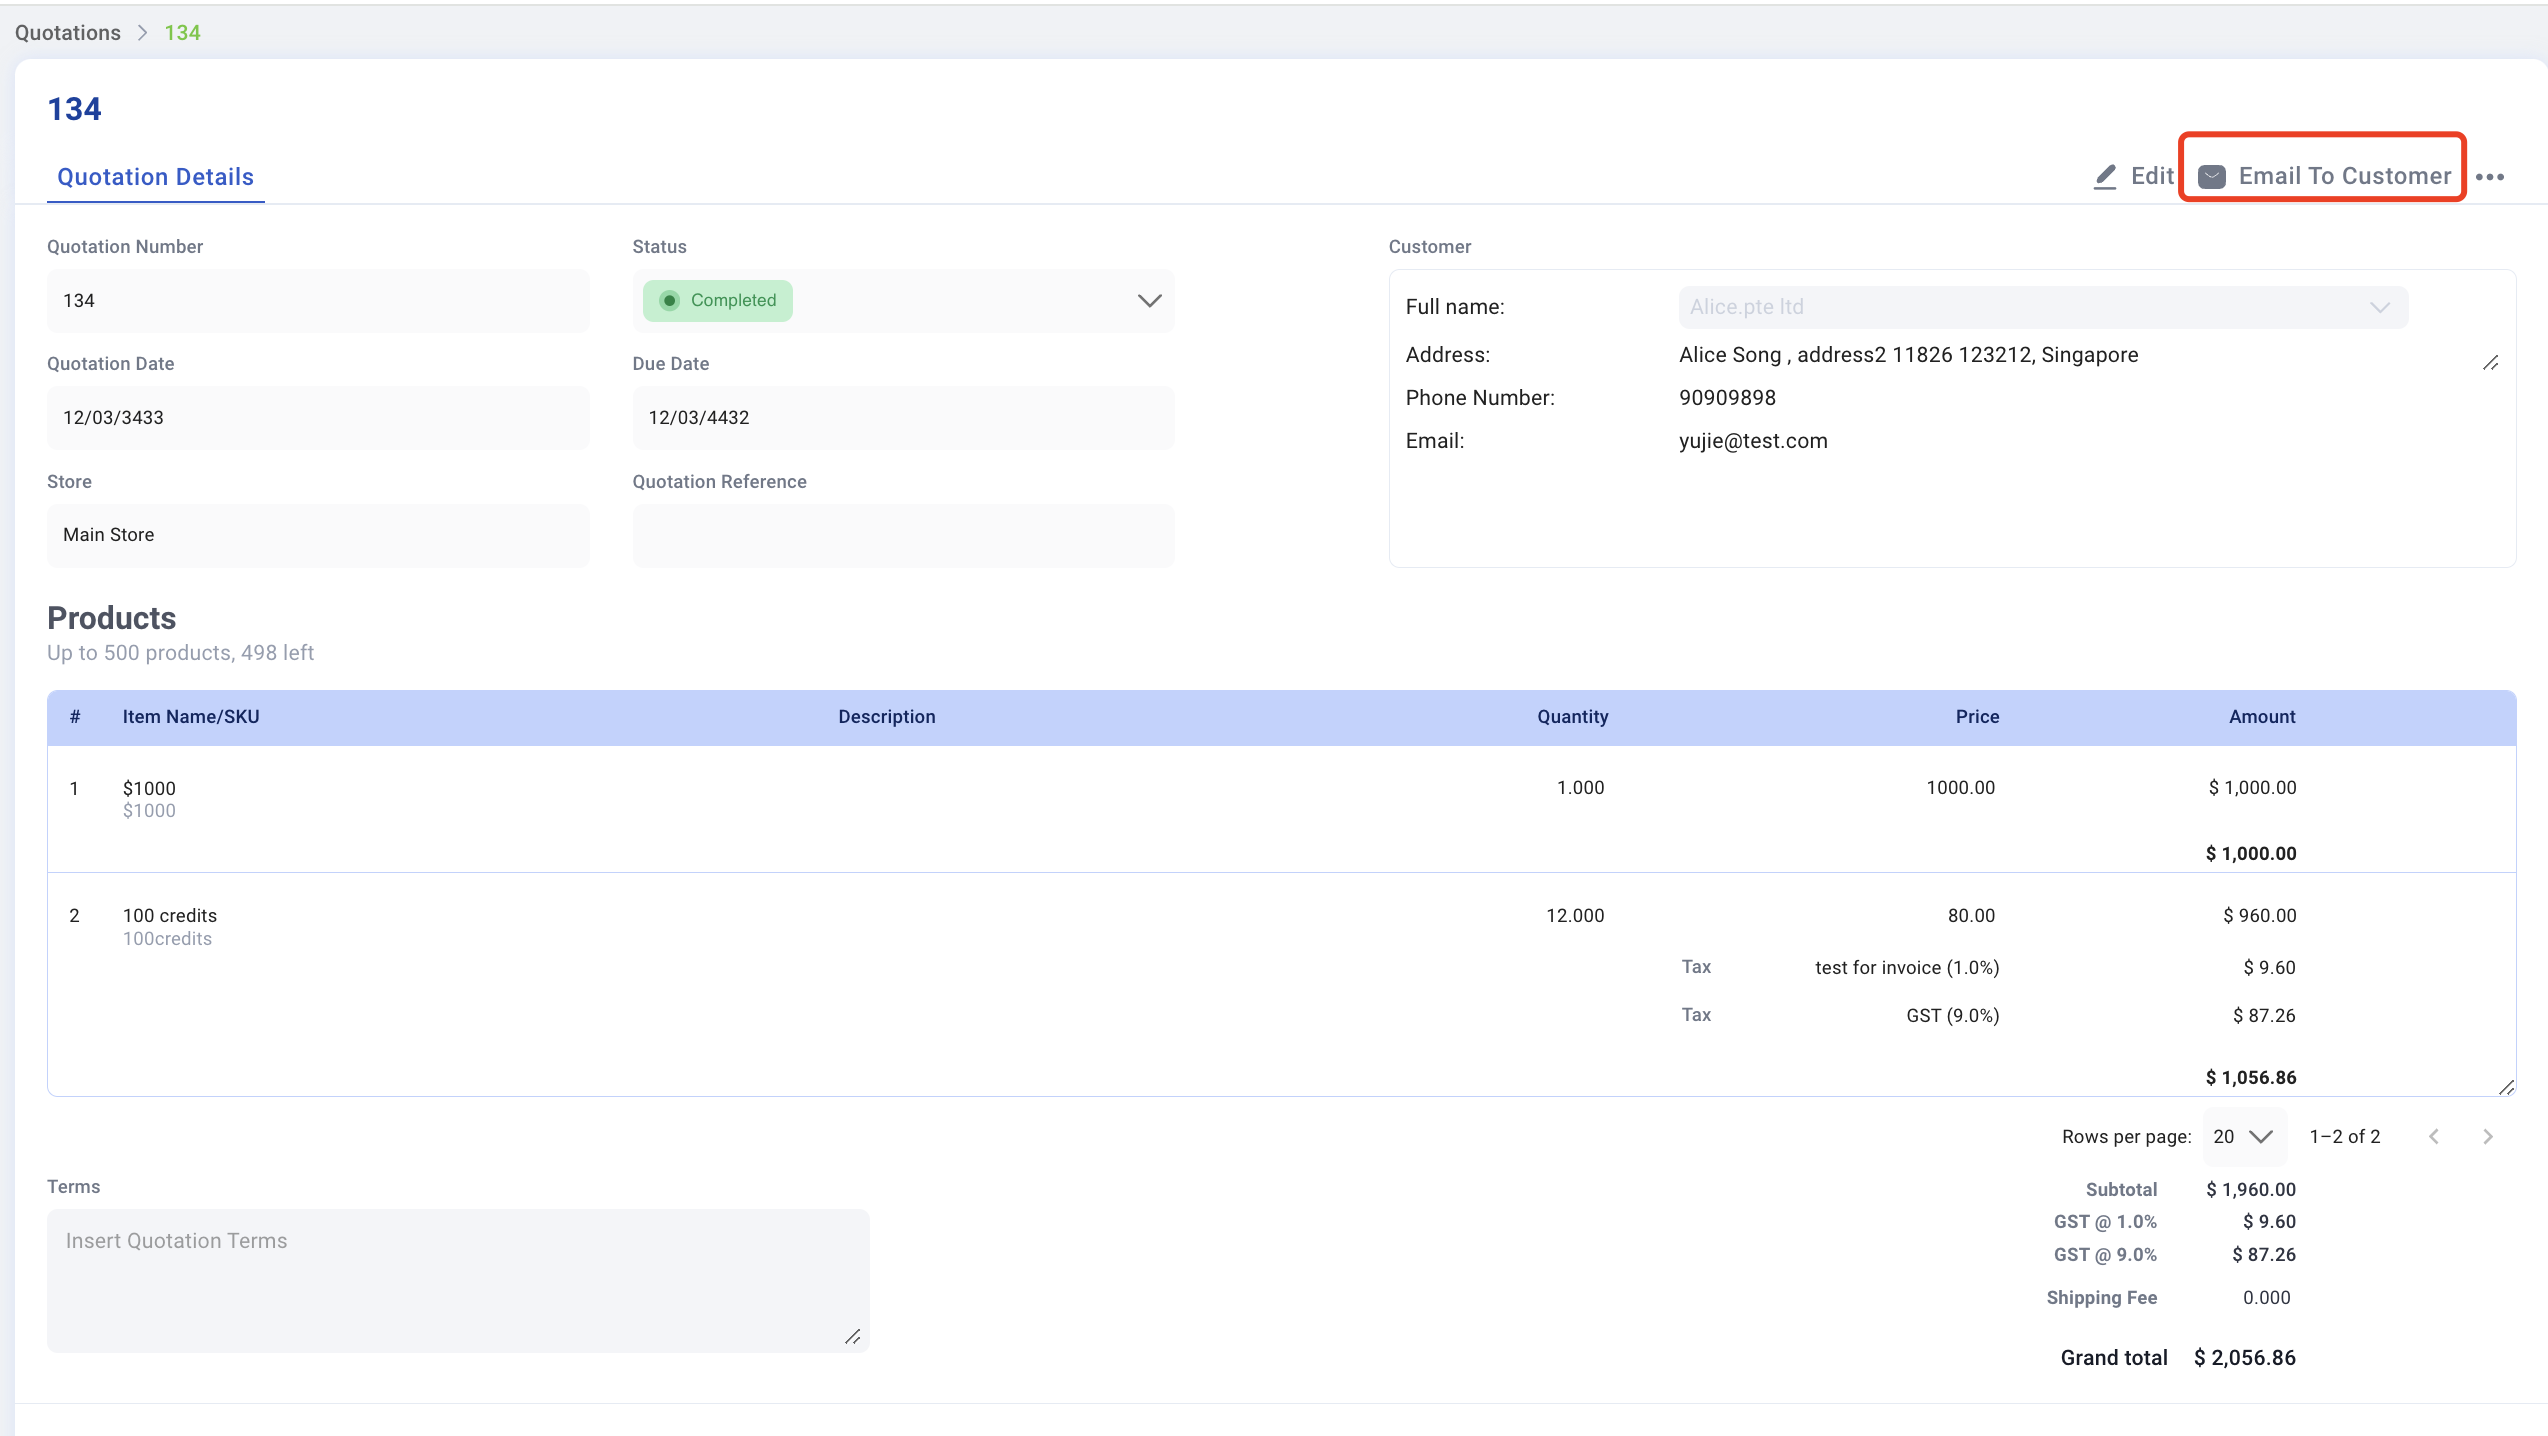
Follow the steps below to email the quotation to customer.
1. Click on “Email To Customer”
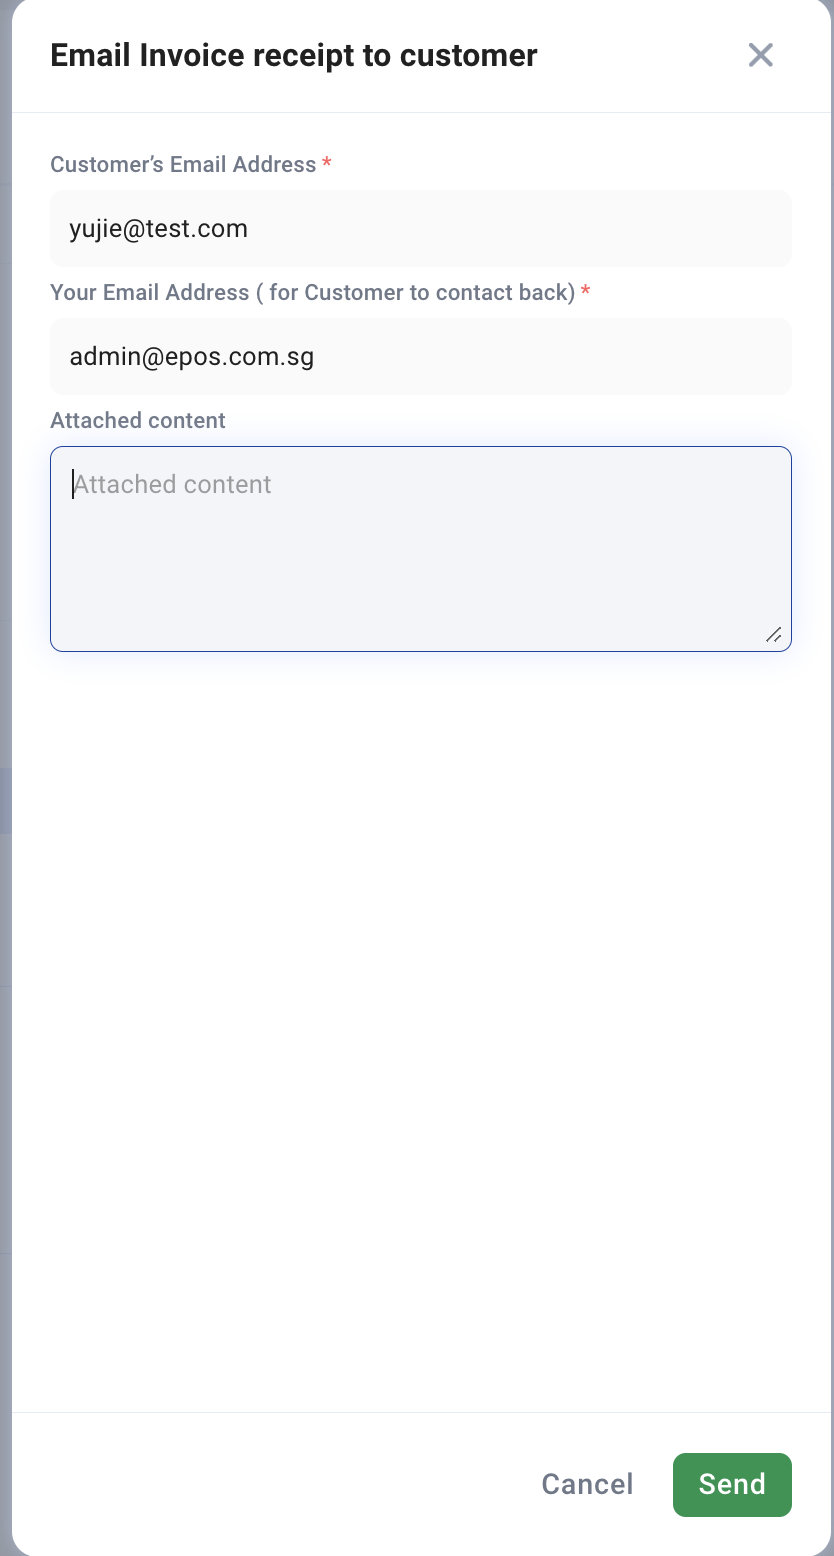
2. Fill in Customer’s Email Address and Your Email Address
You can also add attached content to it
3. Click “Send”, your quotation would be sent to the customer successfully!
Perform the following steps to create a new customer while creating a quotation:
1. To create a quotation, navigate to the V5 Backend Sales module and fill in the required details. If the customer is not found during the search, simply click on “+ New Customer” to add a new customer.
2. Fill in the relevant fields to create a new customer profile.
3. Click “Save” to proceed creating the customer profile.
4. Click “Yes” to proceed adding the newly created customer.
5. The newly added customer’s name can now be entered into the customer list, with their details saved in the system for future use.

