No products in the cart.
Welcome to the EPOS Web Ordering Configuration Page.
This section covers all backend settings related to configuring and managing your web ordering store.
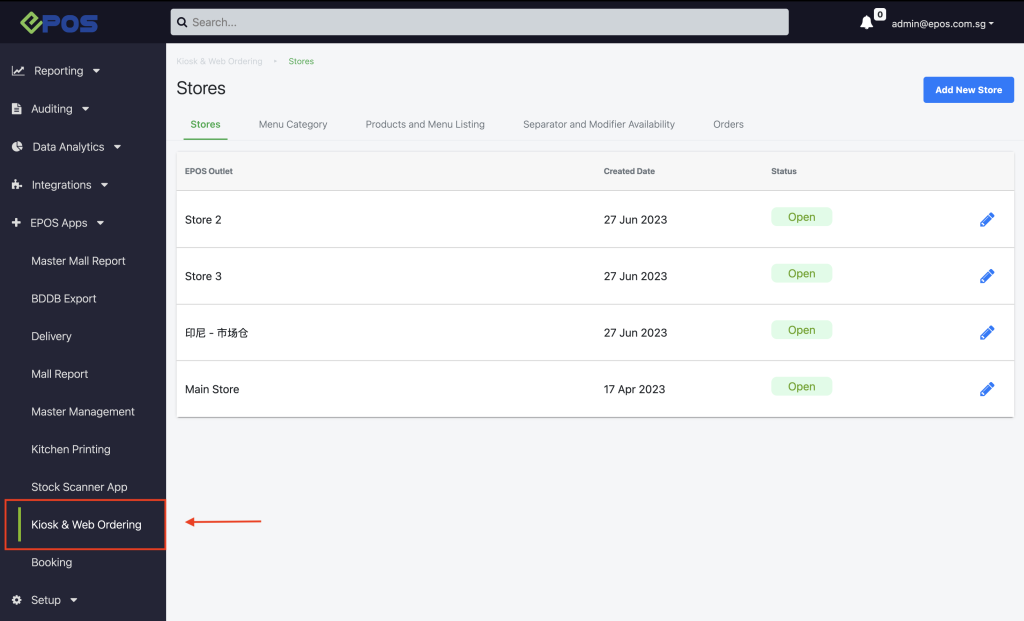
How to access EPOS Web Ordering
For users who have enabled the EPOS web ordering feature, managing online orders is simple and straightforward. Below, we’ll walk you through the steps to access and make the most of this feature effectively.
1. Access the Web Ordering App
- Log in to your EPOS Backend
- Navigate to the EPOS Apps Tab
- Click on Kiosk and Web Ordering to access the configuration settings
2. After opening this page, 5 tabs will be visible: Stores, Menu Categories, Products and Menu Listing, Separator and Modifier Availability, and Orders. This section will cover the settings and features of each tab.
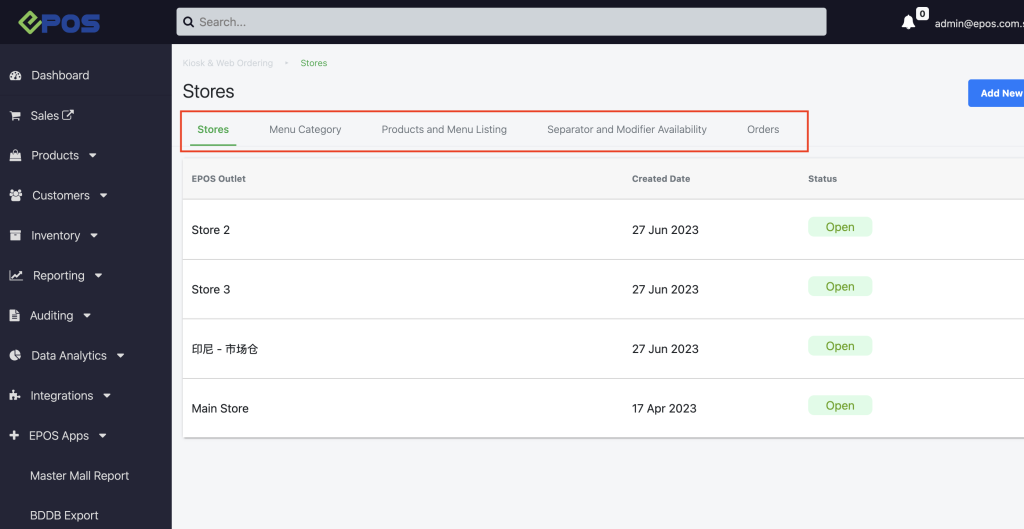
Note: Each of these tabs is used to configure the Web Ordering App. To see the changes made, access the respective Web Ordering App that is already linked to the EPOS backend account.
⬇ Kindly browse through the sections below to find the information you need.⬇
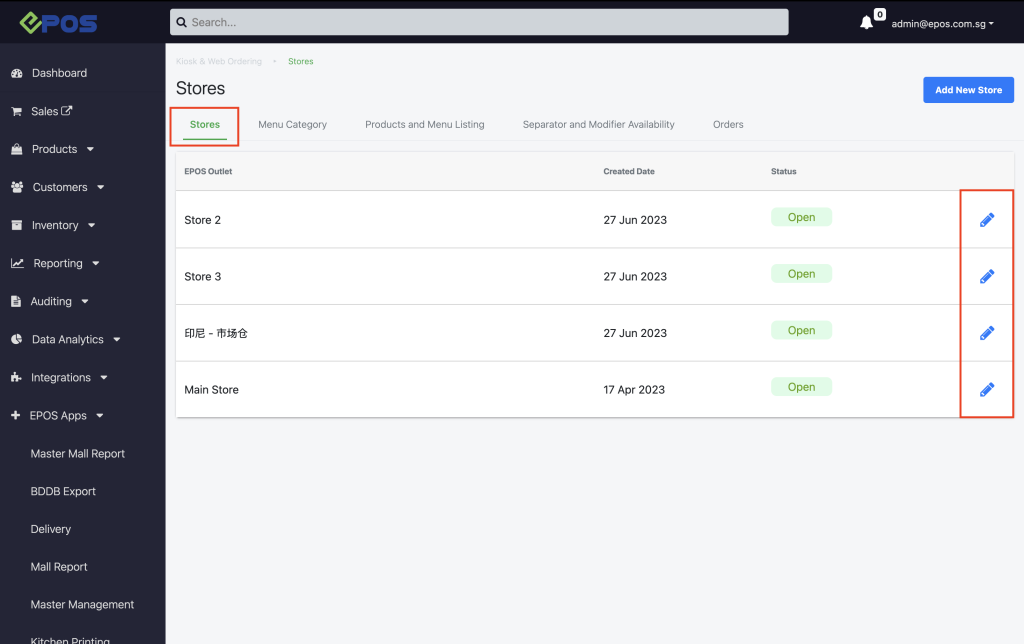
Stores Tab
The Stores tab shows all the outlets currently linked to the Web Ordering App. To configure each outlet, click on the pencil icon as shown below.
Users will then be taken to the Store Configurations Page , as shown below.
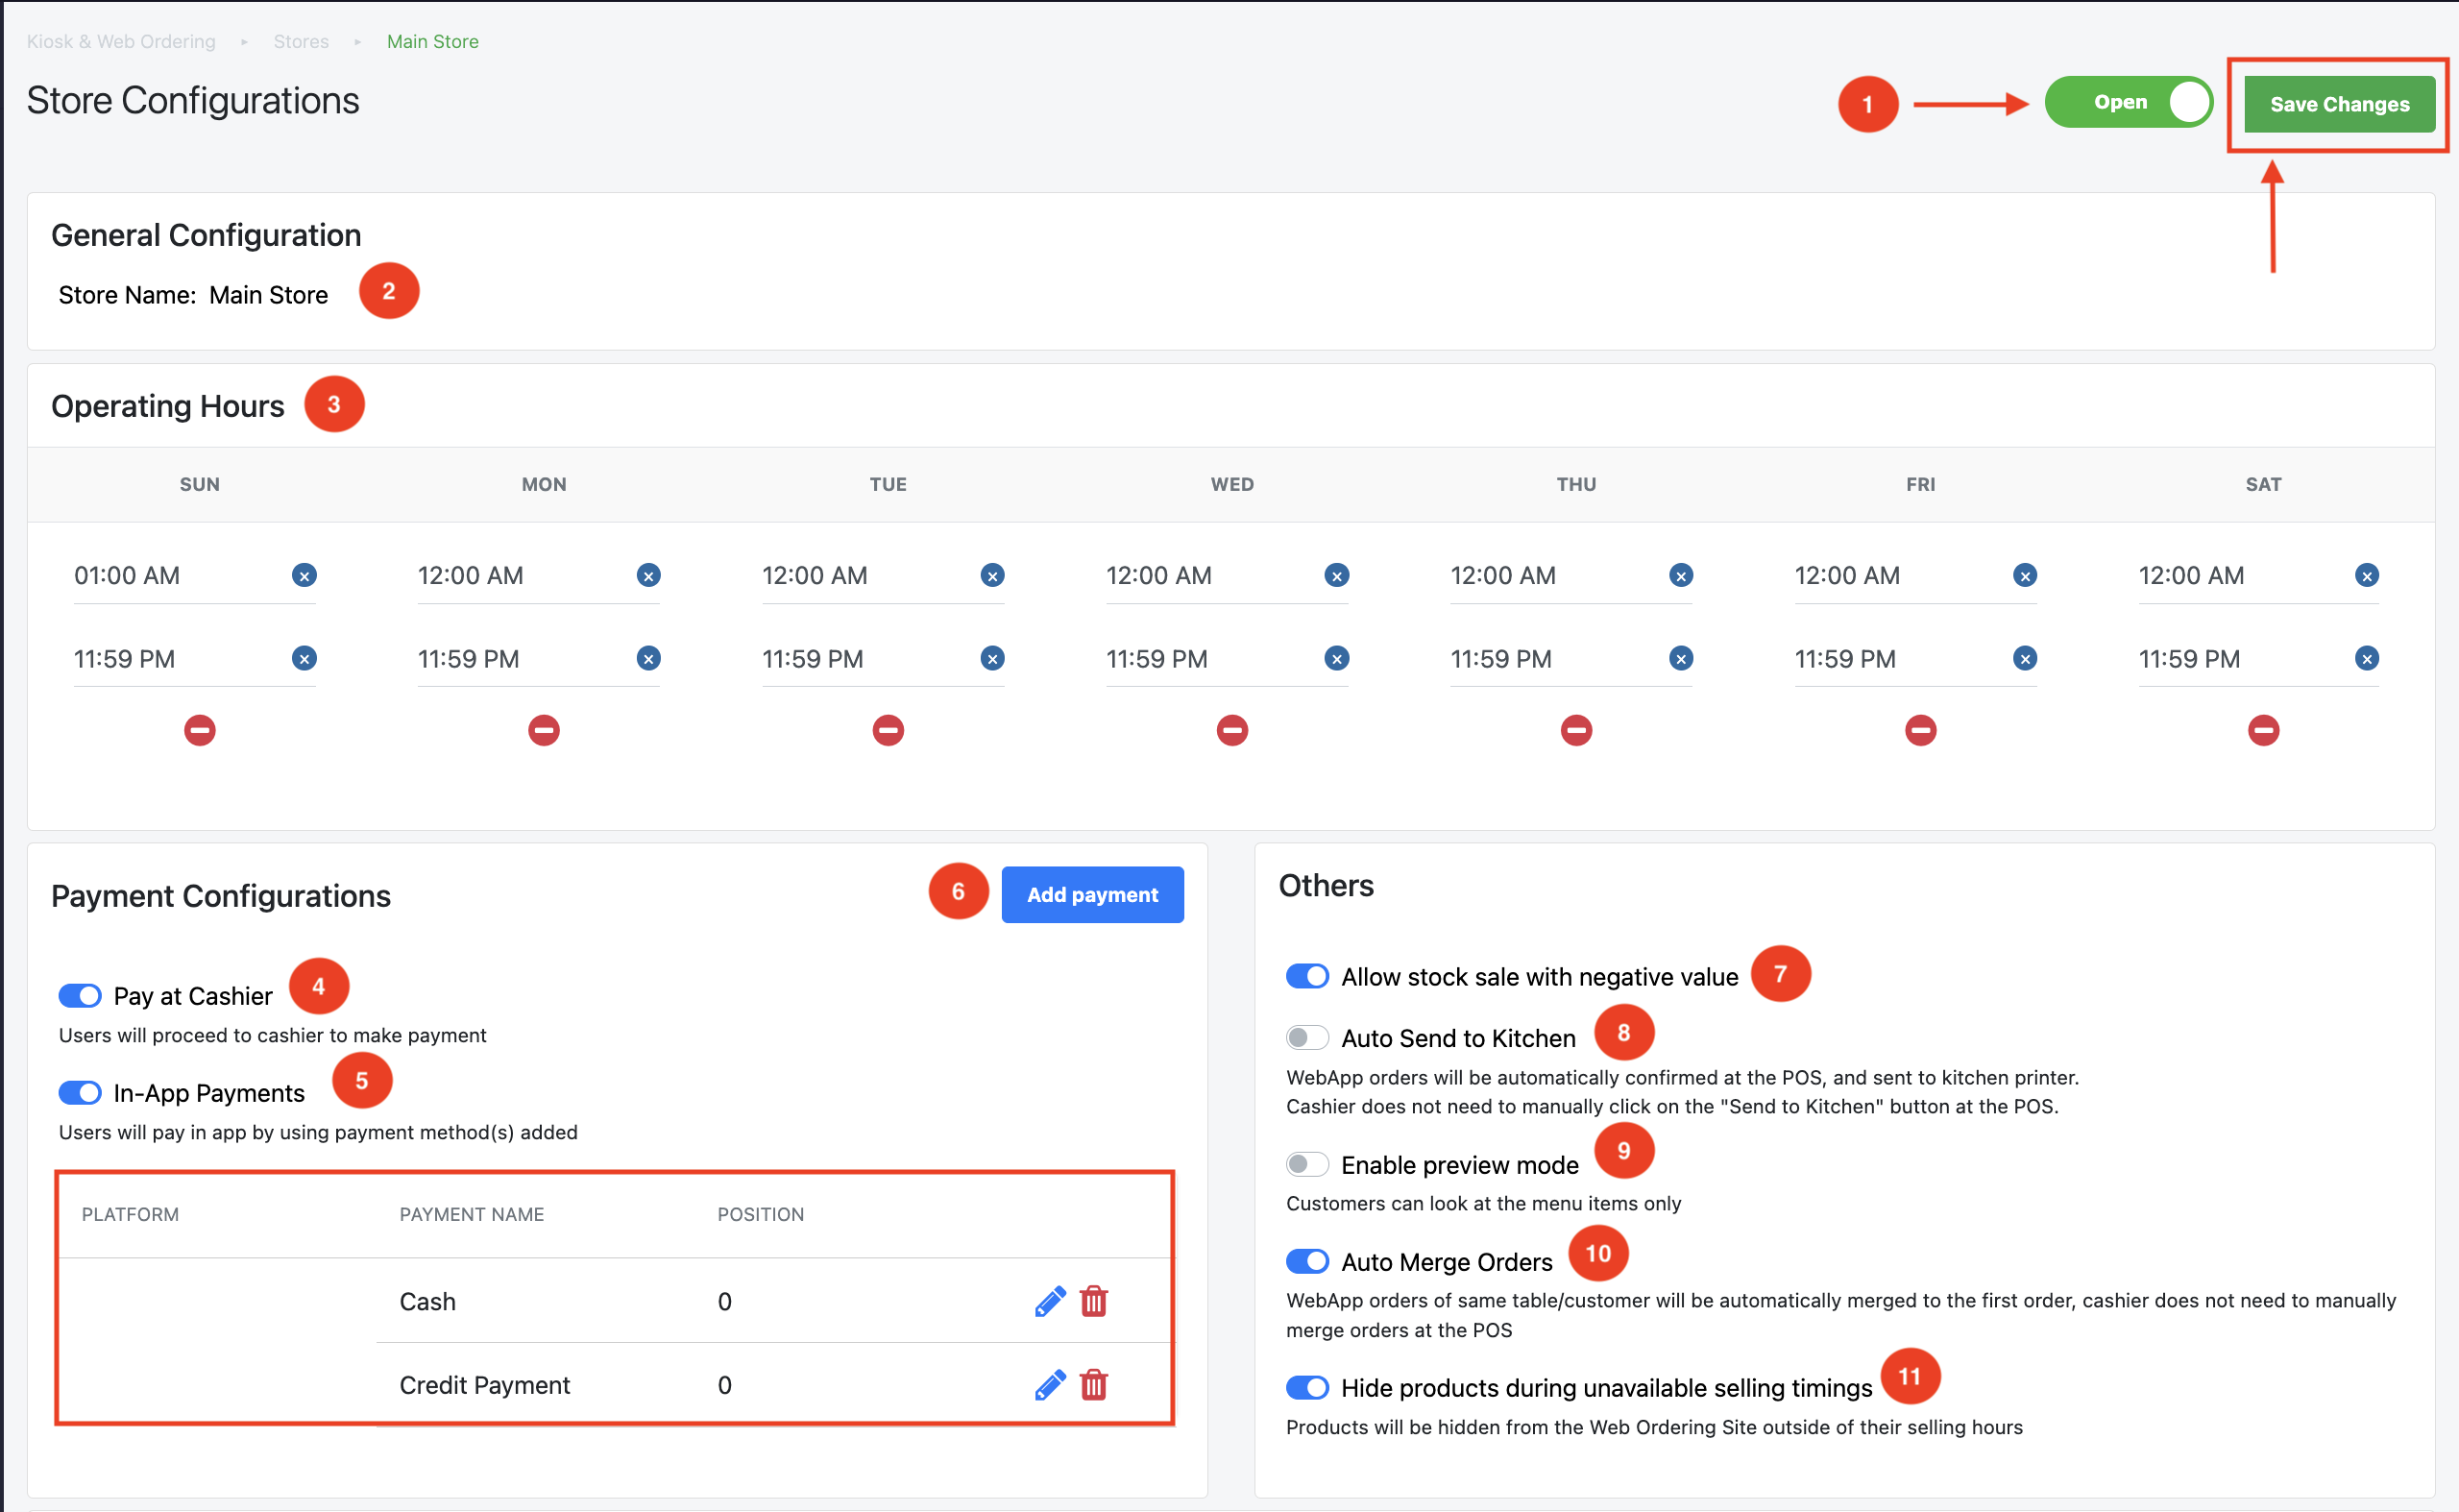
1. Users can open or close the web ordering app using the toggle switch.
If the toggle switch displays “Closed” as such:
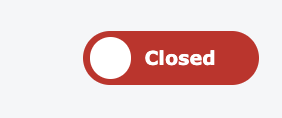
Customers would not be able to access the Web Ordering App for the specific outlet as highlighted below:

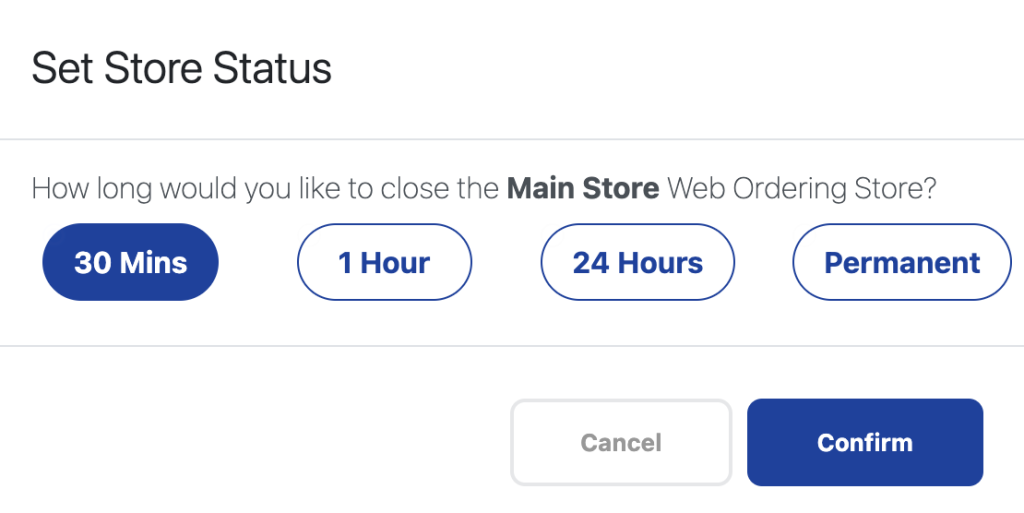
Note: To close the store, simply use the toggle switch. Once activated, a new window will appear where users can set the duration for how long the Web Ordering Store will be closed.
2. Displays the name of the outlet being configured, allowing users to confirm that the changes are being made to the correct outlet.
3. Allows users to set the operating hours for each day of an individual outlet. If customers attempt to order outside of these hours, a “closed” message will appear on the web ordering app.
4. When enabled, the web ordering site will offer customers the option to place orders and pay later at the cashier.
5. When turned on, customers can pay directly in the Web Ordering App using the payment methods set up.
6. Users can manually add the different payment methods to the Web Ordering App.
Note: Clicking “Add Payment” redirects users to a new display. Afterwards, make sure to select the Web Ordering App and the desired payment method from the dropdown list.
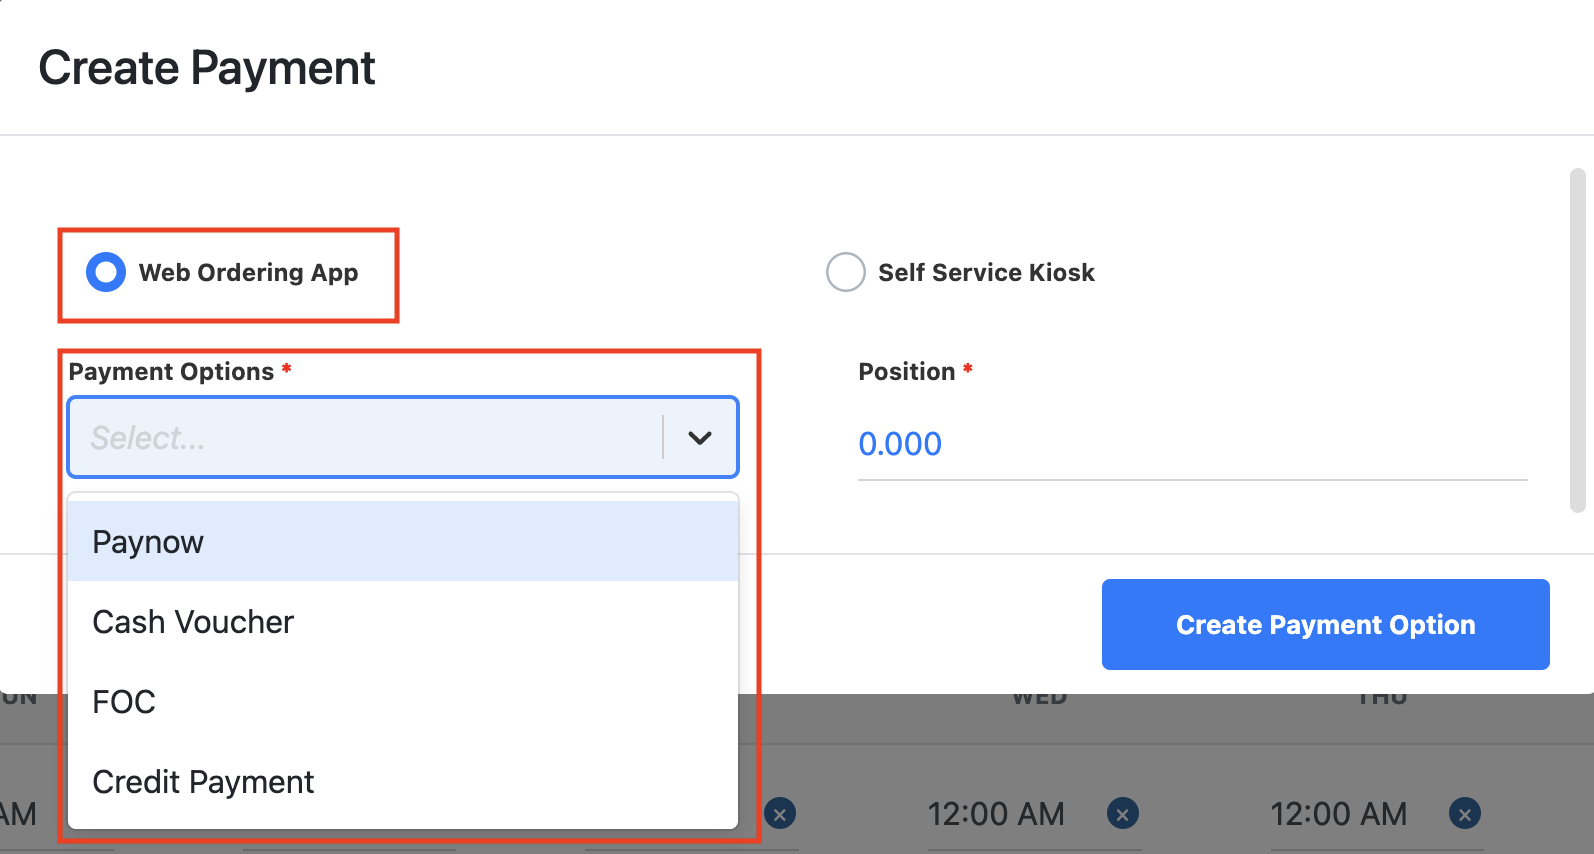
For help setting up different payment options, please contact EPOS at 8482-1888.
Available methods include credit card, Google Pay, Apple Pay, and integrated PayNow.
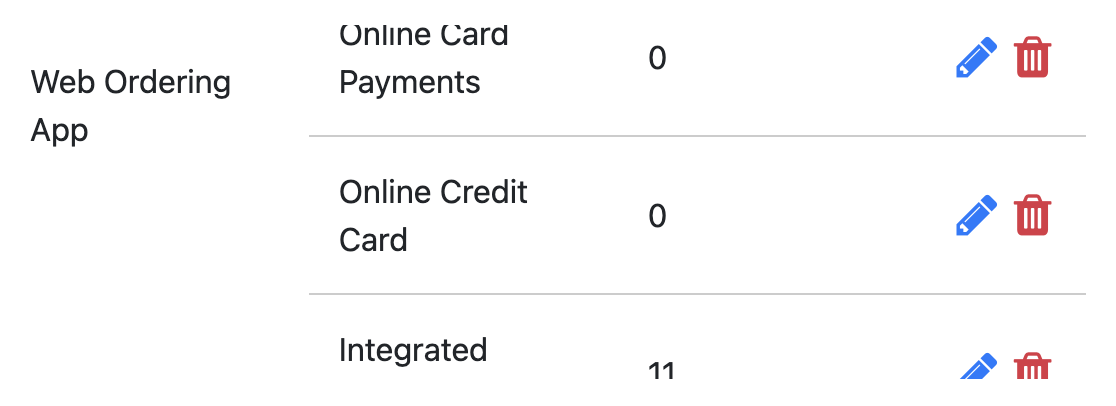
Note: After adding the desired payment method, users can view all available payment options in the section below. The pencil icon allows editing of payment configurations, while the trash can icon deletes them.
7. When turned on, users don’t need to configure inventory for the web ordering store, as it allows negative stock. This ensures products are always available, regardless of inventory in the EPOS backend.
8. When turned on, orders from the Web Ordering App are automatically sent to the kitchen printer without requiring approval from the cashier at the POS.
9. When turned on, preview mode allows customers to view the menu on the Web Ordering App without being able to place orders themselves. It essentially enables the QR Code to function as an e-menu when scanned.
10. When turned on, orders from the same table or customer are automatically combined for payment, without needing manual merging by the cashier at the POS.
11. When enabled, products will be hidden from the web app outside of their set selling hours.
As you scroll down, additional features for the web app include the following:
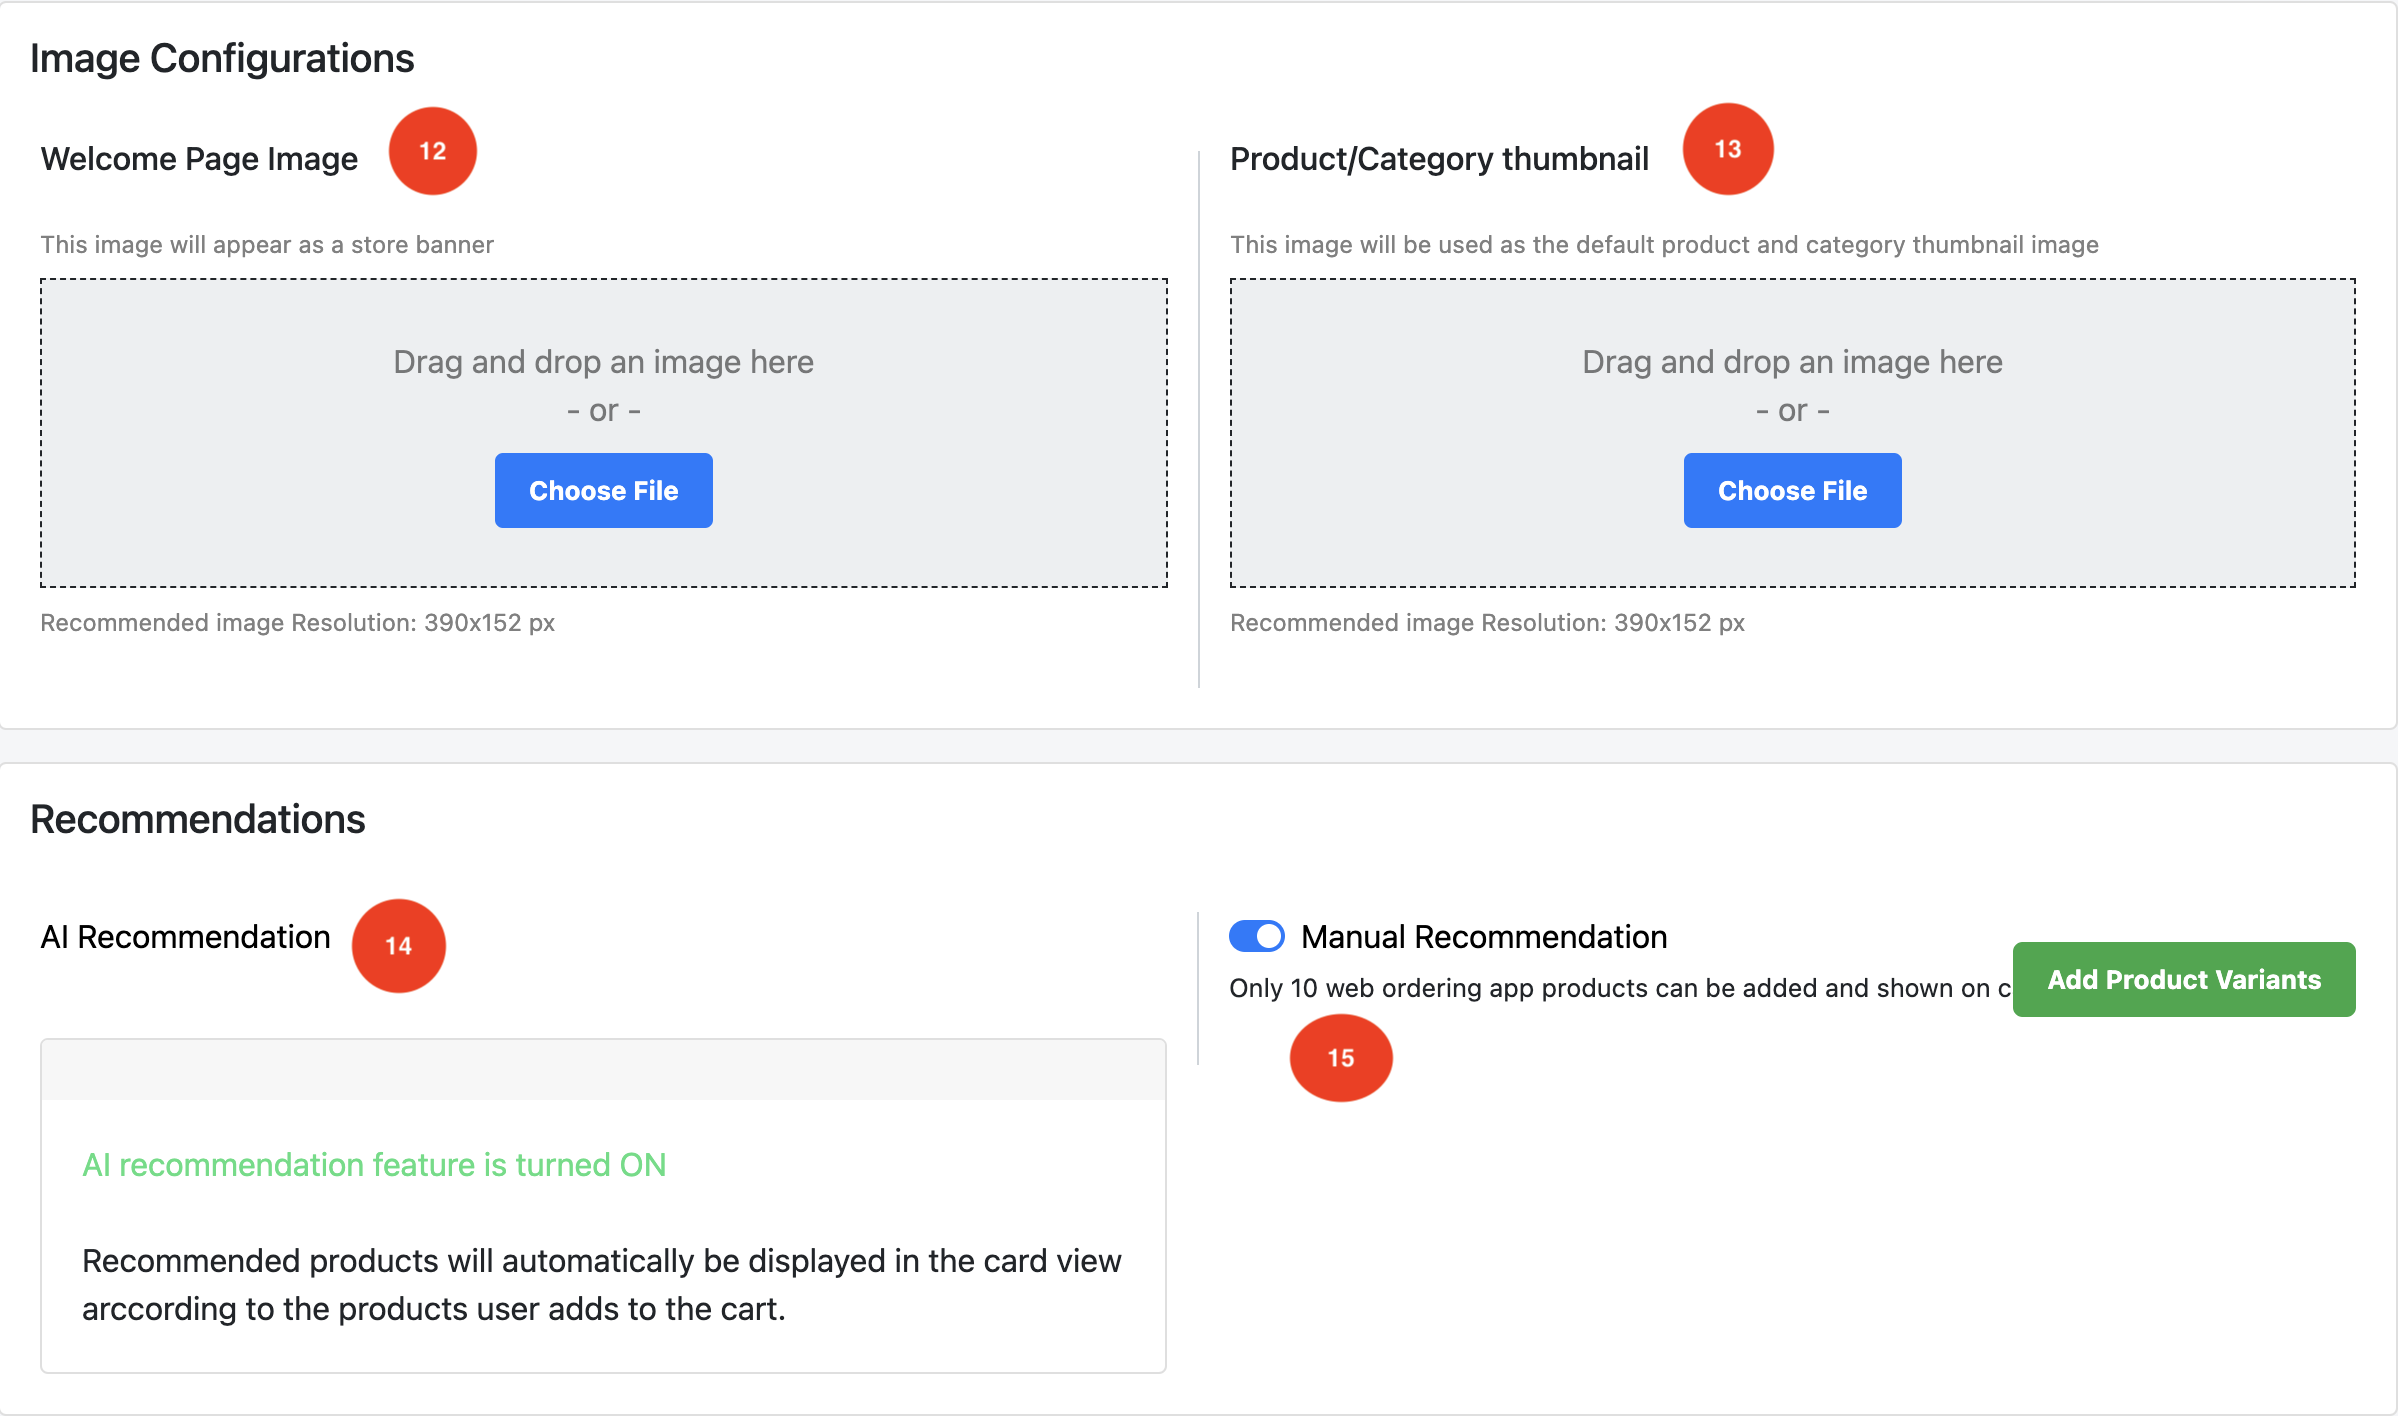
12. Upload the image here to display it on the Web Ordering App banner.
13. The image uploaded here will be automatically displayed for any products or product categories in the backend that don’t have an image set.
14. When turned on, recommendations for similar items will show up during the “Add to Cart” stage and recommendations for items often bought together during the “Checkout Stage”.
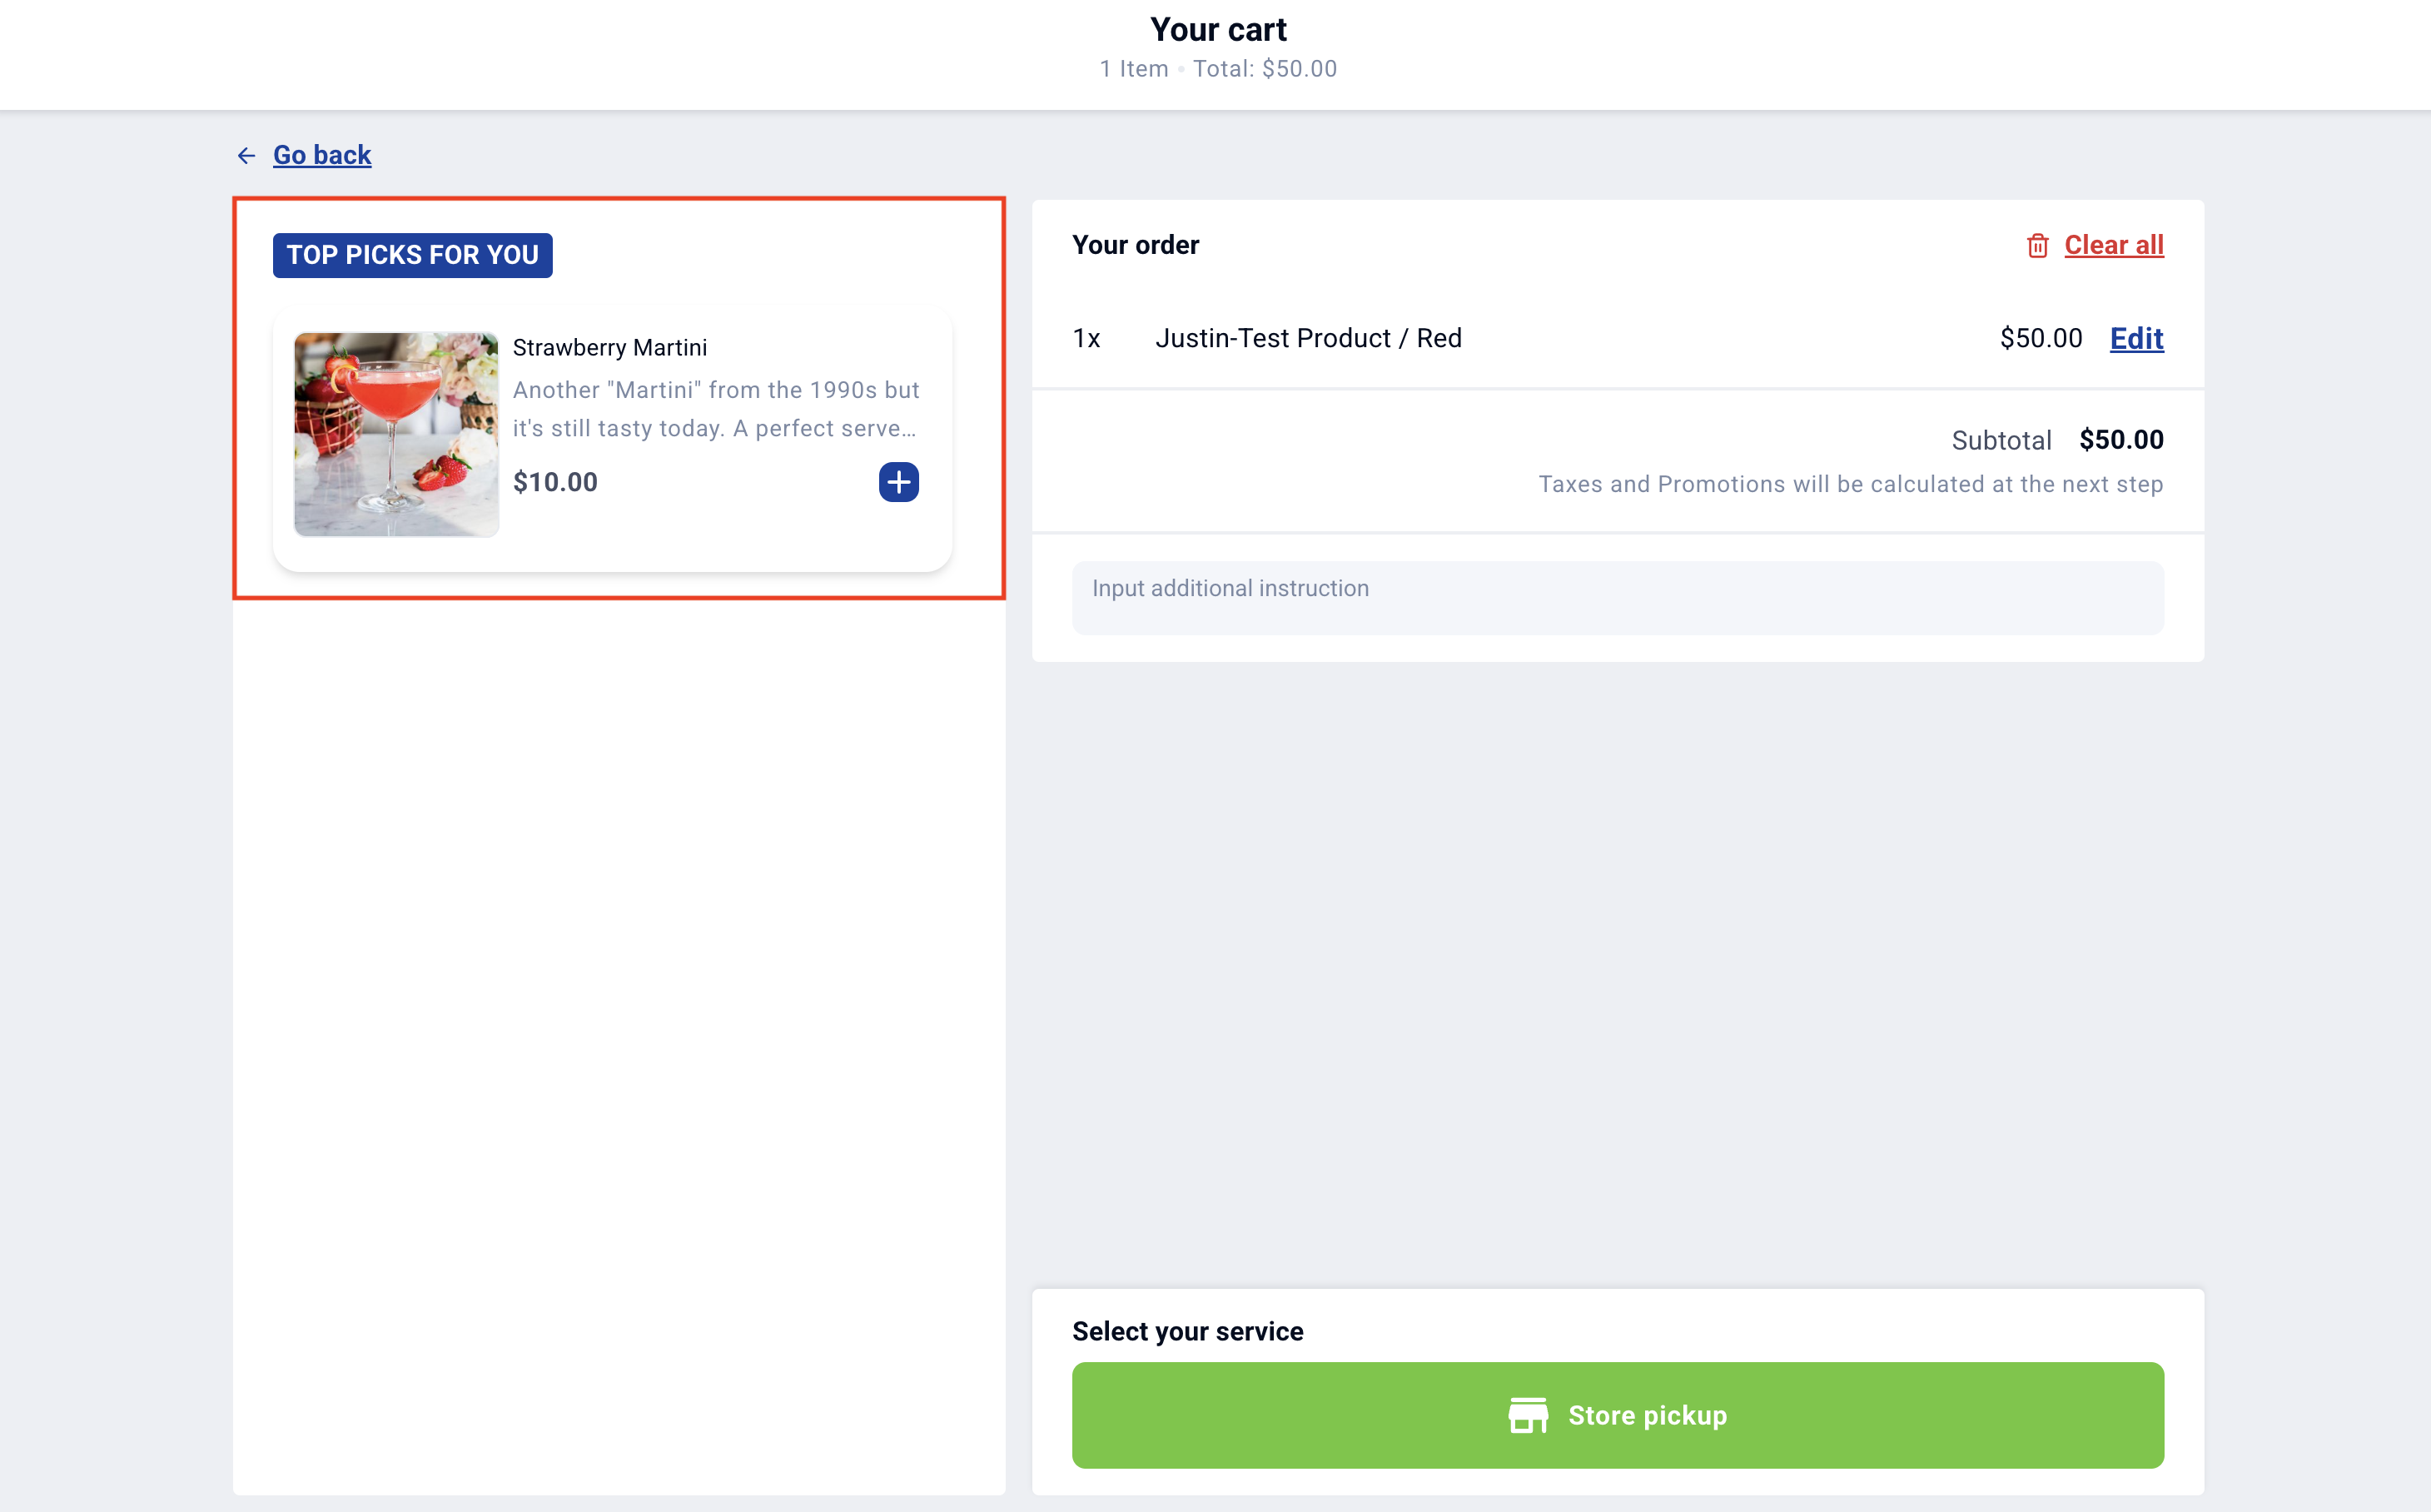
15. When turned on, users can manually select products to be displayed as recommendations on the cart view as highlighted in the image below.
Note: Click the “Add Product Variants” button to choose which products to add.
The last section of the store configuration is the promotion display feature.
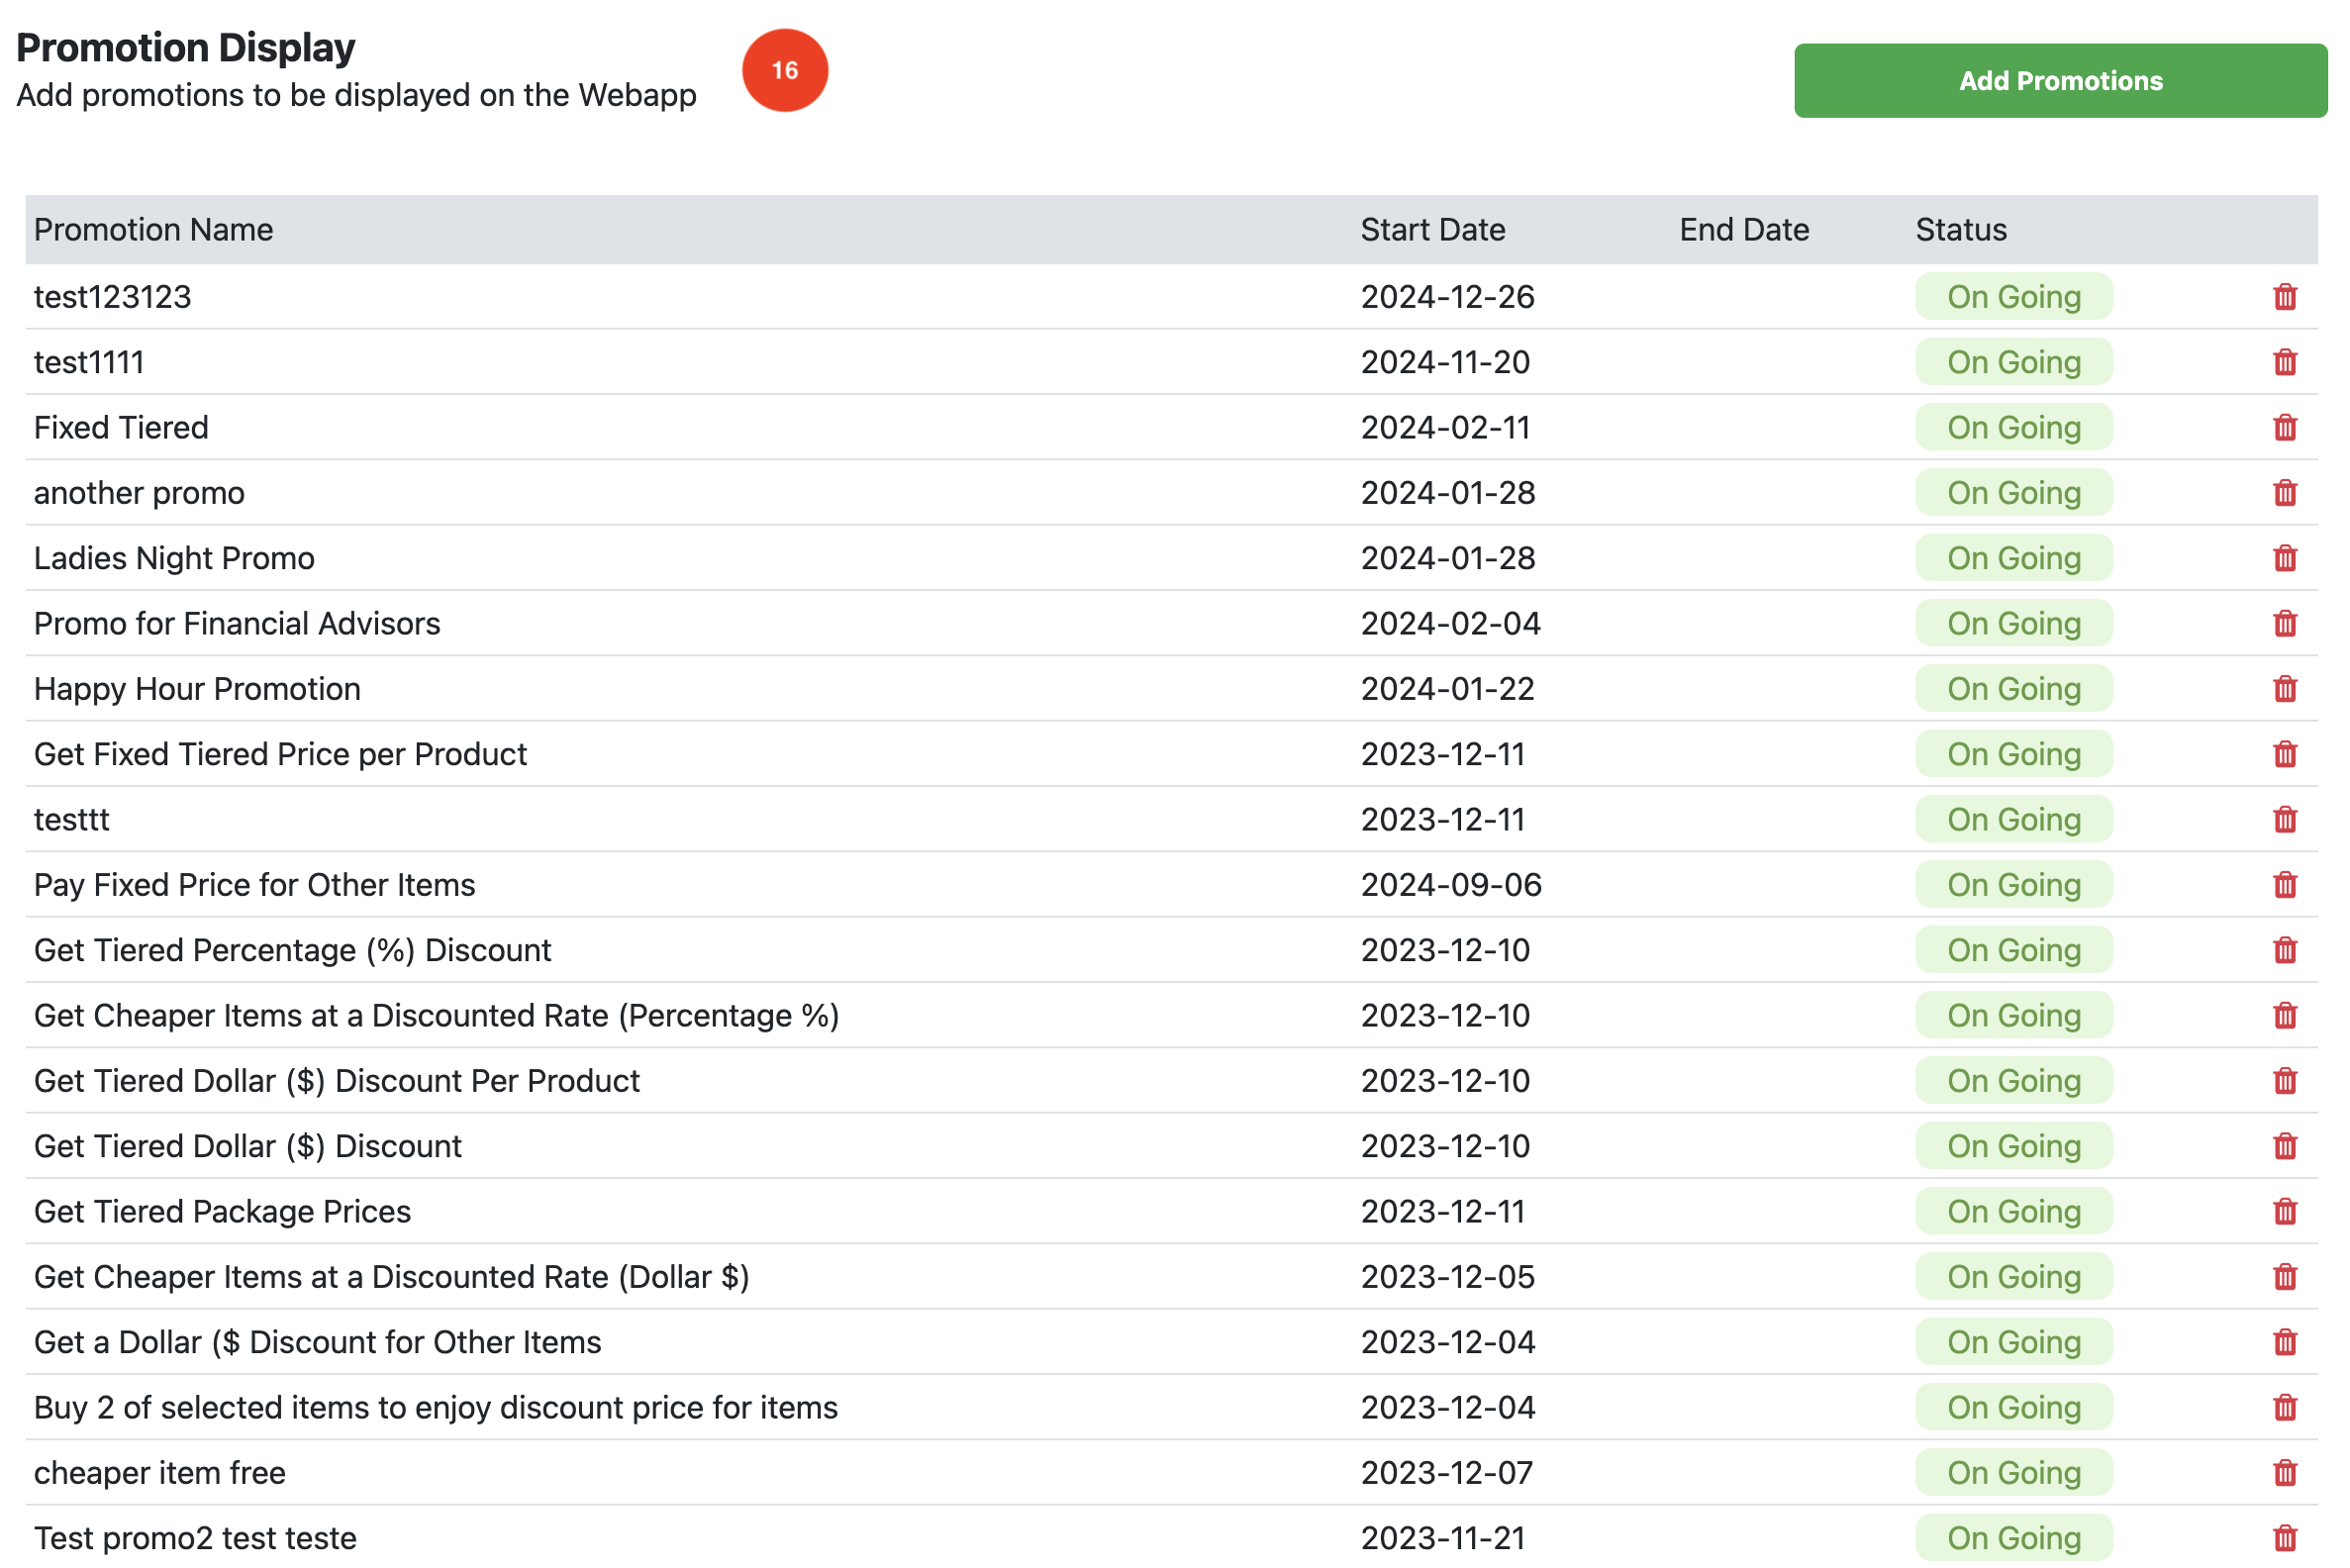
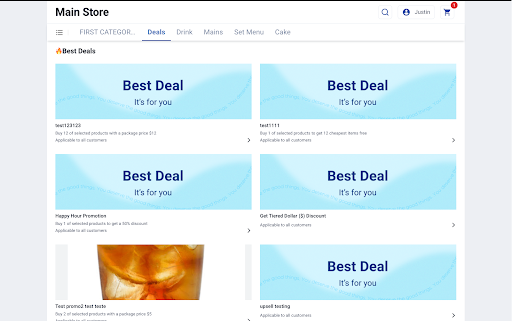
16. In this section, users can manually add existing promotions to appear under the “Best Deals” section in the Web Ordering App. As shown below.
Note: Users can set up promotions under the Products tab in the backend, to learn more about setting up promotions click here.
Menu Category Tab
This section allows users to set up menus specifically for the Web Ordering App. Please note:
- The menu setup applies only to the Web Ordering App, not the POS frontend.
- Menu categories do not automatically include products from POS product categories.
- Users can set different menus for different outlets/stores if needed.
First, click on the “Menu Category” tab under “Kiosk and Web Ordering.”
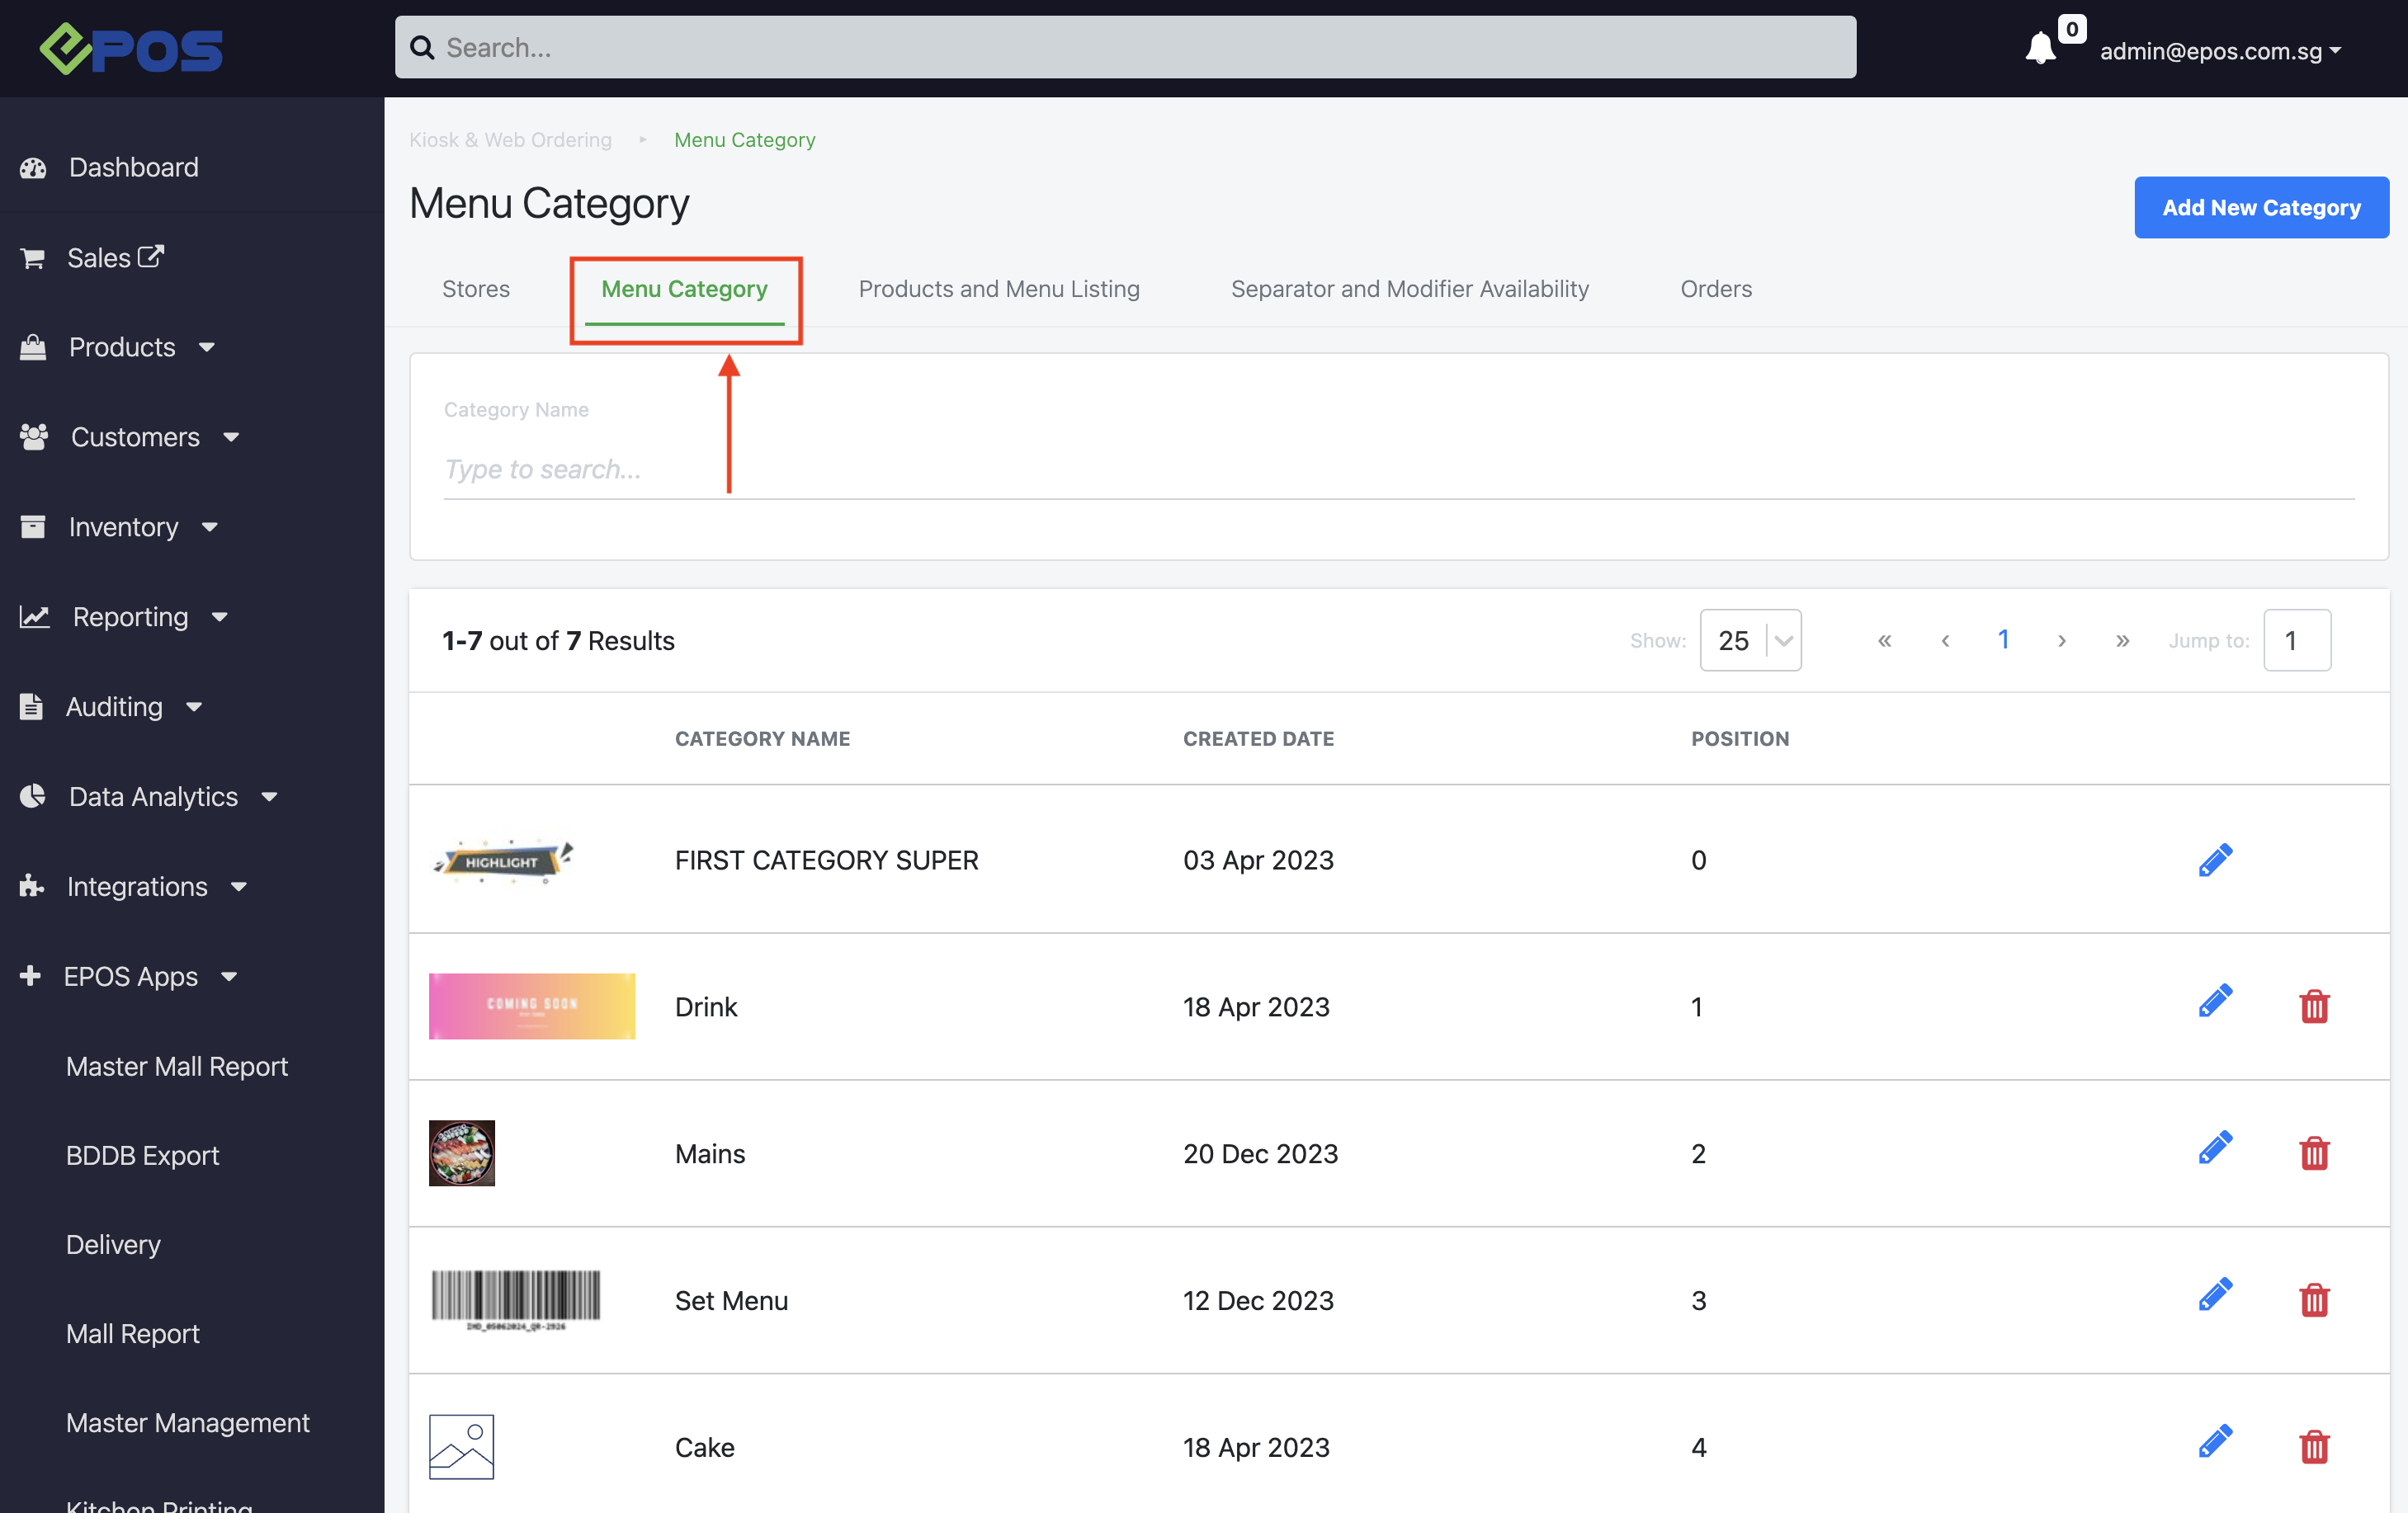
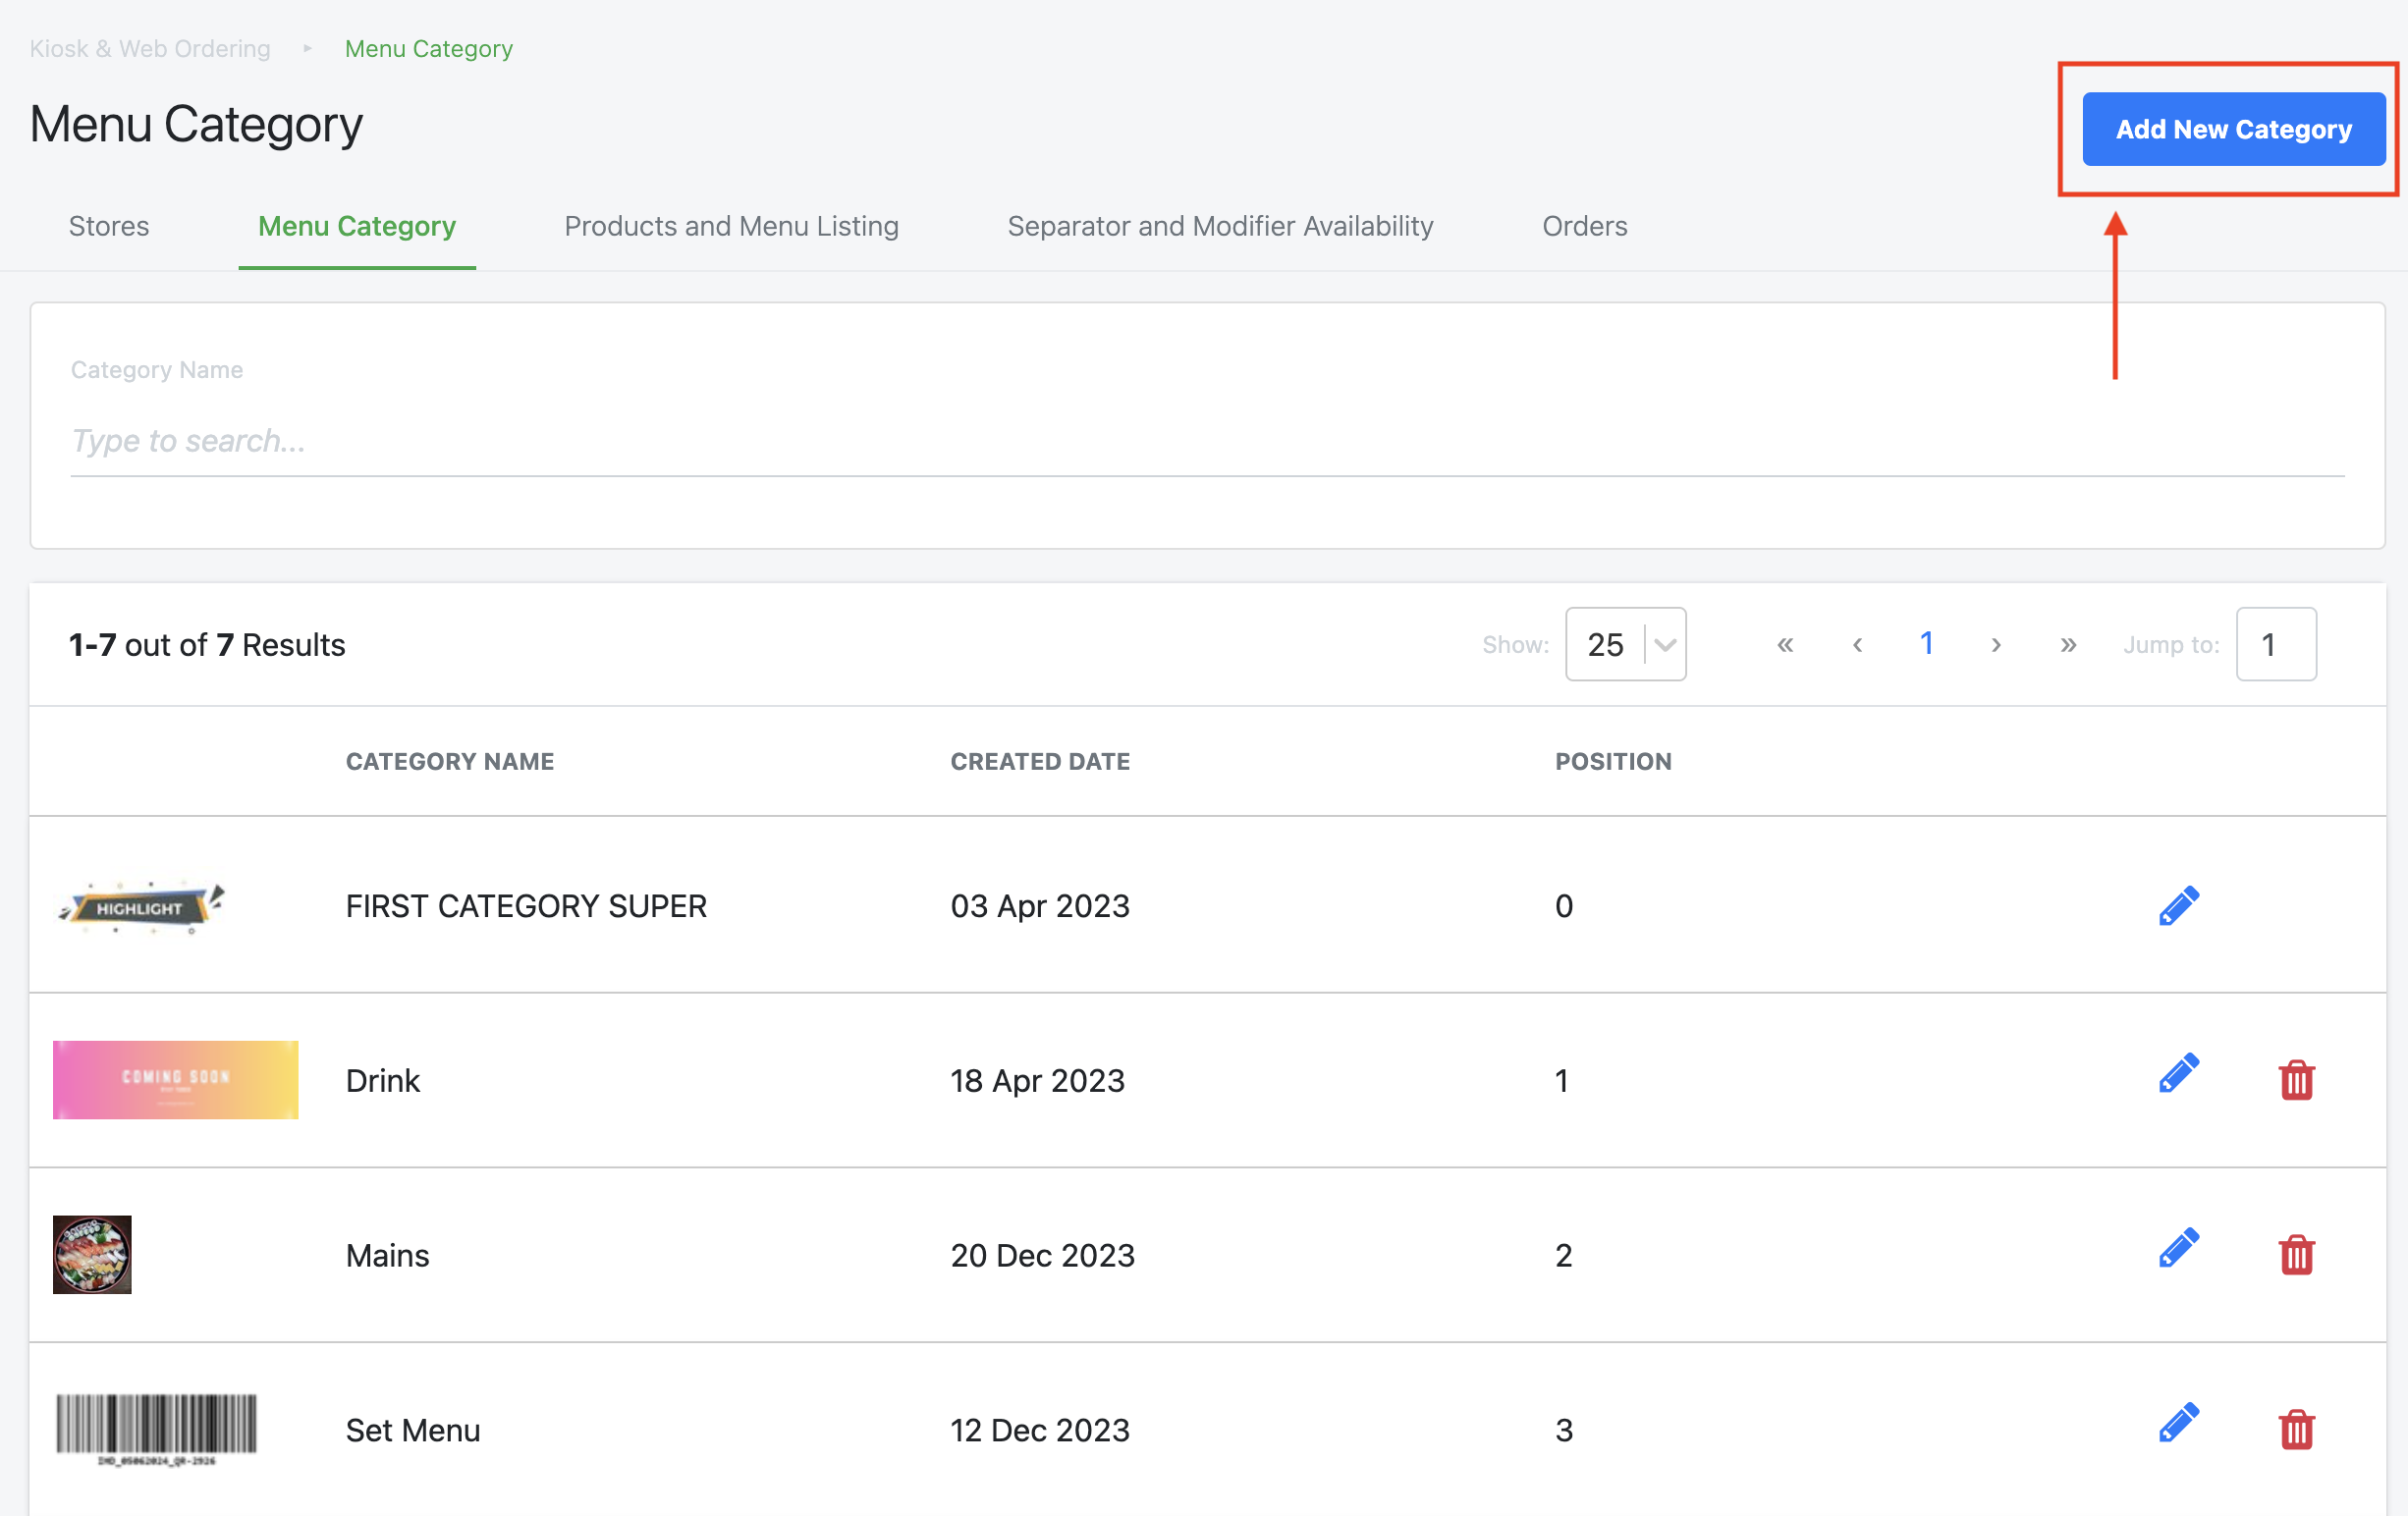
To create a new Menu Category Simply click on the “Add New Category” button highlighted below.
Afterwards users will be redirected to a new display as shown below.
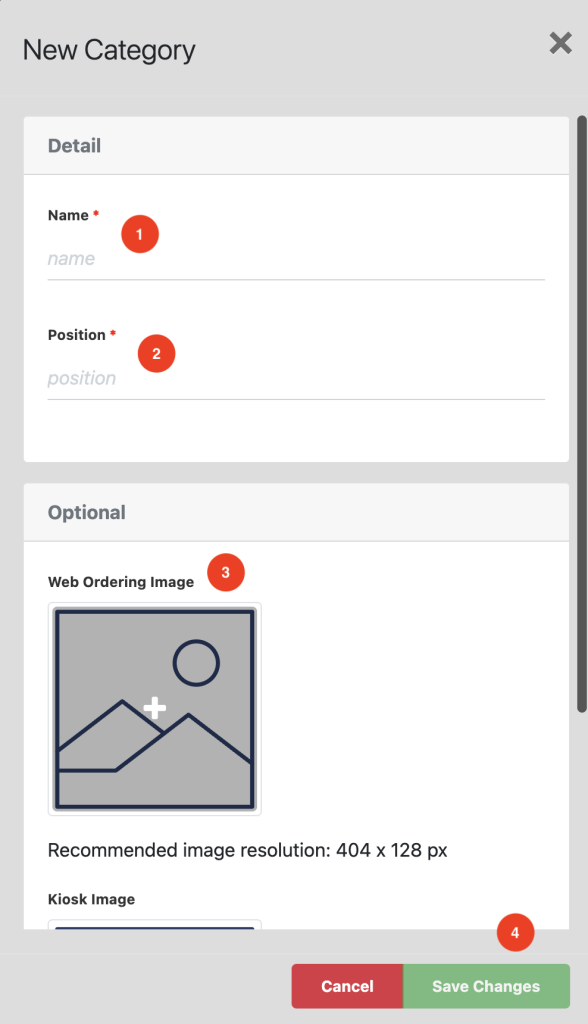
- Enter the Name of the Category
- The Position that the user want the Category to appear in the Web Ordering App
- Upload the category image under “Web Ordering Image” to display it on the web ordering app.
- Then Click “Save Changes” to confirm the modifications made
After adding the desired menu category, all menu categories added to the Web Ordering App will be displayed as shown below.

Note: However, these menu categories do not yet have any products added to them. To add products, refer to the Product and Menu Listing Tab section below.
Product and Menu Listing Tab
This section lets users view and manage all products across all outlets in the Web Ordering stores. Users can:
- Add new products (Note: The product must first be created in the backend, and the Web App menu must be added).
- Manage product selling times and availability for each outlet.
- Assign menu categories.
- Review all products in all outlets.
First, click on the “Product and Menu Listing” tab under “Kiosk and Web Ordering.”
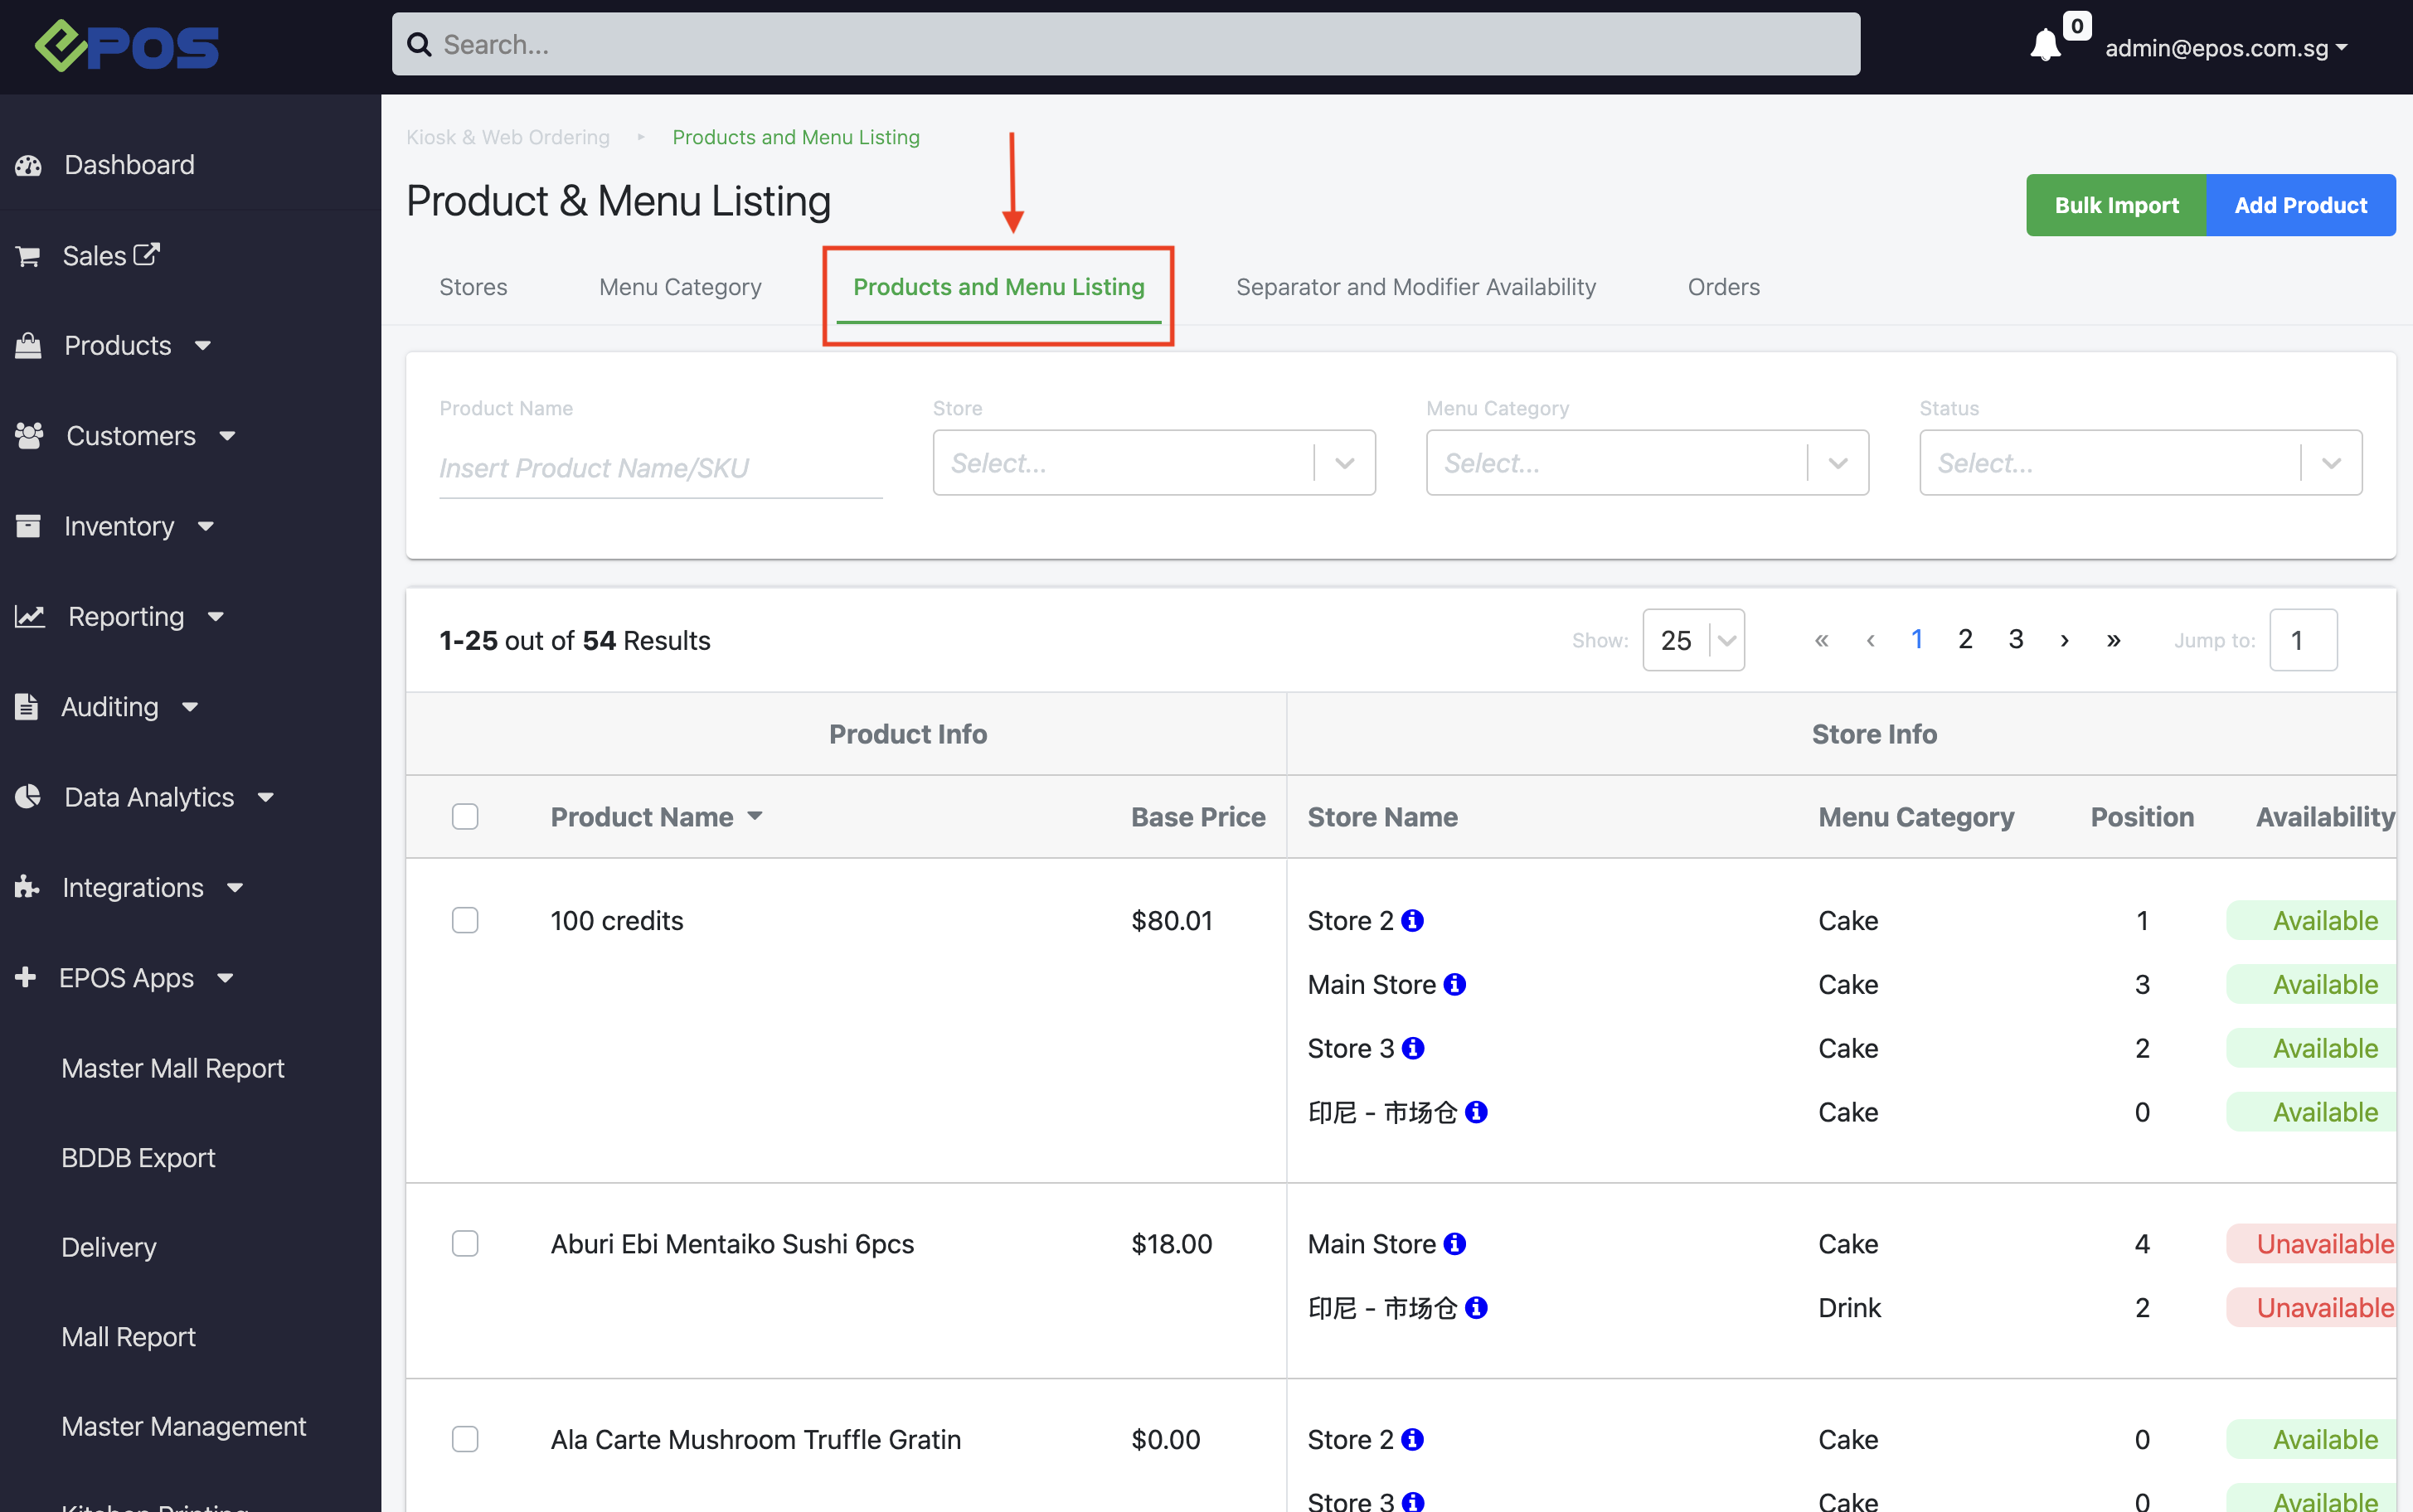
This section covers all the features and functions of the Product and Menu Listing tab.
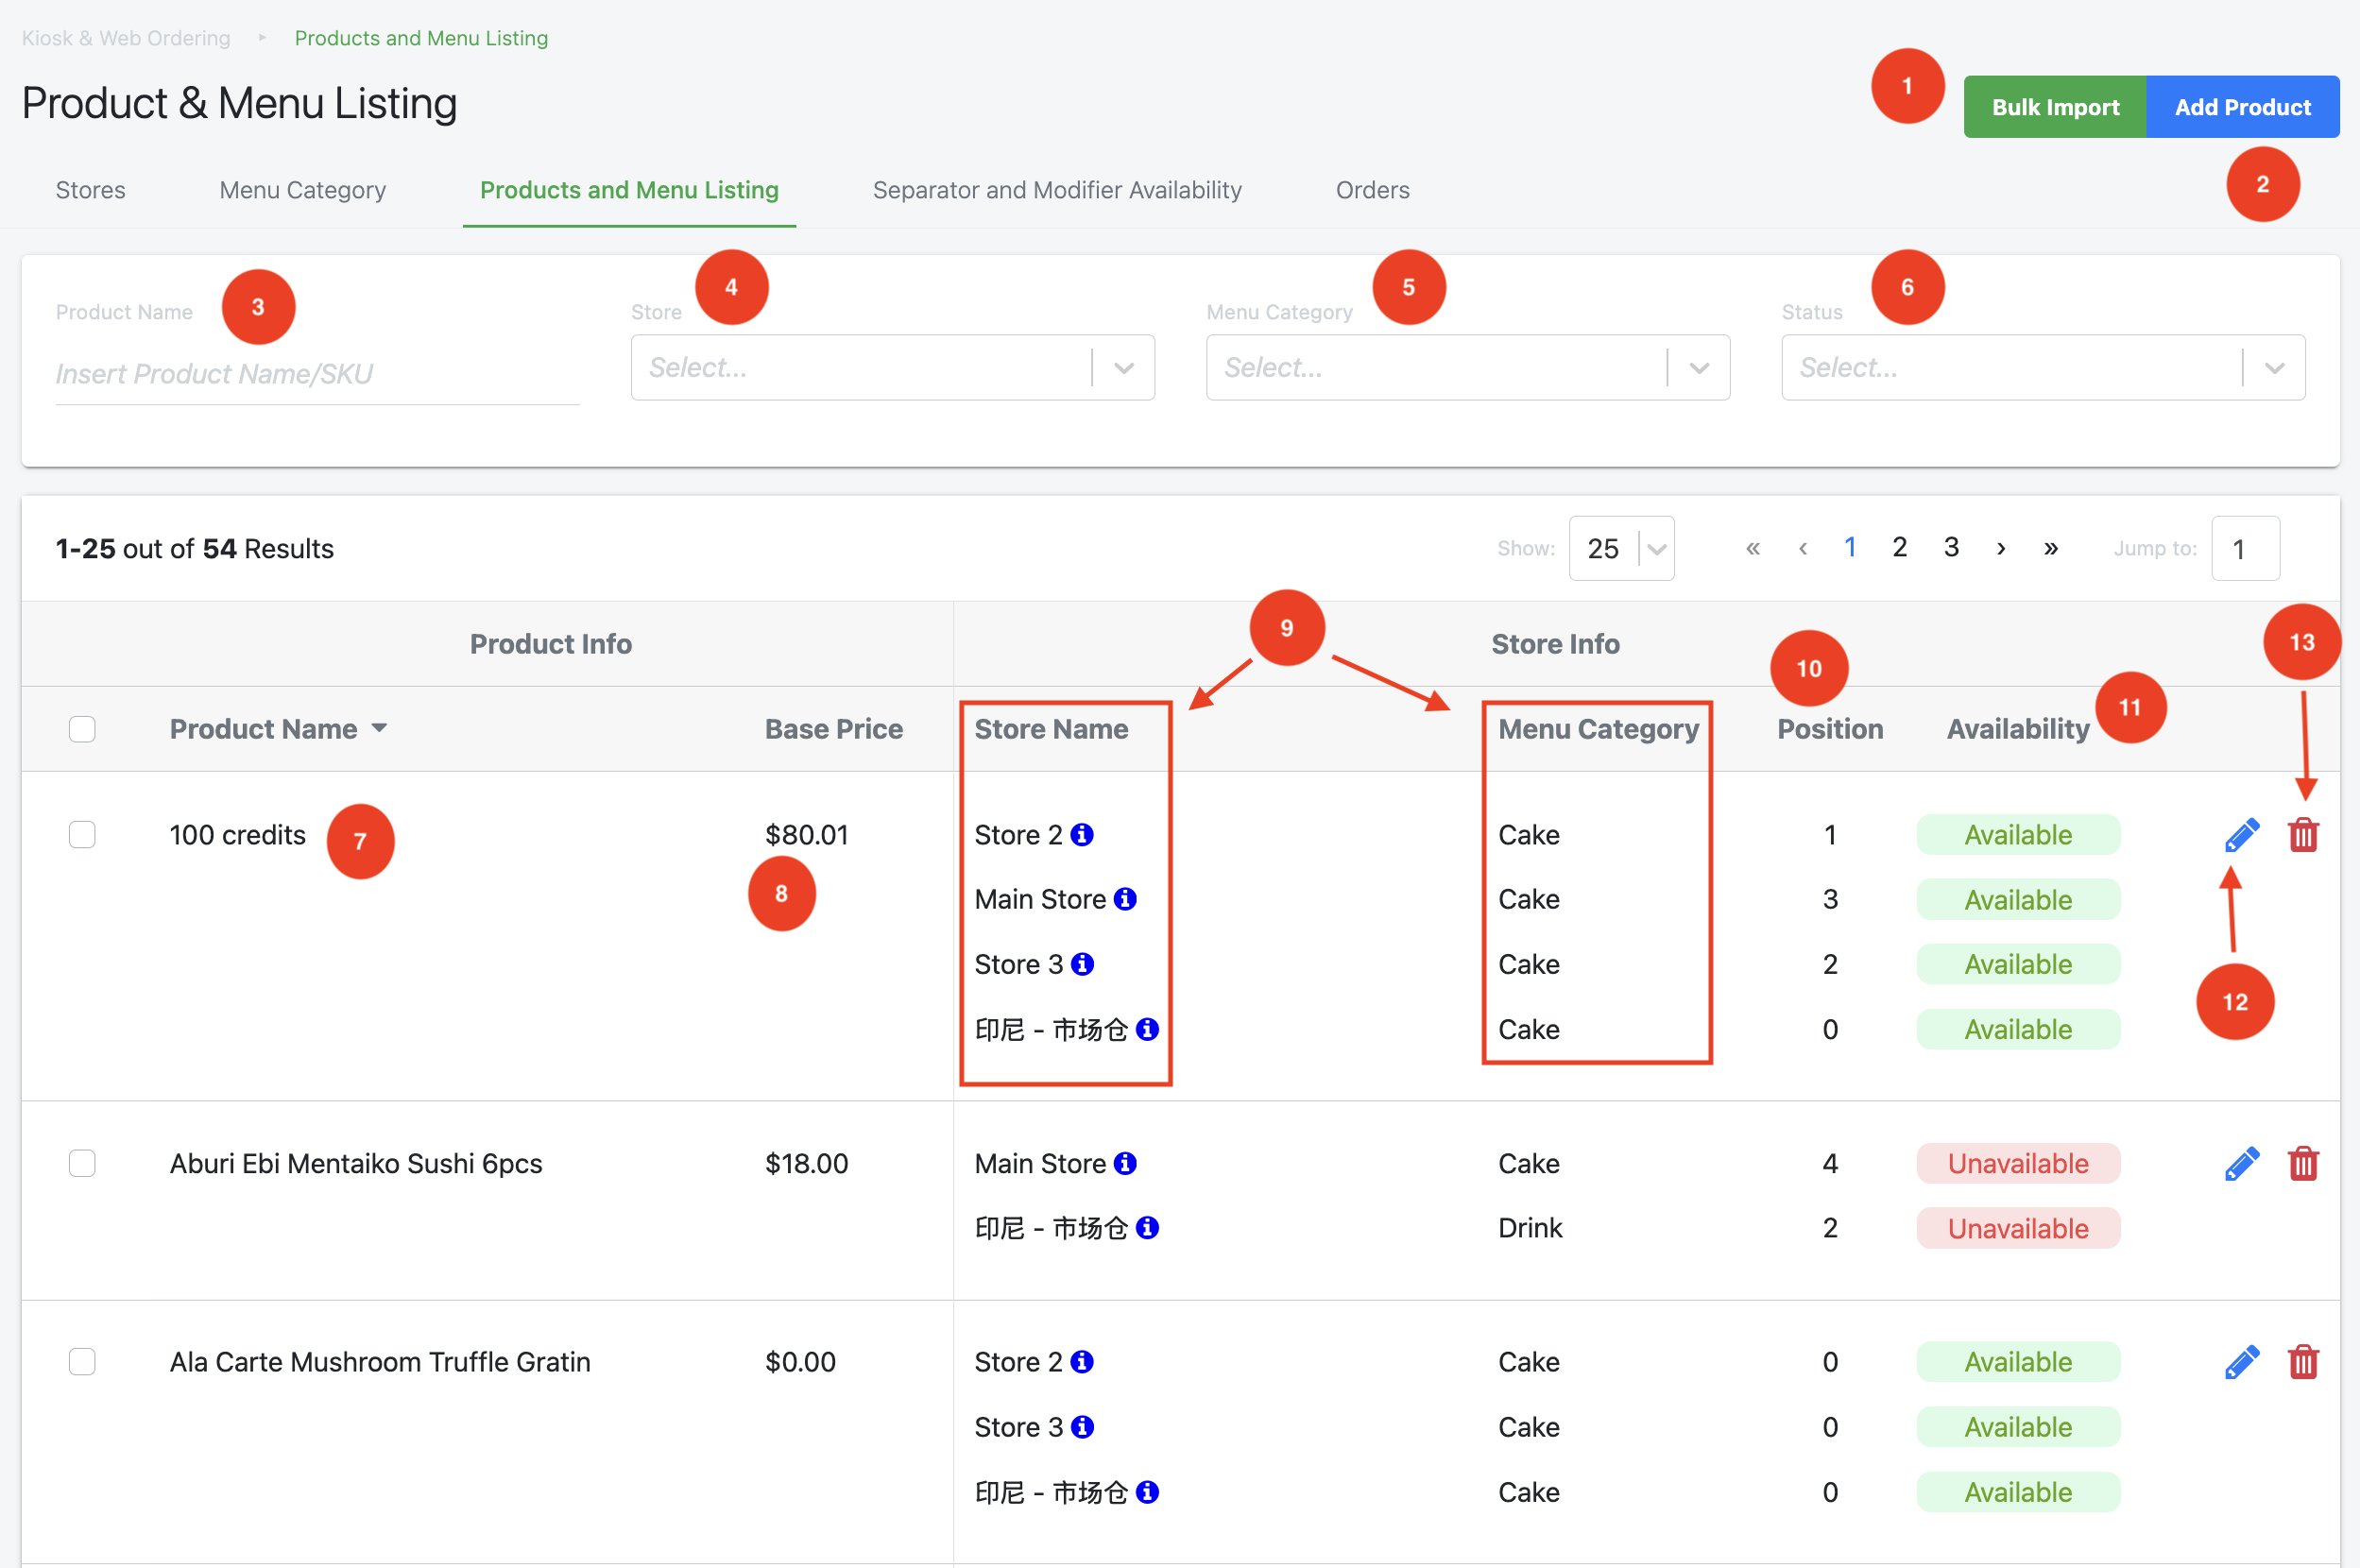
1. Import multiple products at once by using the provided template and pressing the “Bulk Import” button.
2. Manual creation of product.
3. Insert Product Name/SKU to search for the product.
4. Select which store to display all the products sold in that specific outlet.
5. Select which menu category to display all the products classified under the category.
6. Select the status of the product to filter available or unavailable products.
7. Displays the product’s name.
8. Displays the price it is being sold on the Web Ordering App for all outlets.
9. Displays the Web Ordering Store where the product is sold and its assigned menu category.
10. Shows the product’s position within the menu category list in that specific Web Ordering Store.
11. Displays whether the product is available or unavailable for the customer to purchase through the Web Ordering App.
12. Click here to edit the product.
Afterwards, it will redirect users to a new page as shown below.
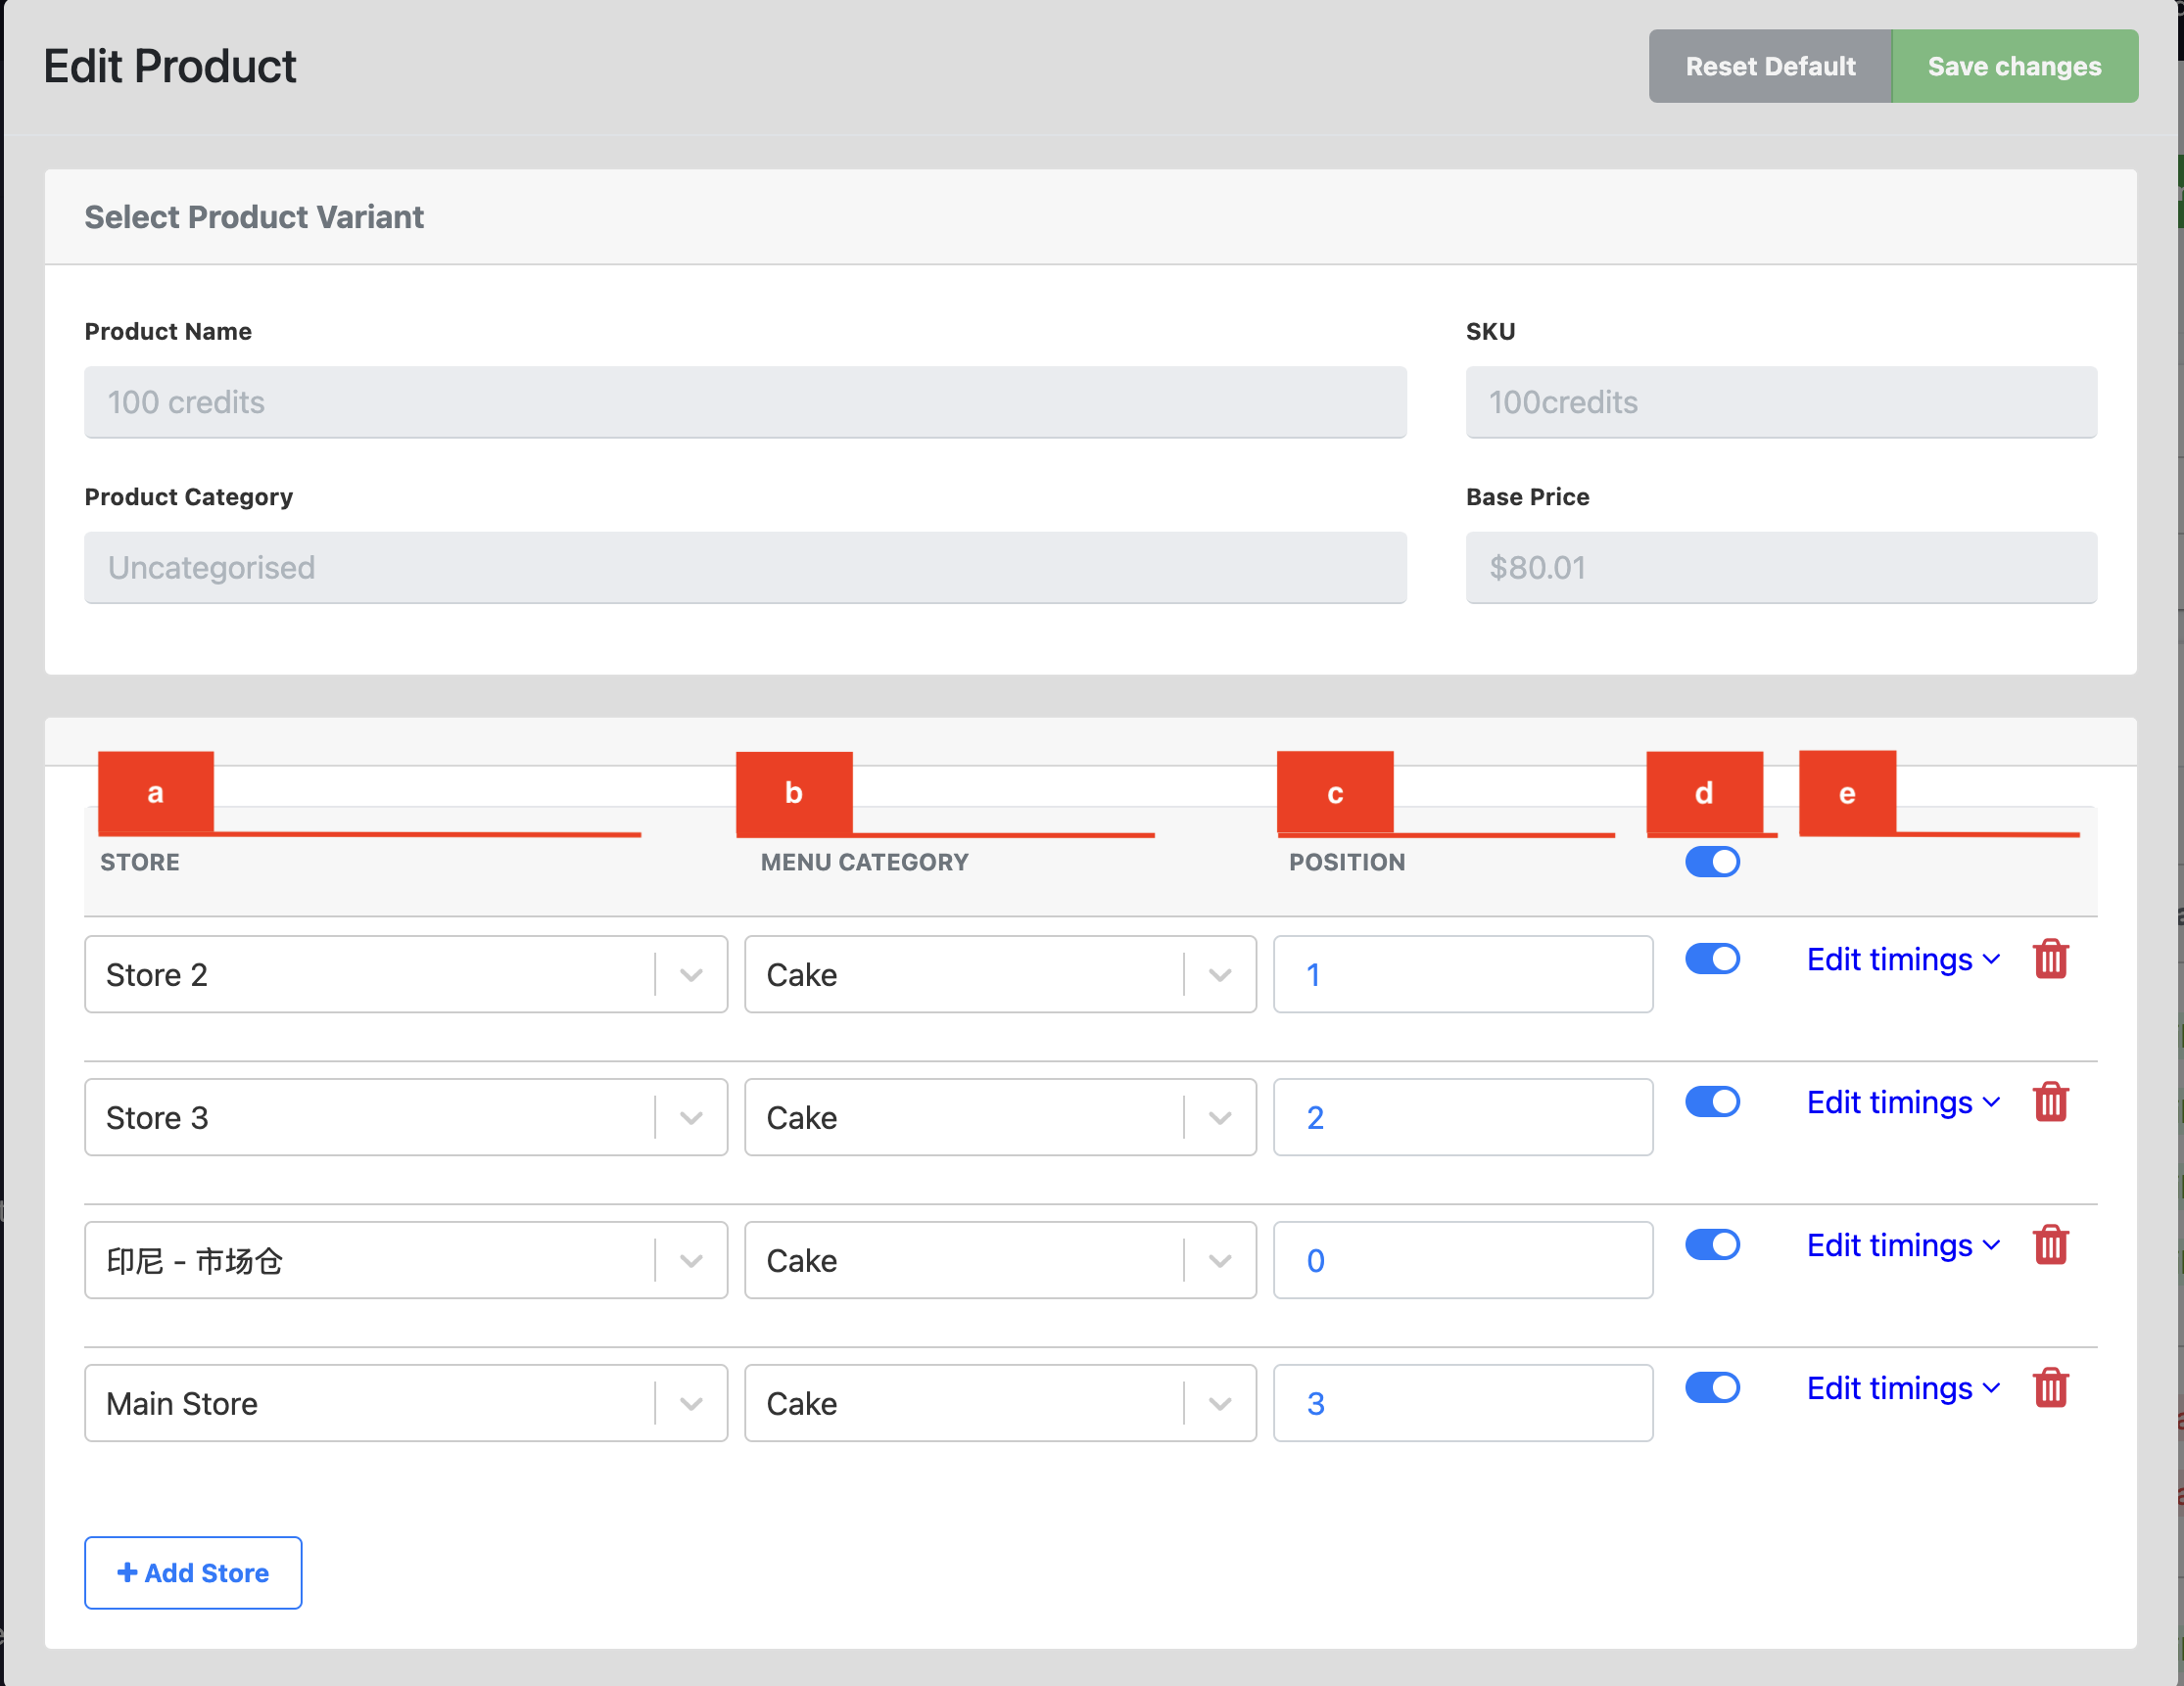
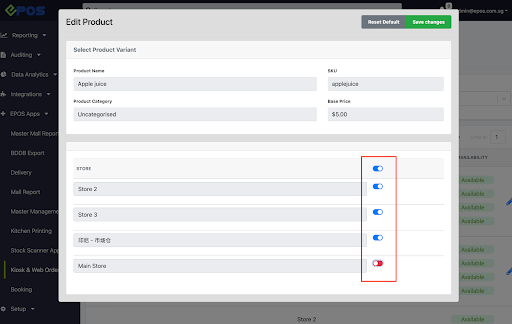
a. Select which Web App Store the Product will be displayed on.
b. Select the menu category in which the product will be classified under.
c. Select the position of the product in the category.
d. Toggle the product availability for each store.
e. Edit the product’s individual timings for each individual Web App Store.
13. Click here to delete the product entirely.
Separator and Modifier Availability Tab
This section explains how to adjust the availability of separators and modifiers in EPOS Web Ordering App.
Note: Separators are used in set menus to divide different components, such as main dishes, sides, or drinks, for easier organization.
Note: Modifiers are additional options or customizations for a menu item, allowing customers to customize their order, like choosing toppings or extra ingredients.
First, click on the “Separator and Modifier Availability” tab under “Kiosk and Web Ordering.”
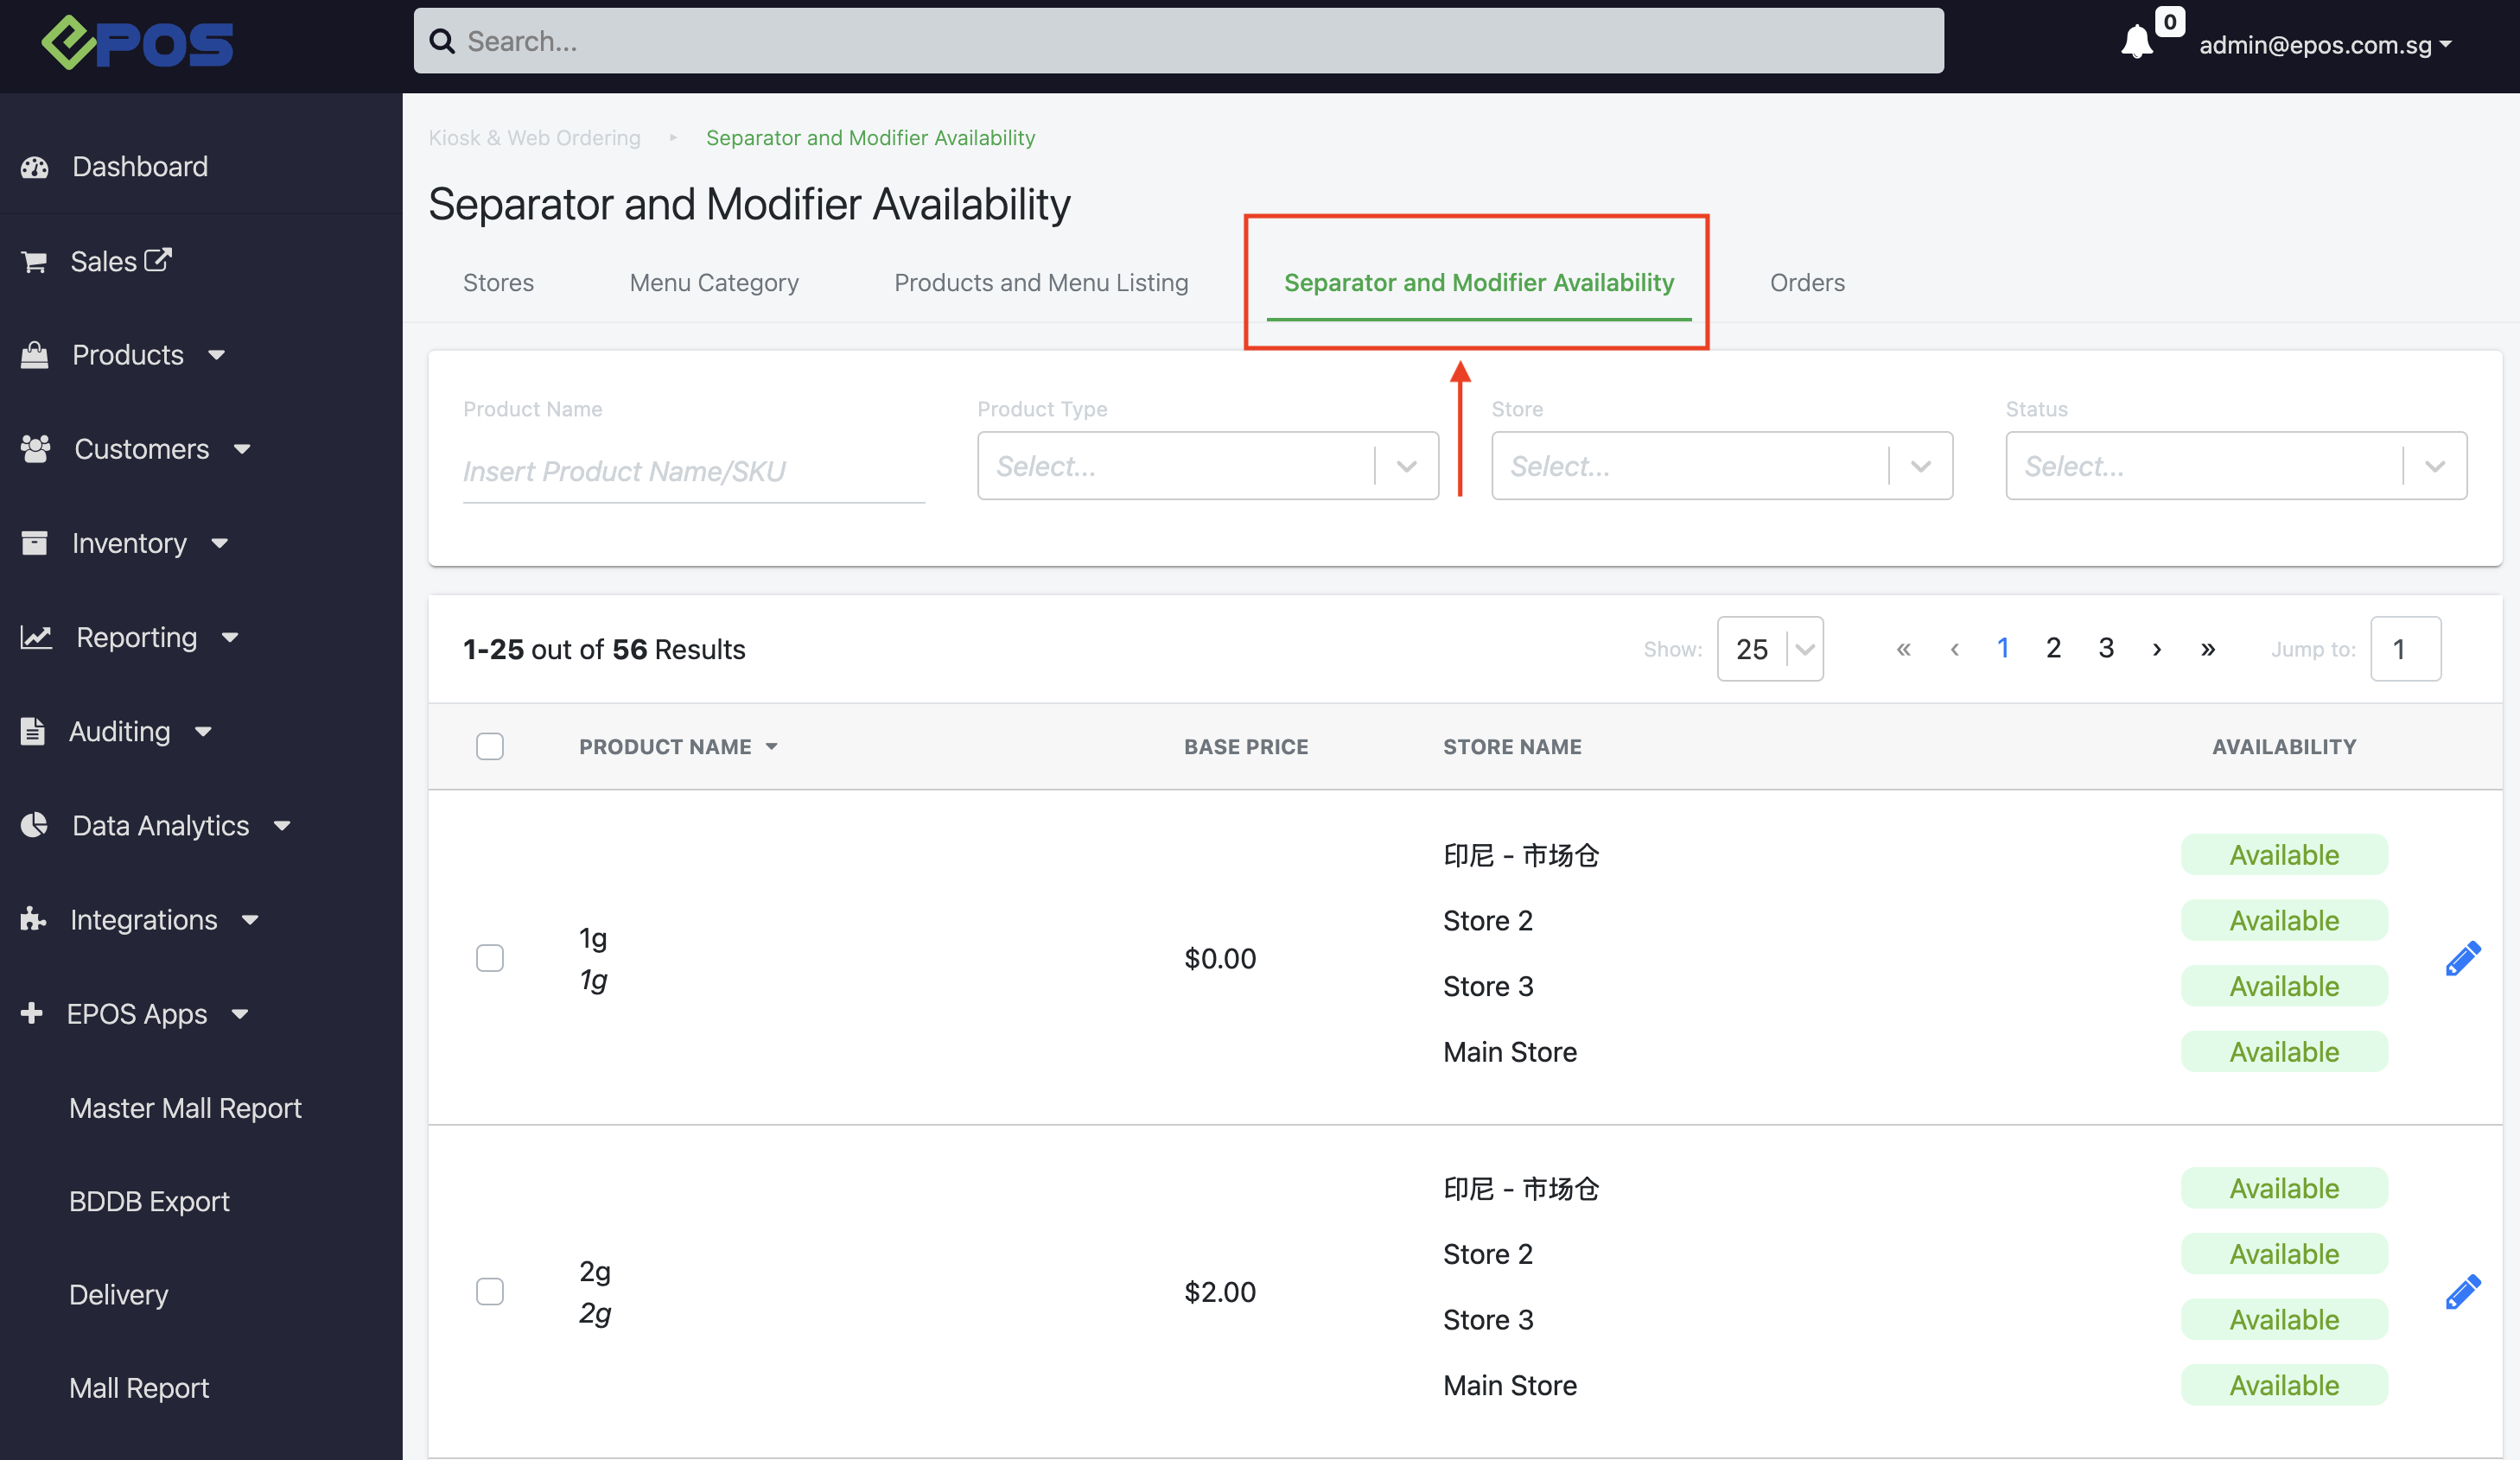
This section covers all the features and functions of the Separator and Modifier Availability tab.
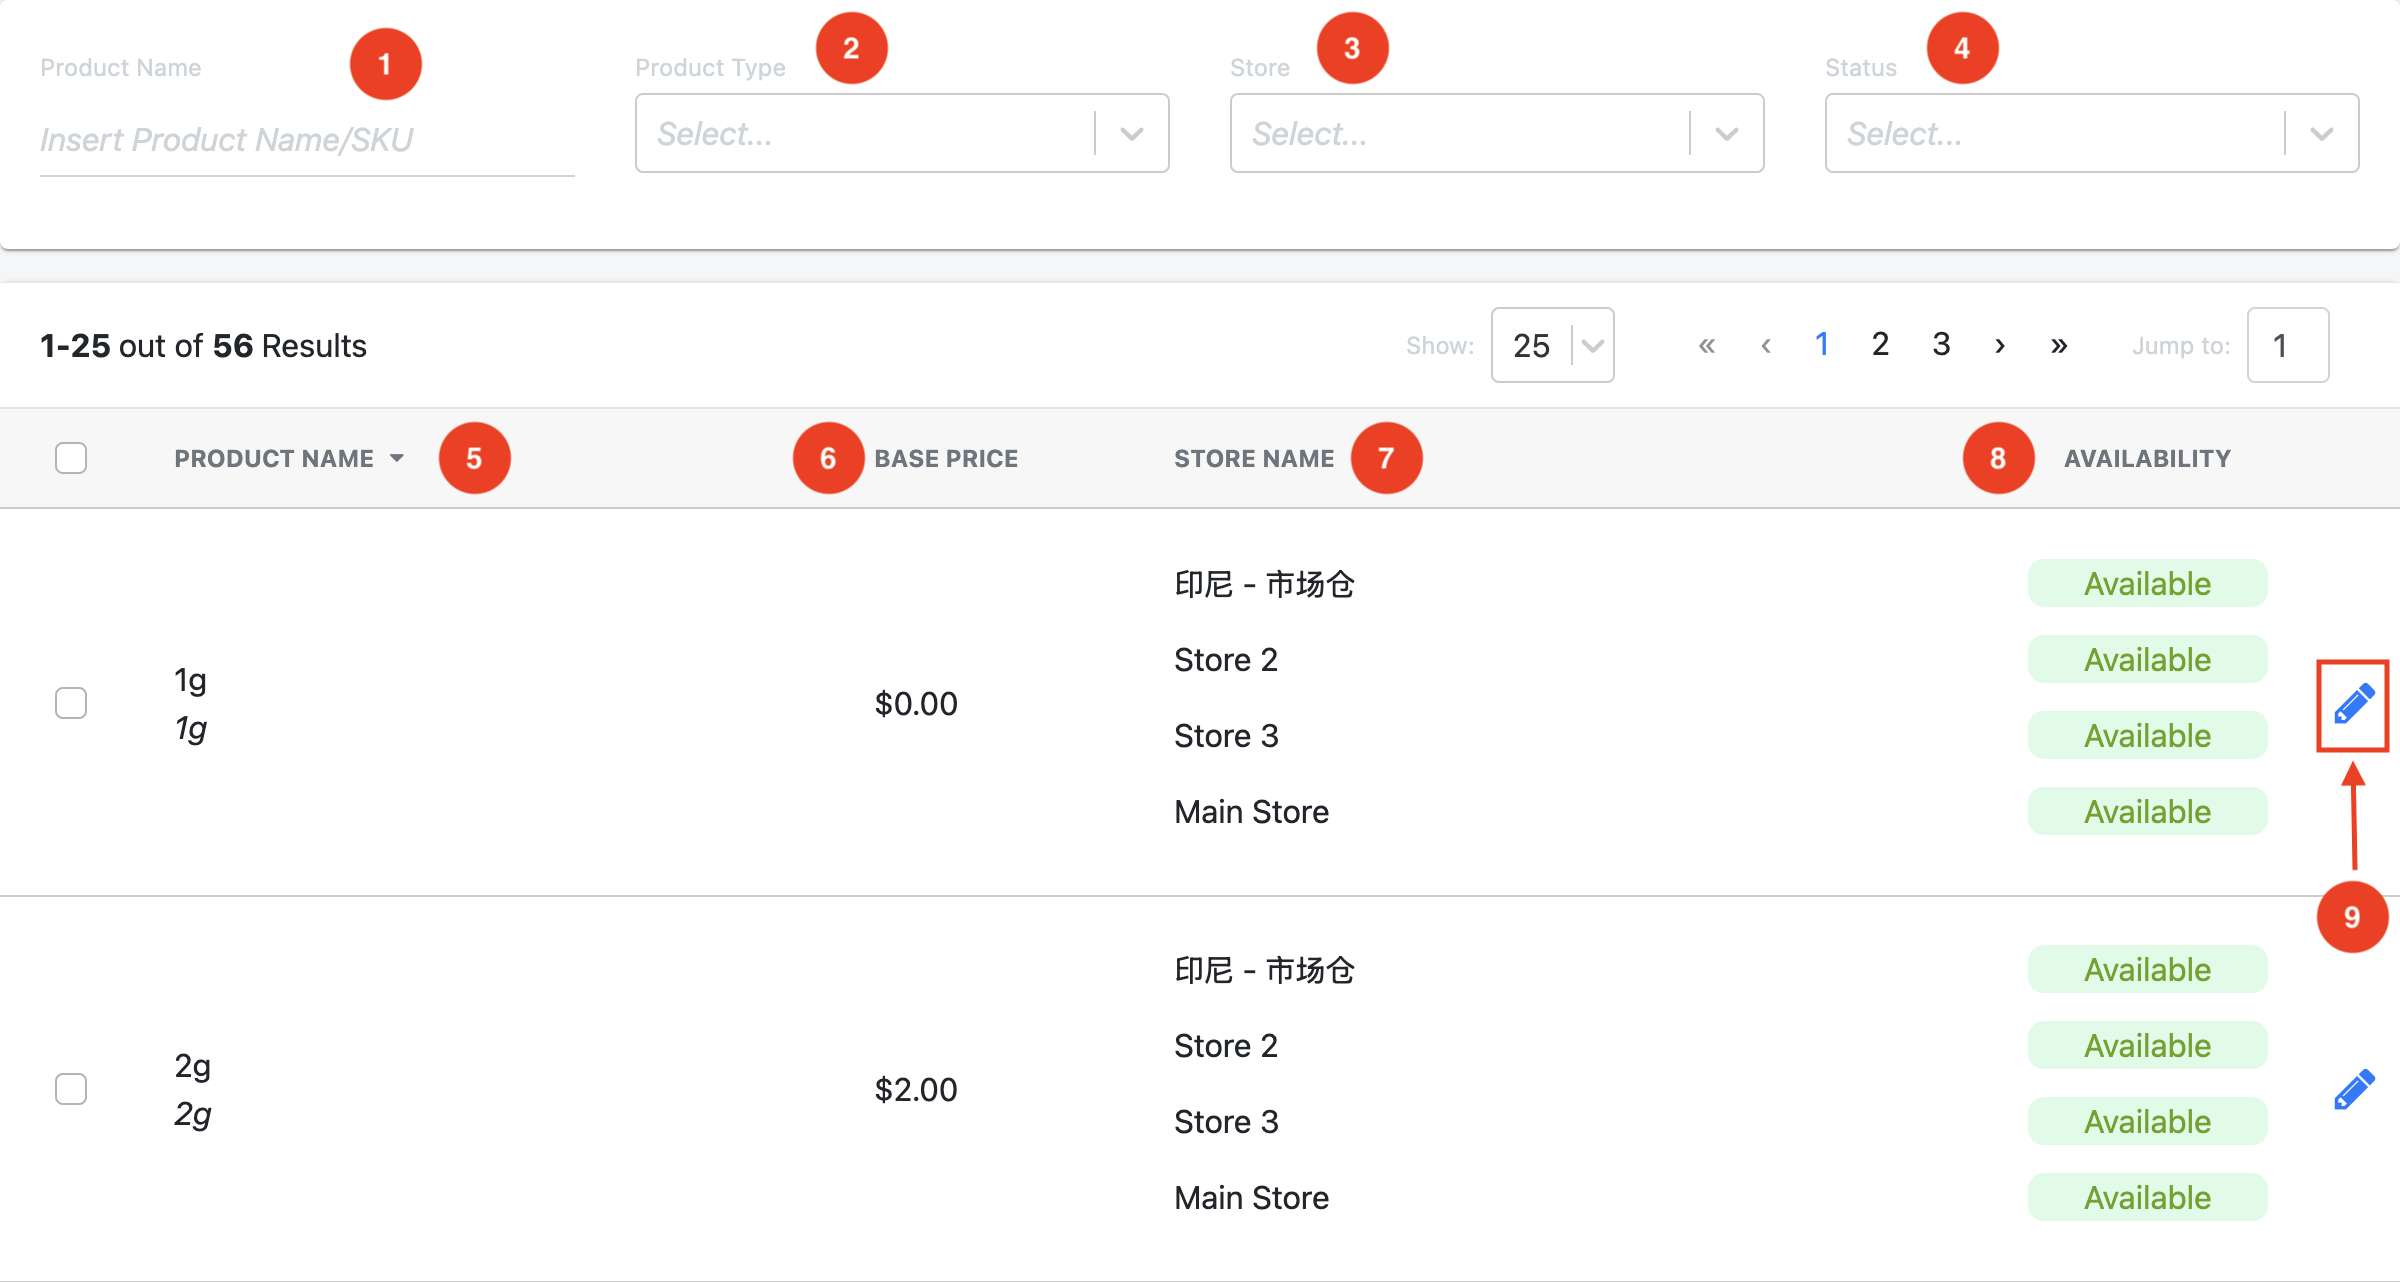
- Insert Product Name/SKU here to search for the desired modifier/separator product.
- Select the product type, whether its separator or modifier.
- Search for the specific Web App Store to display all of its separators and modifiers.
- Search for the status, whether it is available or unavailable.
- The product name of the separator/modifier will be shown here.
- The price will be reflected here.
- The Web Store Names will be displayed here.
- The availability of the product in each individual store will be shown here.
- Click here to edit the selected separator/modifier product.
Afterwards, users will be redirected to a new page as shown below.
Users can then toggle the availability of the separator on or off for that specific outlet.
Note: Users cannot add individual separators or modifiers. These will be automatically included when a product with separators and modifiers is added under the Product and Menu listing tab.
💡Users can then go to the frontend web app ordering to see the change, where the unavailable separator/modifier will be marked as “Sold Out” and can no longer be selected.
Orders Tab
This section displays the order histories of the Web Ordering App.
First, users click on the “Orders” tab under “Kiosk and Web Ordering.”
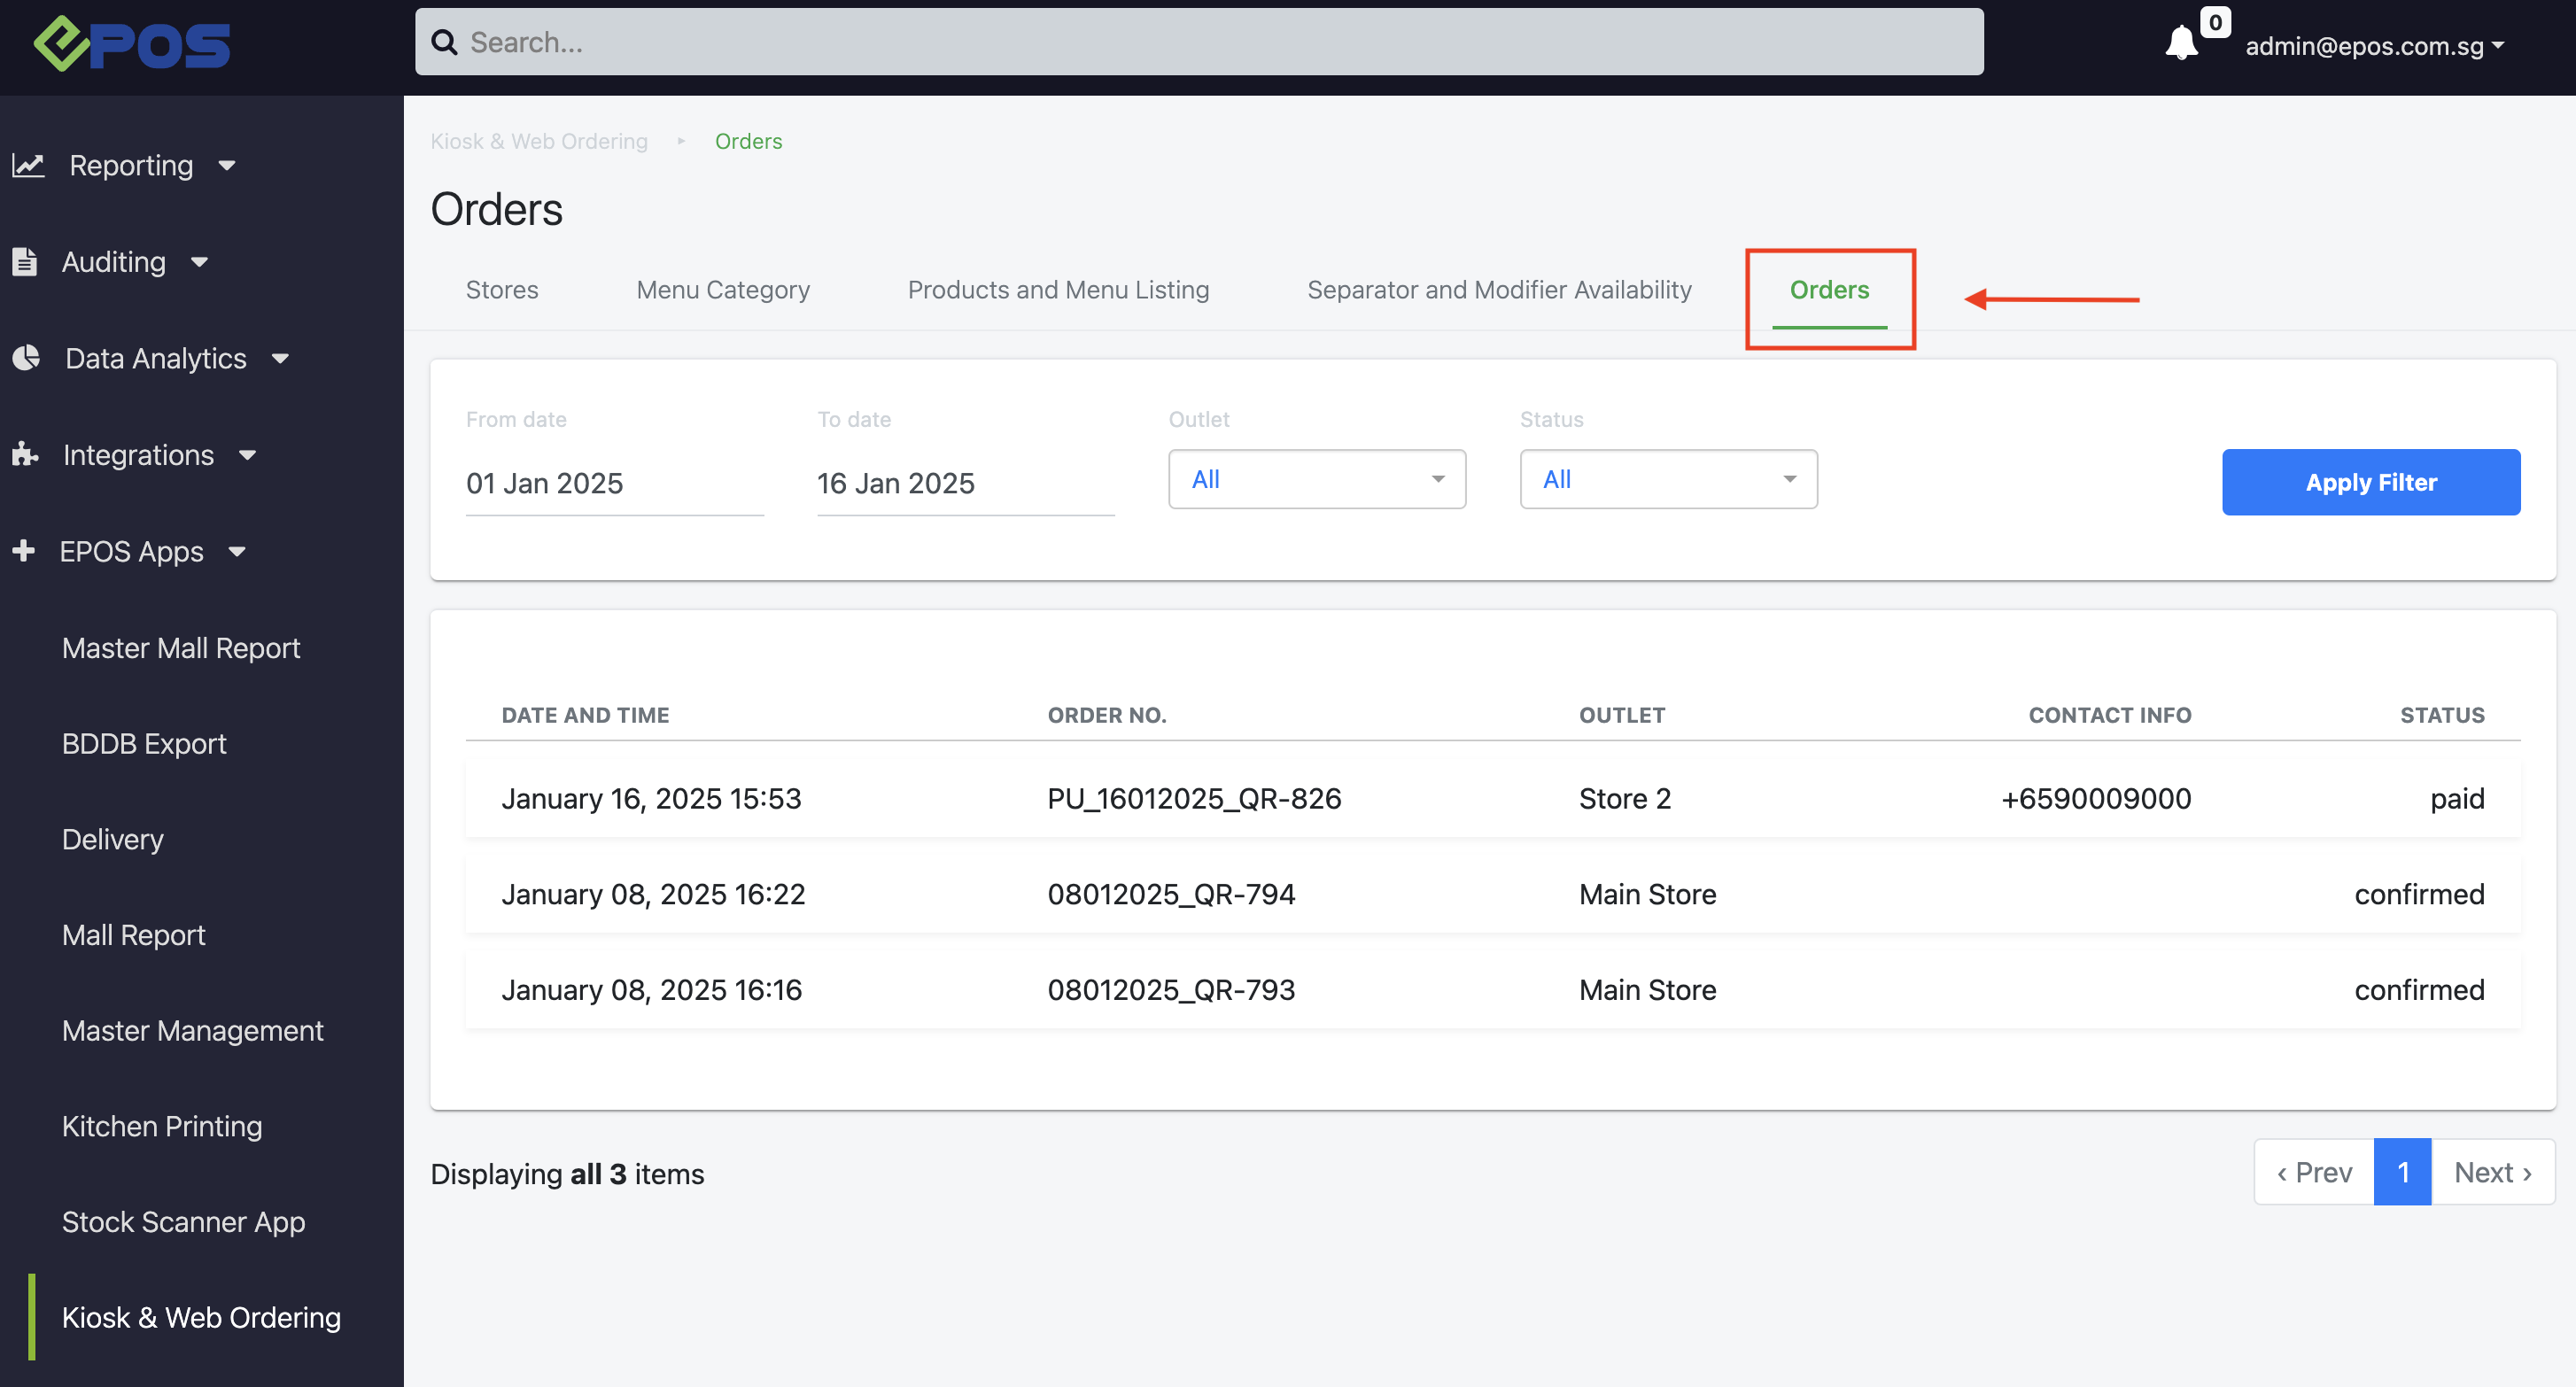
This section covers all the features and functions of the Orders tab.
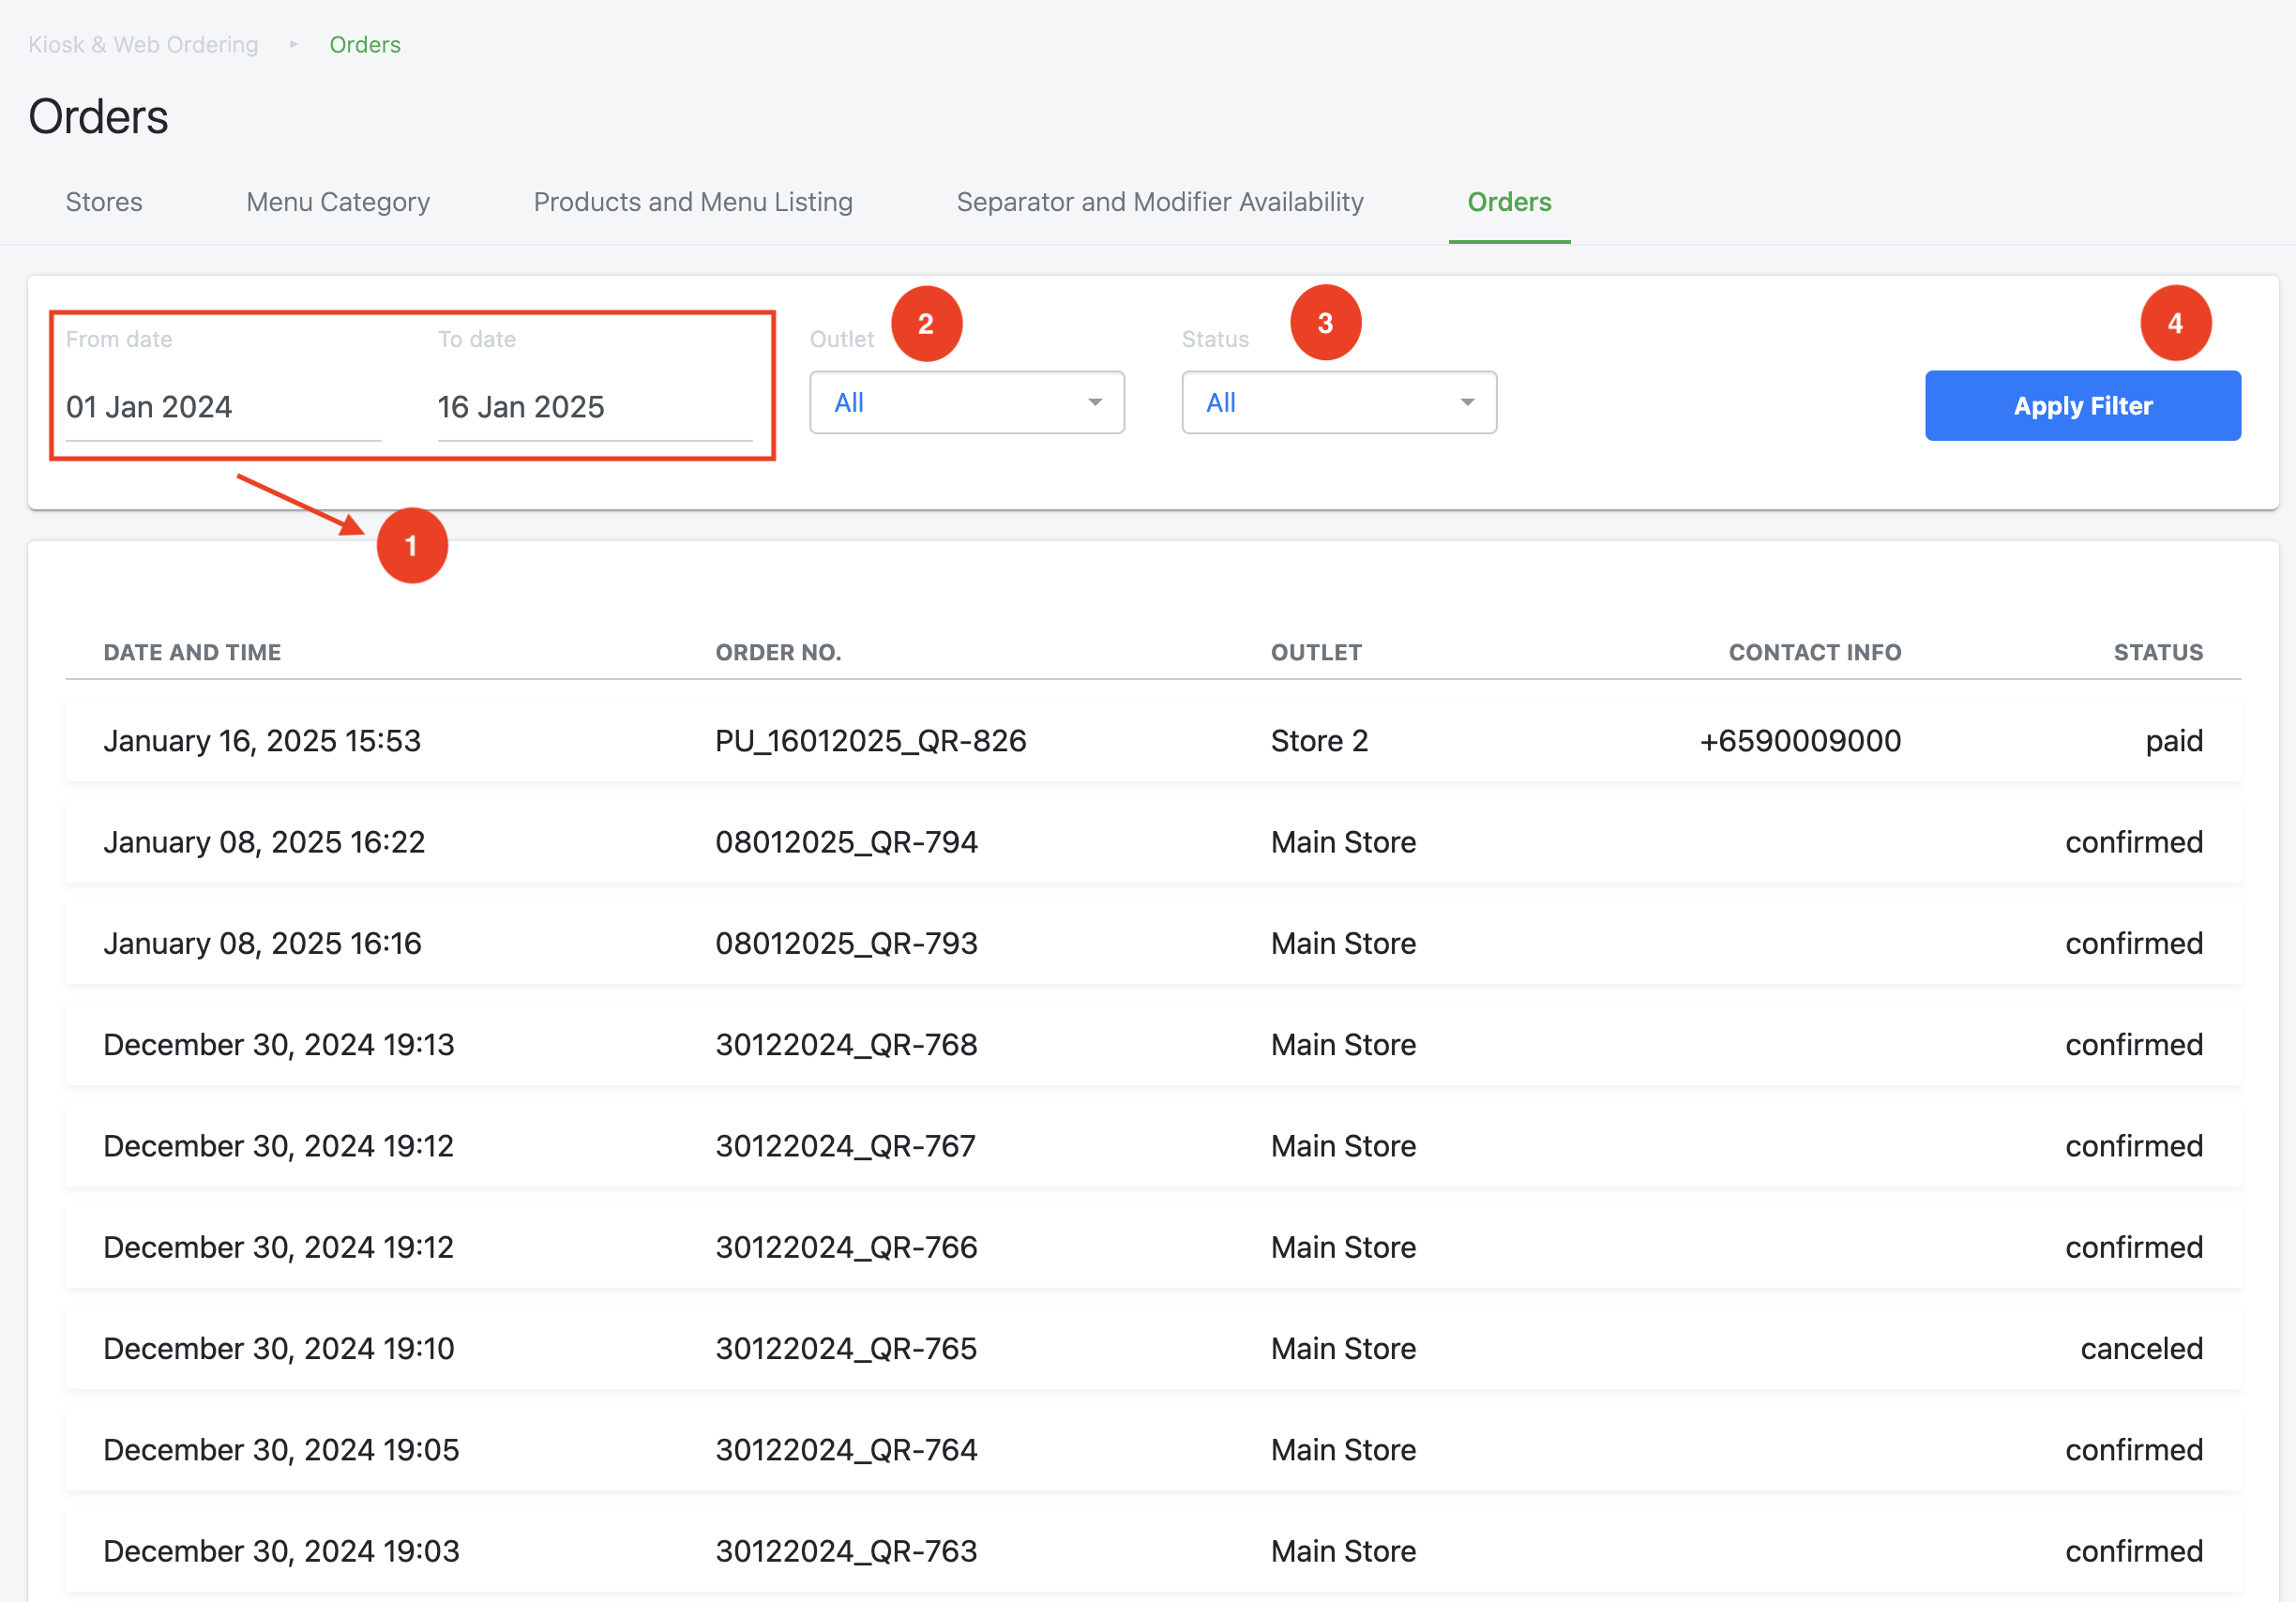
1. To filter results, select a specific date range to display orders between those dates.
2. Select the outlet where the order was placed.
3. Select the order status.
The following drop down list will then be displayed.
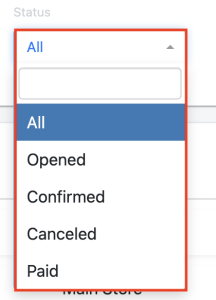
a. Opened: Order is received but has not been sent to the kitchen to be processed.
b. Confirmed: Order is received but not yet paid by the customer.
c. Canceled: The order is canceled by the customer.
d. Paid: The order is completed and has been paid by the customer.
4. Click “Apply Filter” to display the wanted results.