No products in the cart.
Release Changes
Jan 2024: Introduced New Voucher Targeting Option – All Registered Customers
Dec 2023: Dollar discount vouchers are now applicable to QR/web ordering orders, excluding the “Pay at cashier” payment modes.
Dec 2023: Implemented Dollar Discount Voucher Configuration For Vouchers
Dec 2023: Implemented “Minimum Spending” Configuration For Vouchers
Oct 2023: Voucher Settings Now Have Customer Redemption Limit
Sep 2023: Introduced a new voucher type: Cash Voucher and Discount Voucher
Looking for how to apply vouchers on the POS?
- For Discount Vouchers: Refer to frontend > voucher code
- For Cash Vouchers: Refer to frontend > voucher
⬇ Explore the functionalities of the vouchers page by toggling between tabs below.⬇
This section describes in detail the feature of Voucher. Users will be guided on creating and configuring Vouchers. This feature can be utilised as a one-time off voucher as well as repeated redemptions within a specific timeframe.
At the Features Panel, Click on Voucher to access Voucher main page.
These are the key areas of the voucher page:
1. Navigate to Vouchers tab
2. Create Voucher
Enables users to create new voucher series.
For more information, see the “Creating New Voucher Series” tab.
3. Voucher Series Details
Shows user information relating to a particular voucher series
- Name of the Voucher Series
- Description of the series
- Voucher Type (Discount/Cash)
- Discount Type (Percent/Amount)
- Amount
- Start Date & End Date
- Status
4. Voucher Series Configuration
Click on the name of the Voucher Series to be directed to the Configuration page of a particular Voucher Series.
To create a new voucher, refer to the “overview” tab (point i).
A “New Voucher” pop-up would open. Select the appropriate voucher type – Discount Voucher or Cash Voucher.
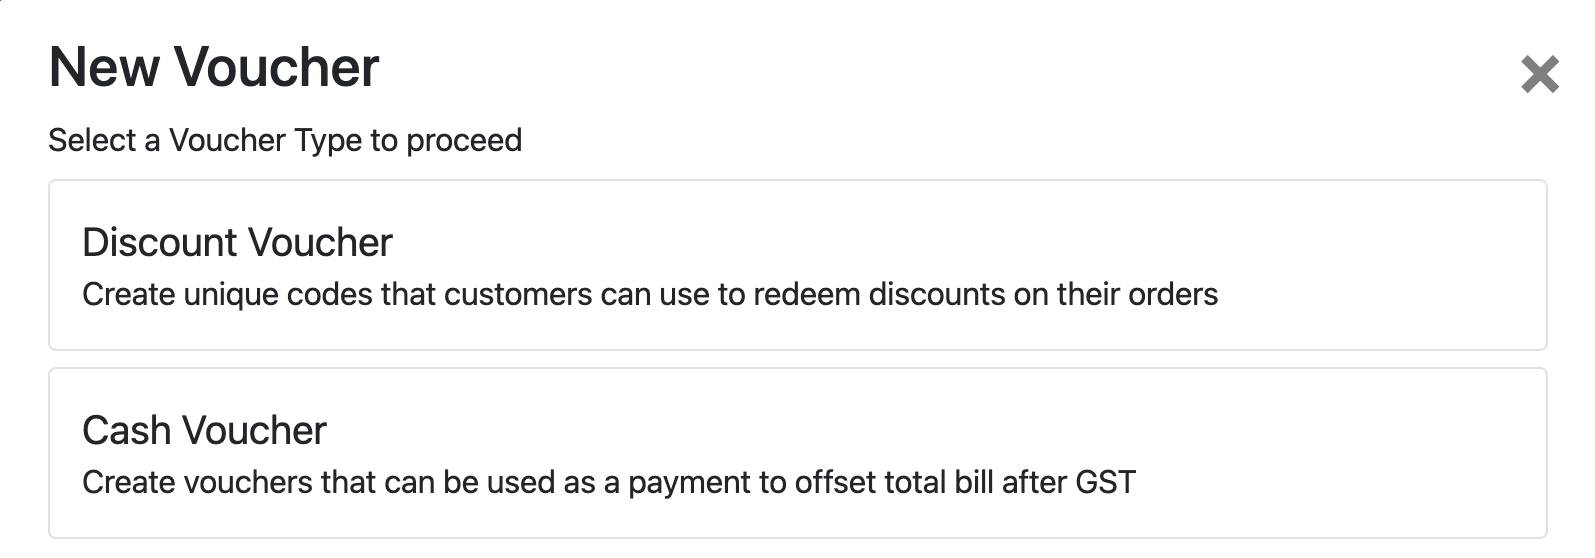 💡 Discount Vouchers are applied as line item adjustment
💡 Cash Vouchers are applied as Payment adjustment
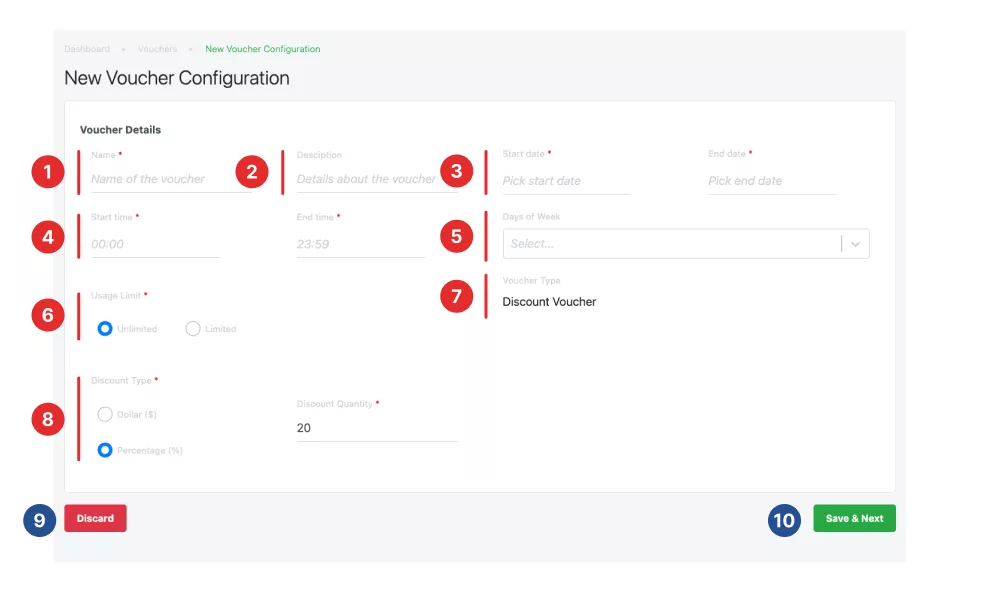
After selecting the voucher type, you will be brought to the “New Voucher Configurations Page”, the first part of configuring your new voucher.
Part 1 – New Voucher Configuration (Voucher General Setting)
1. Name
Enter the name of the voucher series.
–
2. Description
Enter details or remarks for the voucher series.
–
3. Start Date and End Date
Select the validity period for the voucher series.
–
4. Start Time and End Time
Select the validity hours within a day for the voucher series.
–
5. Days of Week
Select the particular days within a week for the voucher to be valid.
💡 Leaving this blank would mean that the voucher is available on all days of the week
–
6. Usage Limit
Select either
- Unlimited: Allows voucher series to be redeemed unlimited times.
- Limited: Limits the voucher series to be redeemed for a specific number of times.
- Enter the Limited Quantity, the number of times for voucher to be redeemed until voucher is invalid.
–
7. Voucher Type
Reflects the Voucher Type created, either Discount Voucher or Cash Voucher. For more information, scroll back to the top of this page.
–
8. Discount Type and Discount Quantity
Select either
- Dollar ($): Voucher will give a discount in dollar terms
- Percentage (%): Voucher will give a discount in percentage terms.
- Amount: Amount to be discounted by voucher.
–
9. Discard
This button cancels the voucher creation process.
–
10. Save & Next
Click this to move on to the next stage of voucher configuration.
💡 Ensure that the compulsory fields marked with an asterisk (*) are filled in to proceed.
–
Part 2 – New Voucher Configuration (Voucher Targeting Setting)
This is the second part of configuring your new voucher.
Target this voucher to
1. Available to
Enables users to select the applicable customer type.
| Able to limit to 1 redemption per customer? | Require customers to be tagged to order? | Does the customer have to be part of either a customer group or a membership tier | |
| Everyone | ❌ | ❌ | – |
| All Registered Customers | ✔️ | ✔️ | ❌ |
| Customer Group / Membership Tier | ✔️ | ✔️ | ✔️ |
2. Available at
Enables users to select relevant outlets that accept the voucher.
💡 Leave blank for default option: Everywhere.
–
3. Limit to 1 redemption per customer
Enable this configuration to limit customers in the targetted customer group / membership tier to only ONE REDEMPTION of the voucher.
Disable this configuration to allow customers to redeem the voucher multiple times.
💡 A scenario is when the voucher’s limited quantity is set to 100 and this configuration has been enabled, enable either “all registered customers” or “Customer group / membership tier” so only the first 100 customers can only redeem the voucher once.
–
4. Minimum Spending
- No minimum amount: Customers will be able to use the voucher without any minimum spending amount
- Minimum dollar amount: Customers need to spend a specified minimum dollar amount to use the voucher
–
5. Specific product variants below
This section shows the product variants that this voucher could be applied to. To add product variants, move on to the part 3 – Add variant.
💡 To create new product, go to Add Products
–
6. Add Variant
Click this to add product variants
–
7. Discard
5his button cancels the voucher creation process.
–
8. Save & Next
Click this to move on to the next stage of voucher configuration.
💡 Ensure that the compulsory fields marked with an asterisk (*) are filled in to proceed.
–
Part 3 – New Voucher Configuration (Voucher Serial Number Creation)
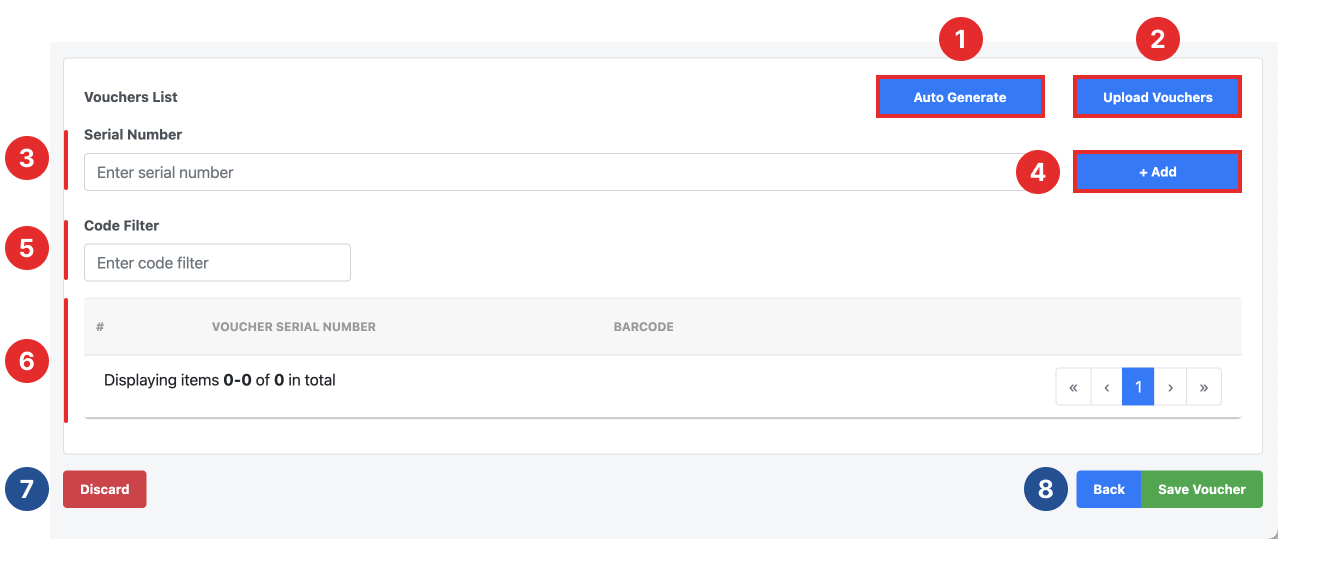
There are 3 ways to create voucher serial numbers on this page.
- Auto Generate – Random Alphanumerics
- Upload Vouchers – Bulk Importing
- Serial Number Manual Input Voucher
–
1. Auto Generate
Enables the BACKEND PORTAL to auto-generate Serial Numbers for the Voucher Series.
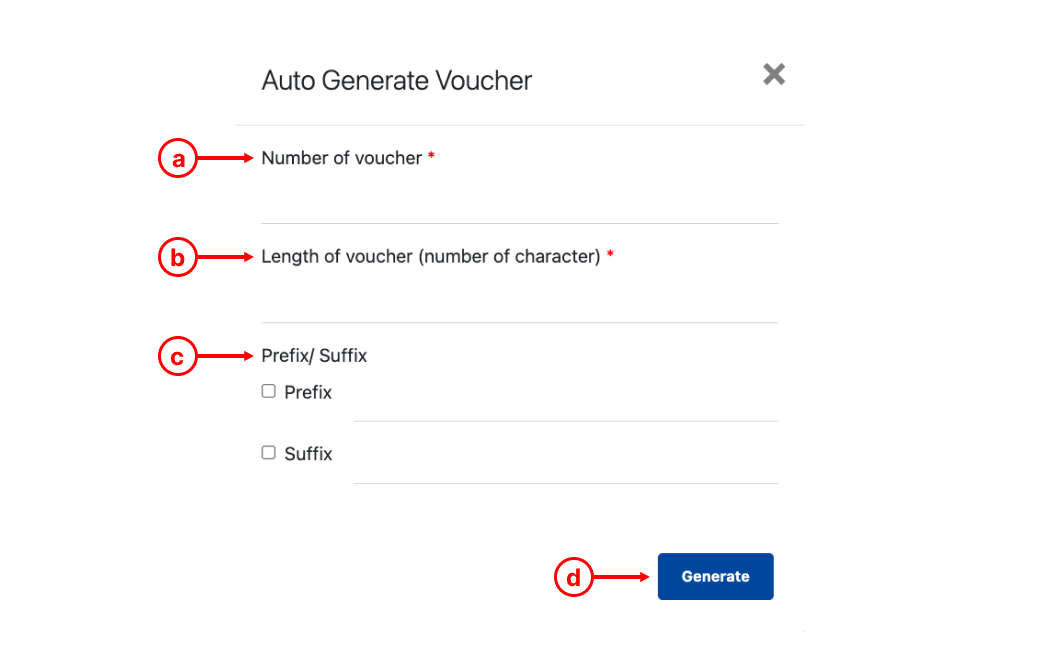 a. Number of vouchers to be generated.
b. Number of characters for the serial number.
c. Prefix/Suffix: ☑️ if prefix or suffix is needed.
d. Click on Generate once done.
💡Prefix is the group of specific text to be used at the beginning of the serial number, while suffix is used at the end.
–
2. Upload Vouchers
Allows users to bulk import customized serial numbers.
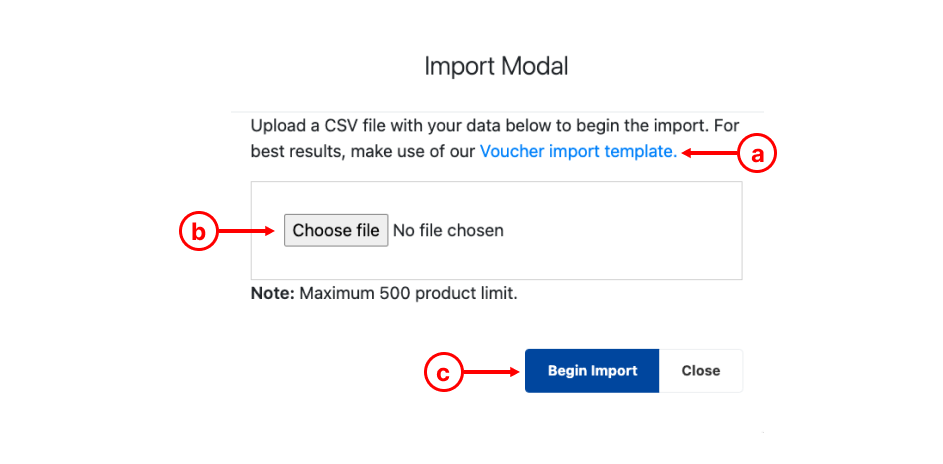 a. Download Codes import Template, open the template and enter serial numbers in column A.
b. Once completed, upload to the BACKEND PORTAL.
c. Click on Begin Import once done, the entire list of Serial Numbers will be added to BACKEND PORTAL.
–
3. Serial number – Manual Input Voucher
Users can enter Voucher Codes freely one line at a time. Once Voucher Code is entered, click on +Add (item 4) to create a new line.
–
4. +Add
Click this button once voucher code has been entered in step 3.
–
5. Code Filter
Enables users to apply filters to the list of vouchers created.
–
6. Shows the list of Voucher Serial Numbers and its respective barcode.
–
7. Discard
This button cancels the voucher creation process.
–
8. Back / Save Voucher
Back: Click this to move back to the previous stage of voucher configuration. (Part 2)
Save Voucher: Click this to save this voucher configuration.
–
To access Voucher Series Configuration, click on the Name of the Voucher Series.
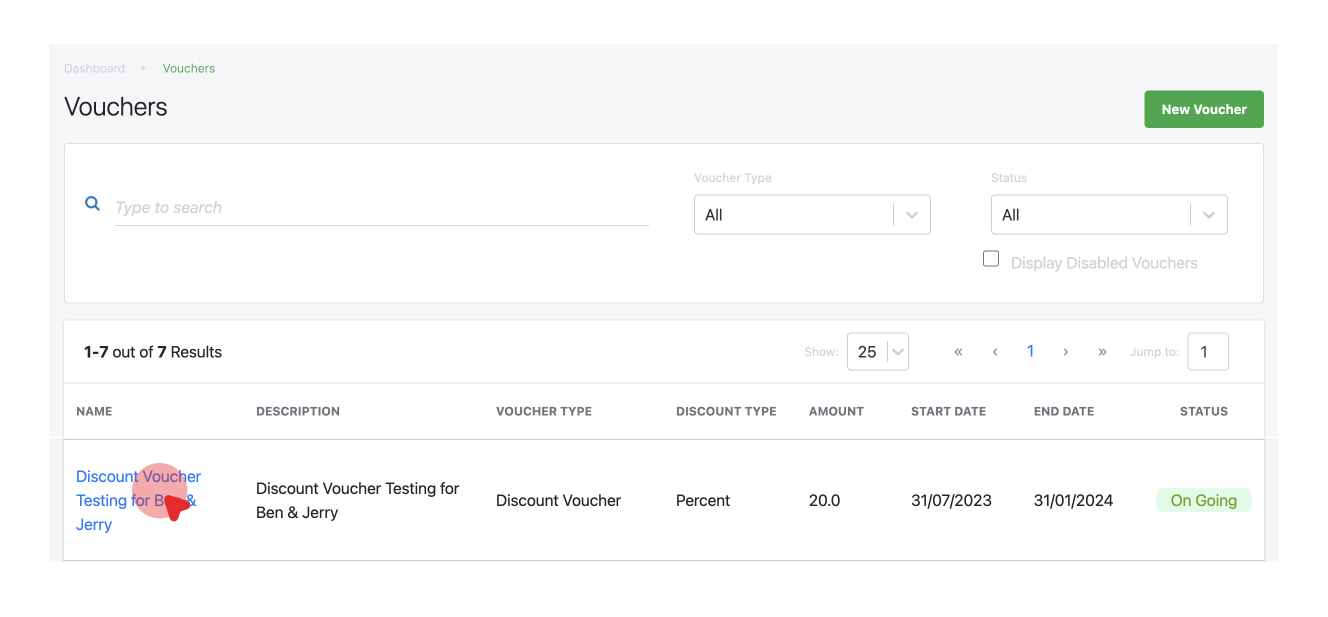
Users will then be directed to the Voucher Configuration page.
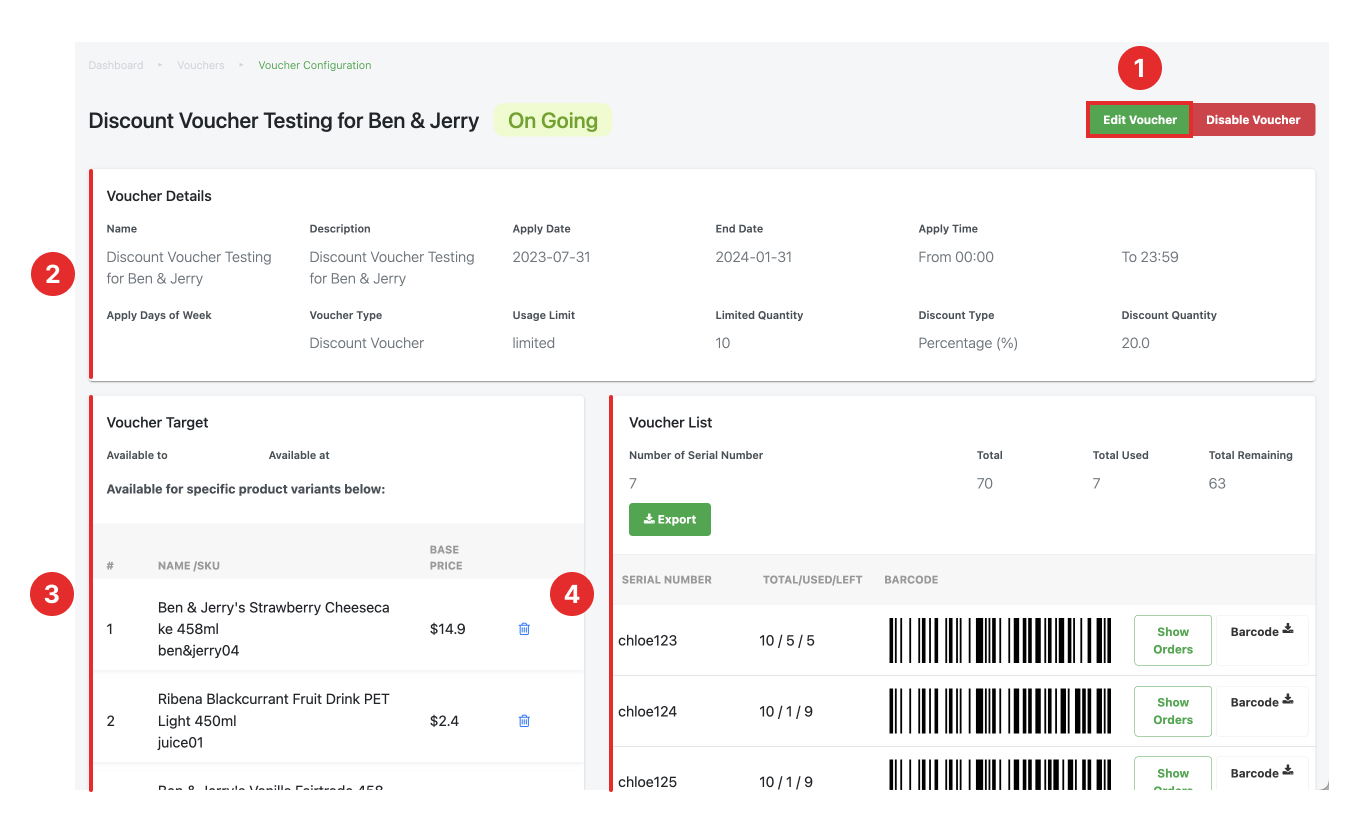
1. Edit Voucher
Directs users Edit Voucher Page, similar to Create New Voucher page. The only difference with the Create New Voucher page is that Voucher numbers can be deleted per line under the Vouchers List.

Click on Save once done.
–
2. Voucher Details
Shows users the details related to the entire Voucher Series.
- Name
- Description
- Start & End Date; Start & End time
- Applicable days within a week
- Voucher Type
- Discount Type and Amount
- Applicable Customer
- Applicable Store Location
–
3. Voucher Target
Shows users the target details related to this voucher series
- Target customers
- Target store locations
- Limit to 1 redemption per customer
- Minimum spending
- Product variants
- Product variant base price
- Delete product variants
–
4. Voucher List Shows users the information on the used and unused vouchers. Users are also able to see the breakdown of each voucher number.
- Number of Serial Numbers in the Voucher Series
- Total number of vouchers (the number of serial numbers multiplied with limited quantity which was configured previously).
- Total Used
- Total Remaining
–

