No products in the cart.
This section covers the features and functions of our payment terminal.
⬇ Explore the functionalities of the delivery order page by toggling between tabs below.⬇
Our Credit Card Payment Terminal allows customers to pay using credit/debit cards, mobile wallets, and QR code payments.
Working hand-in-hand with our POS to create a smoother, faster checkout experience.
Making payments more seamless at the counter.

Supported Payment Methods
Our Credit Card Terminal currently supports the following payment options:
- Credit Cards: Visa, MasterCard
- QR Code Payments: Touch ’n Go, Alipay, Kakao Pay, TrueMoney
- Coming Soon: ShopeePay, GrabPay, WeChat Pay
Note: PayNow is currently not supported on the Antom Credit Card Terminal. However, it can be enabled directly through the POS system. For help setting up PayNow, please contact our team at 8482-1888
Why choose our credit card terminal?
Using the credit card terminal with your POS system comes with a few benefits:
- Competitive Transaction Fees: We offer competitive transaction fees, saving more on payment processing costs.
- Next-Day Payouts (T+1 Working Days): Funds are settled on the next working day, supporting smoother cash flow management.
- Easy Reconciliation: View and monitor your settlement report through the Antom portal with transparent breakdown of all transactions.
Here are some videos to guide you through the payment flow. Including the POS, Kiosk, and QR Ordering systems.
1. POS Transactions
Card Payments
E-Wallet Payments
2. Kiosk
Card Payments
E-Wallet Payments
3. QR Ordering
Users currently have two options to perform refunds or void payments:
- Directly from the Credit Card Terminal
- Antom Portal
Note: You will need to refund/void the transaction in the POS Frontend first before initiating any refund/void in the credit card terminal or Antom portal. To learn more about how to void/return orders on the POS, please refer to this link.
- Refunds triggered will be paid out instantaneously to customers
Refunds Processed via the Credit Card Terminal
Note: Currently, our payment terminal does not support automatic refund processes to the POS. To process a refund, users should first void or return the order on the POS to keep settlement reports accurate, then perform the refund separately on the payment terminal.
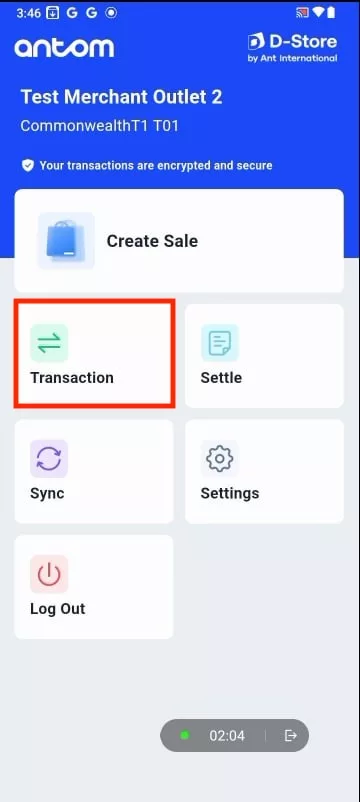
1. Navigate to the Transactions tab.
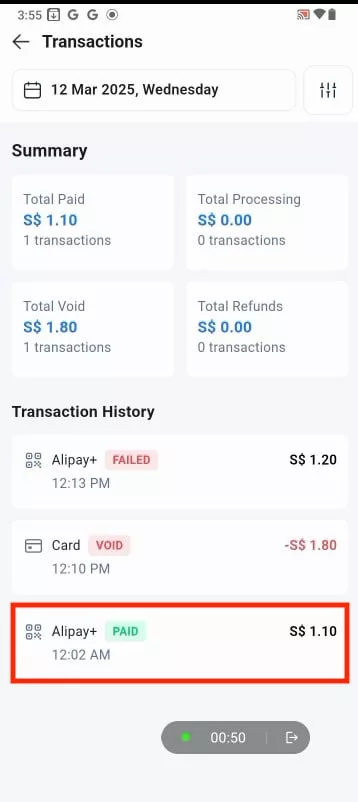
2. Select the transaction that has already been paid and needs to be voided, as shown below.
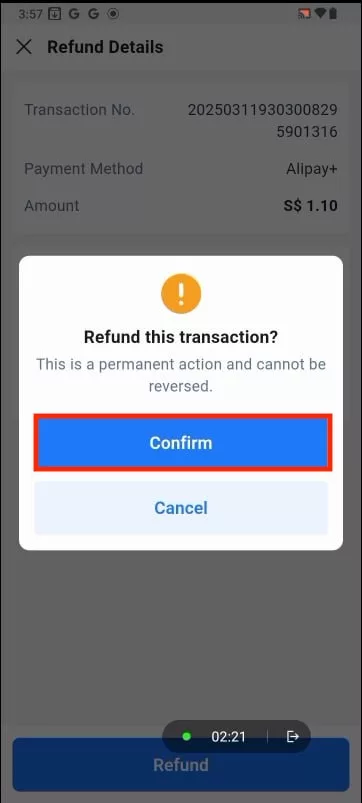
3. Tap the Refund button.

4. Enter the associated PIN for approval.

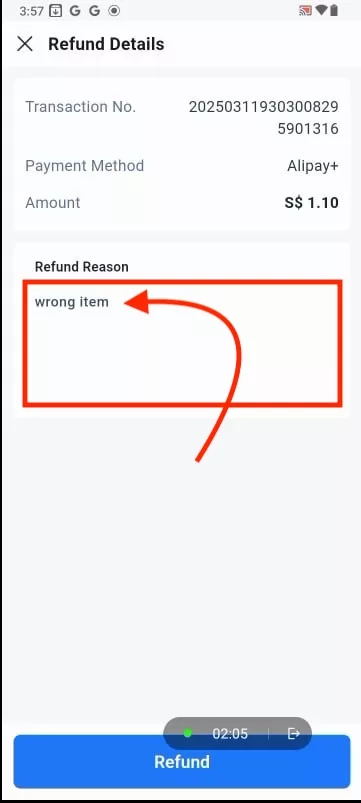
5. Provide a refund reason and click Refund to proceed.
6. Click Confirm to finalize the refund.
7. The transaction will now be successfully voided.
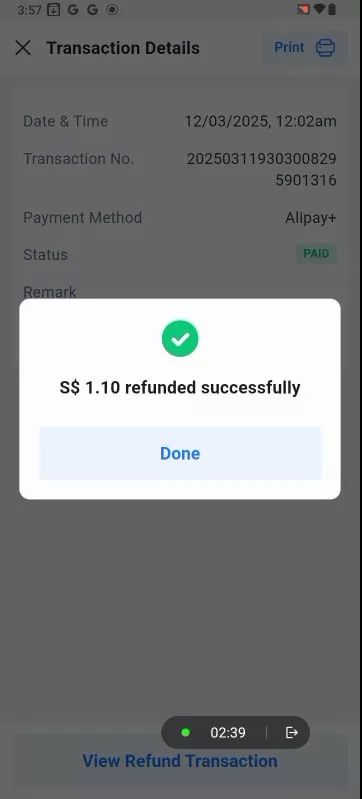
8. To verify, return to the Transactions tab. The payment will be marked as Refunded, with the reason displayed below.
Refunds Processed via the Antom Portal
1. Users are required to access the backend dashboard through the following link: https://dashboard.alipay.com/global-payments/home
2. Select Transaction > Transaction Query
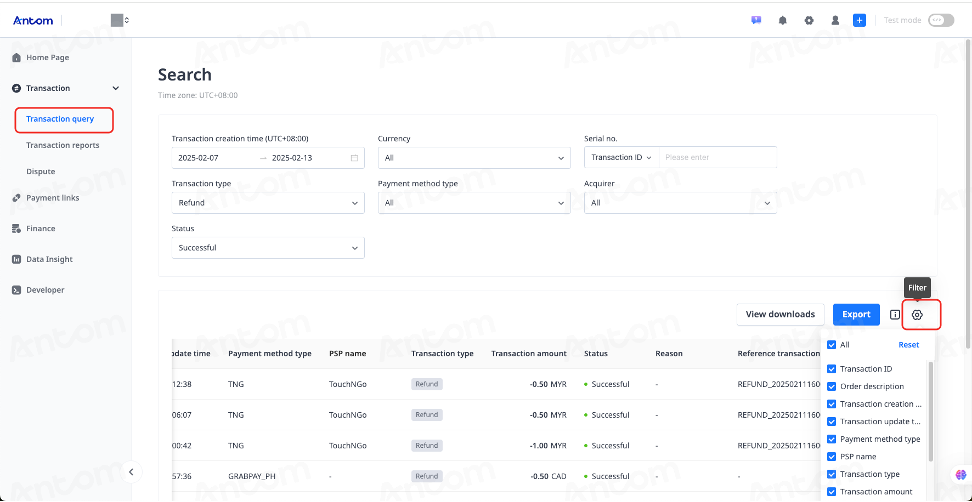
3. Filter the transactions to be refunded or directly search for the Transaction ID of the transaction to be refunded.
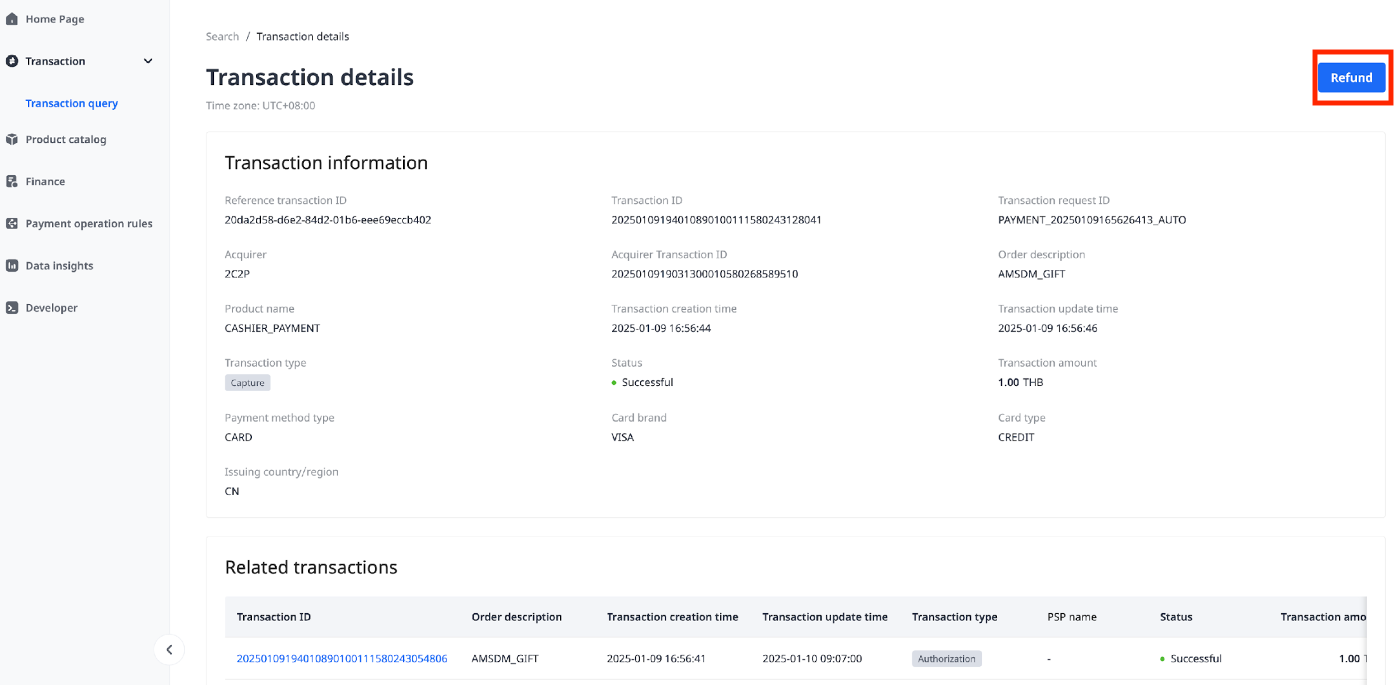
4. Click the Transaction ID to be taken to a new display as shown below:
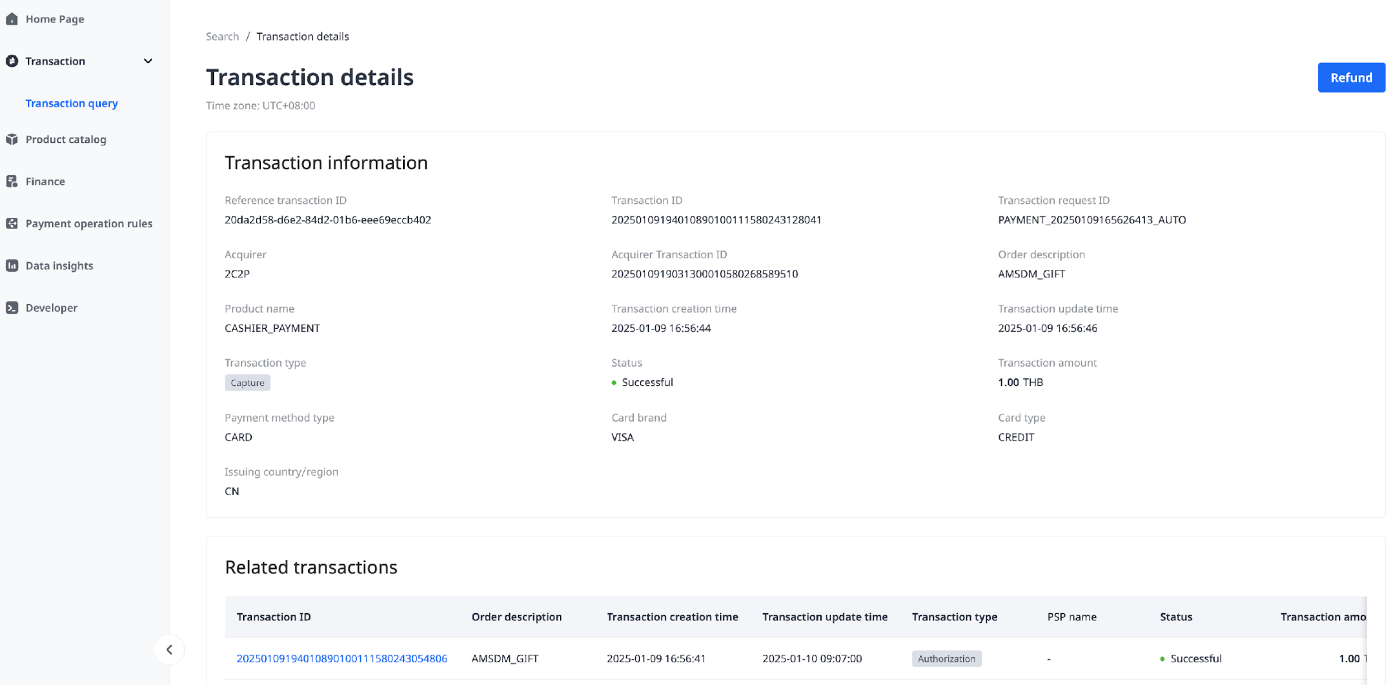
5. Click Refund to initiate a refund process.
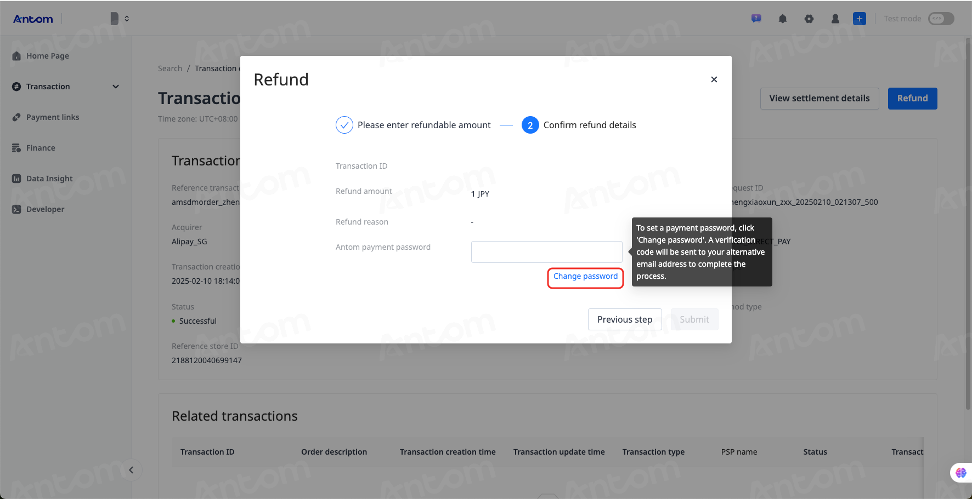
6. In the refund process, you need to:
- Enter the refund amount and refund reason (optional).
- Confirm the refund information, enter the Antom payment password, and click Submit.
Note: When initiating a refund for the first time through Antom Dashboard, you need to click Change Password below the Antom payment password input box to set a password as shown below:
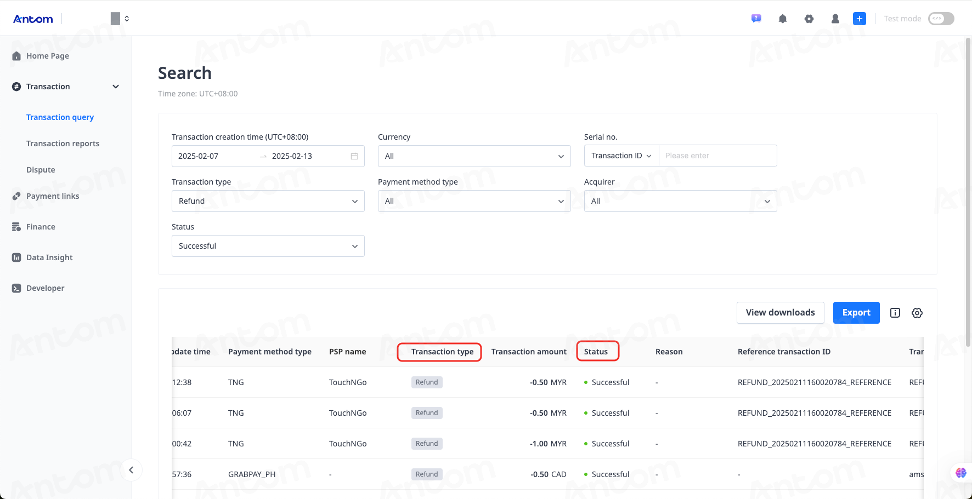
7. To confirm a successful refund, return to the transaction query page, filter the transaction, and check that the transaction type shows as Refund and the Status is Successful, indicating that the transaction has been successfully refunded.
Note: Click a specific transaction ID to view the refund details for the transaction.
Note: Transactions are stored for up to 40 days. For access to records beyond this period, please contact us through the WhatsApp GroupChat.
In this section we will explain how users can Filter and Download Settlement Reports.
To find the Antom Portal User Guide, please refer to the deck here.
1. Login into your Antom Dashboard

2. Navigate to Settlement Reports
- Go to Finance > Settlement Reports.
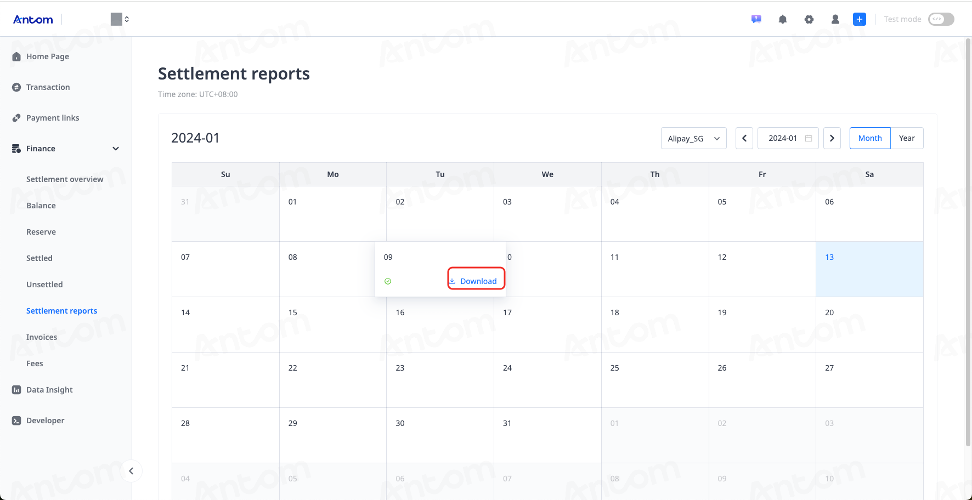
3. Filter by Month
- Select a month from the filter options.
- Hover your mouse over a specific day in the month to see the Download button appear.
- Click the Download button to download settlement reports for that day.
Note: Settlement reports are generated on the second day after the bank receipt for each batch settlement (T+1).
For example, transactions made on the 24th will be reflected in the settlement details and summary reports on the 25th. So, when you select and download the report for the 25th, it will contain the settlement transactions for the 24th.
4. Filter by Year
- Select the year you want to filter by.
- Download monthly settlement reports for each month.
Note: Monthly reports are usually generated by the second day of the following month.
In this section, we’ll explain the functions of:
- Payment Terminal Hardware: Explanation of the hardware functions.
- Changing the Receipt Roll: Guide on how to replace the receipt roll for the payment terminal.
- Enabling Remote Assistance: Instructions on how to enable remote support, allowing our team to assist with configuration or troubleshooting issues.
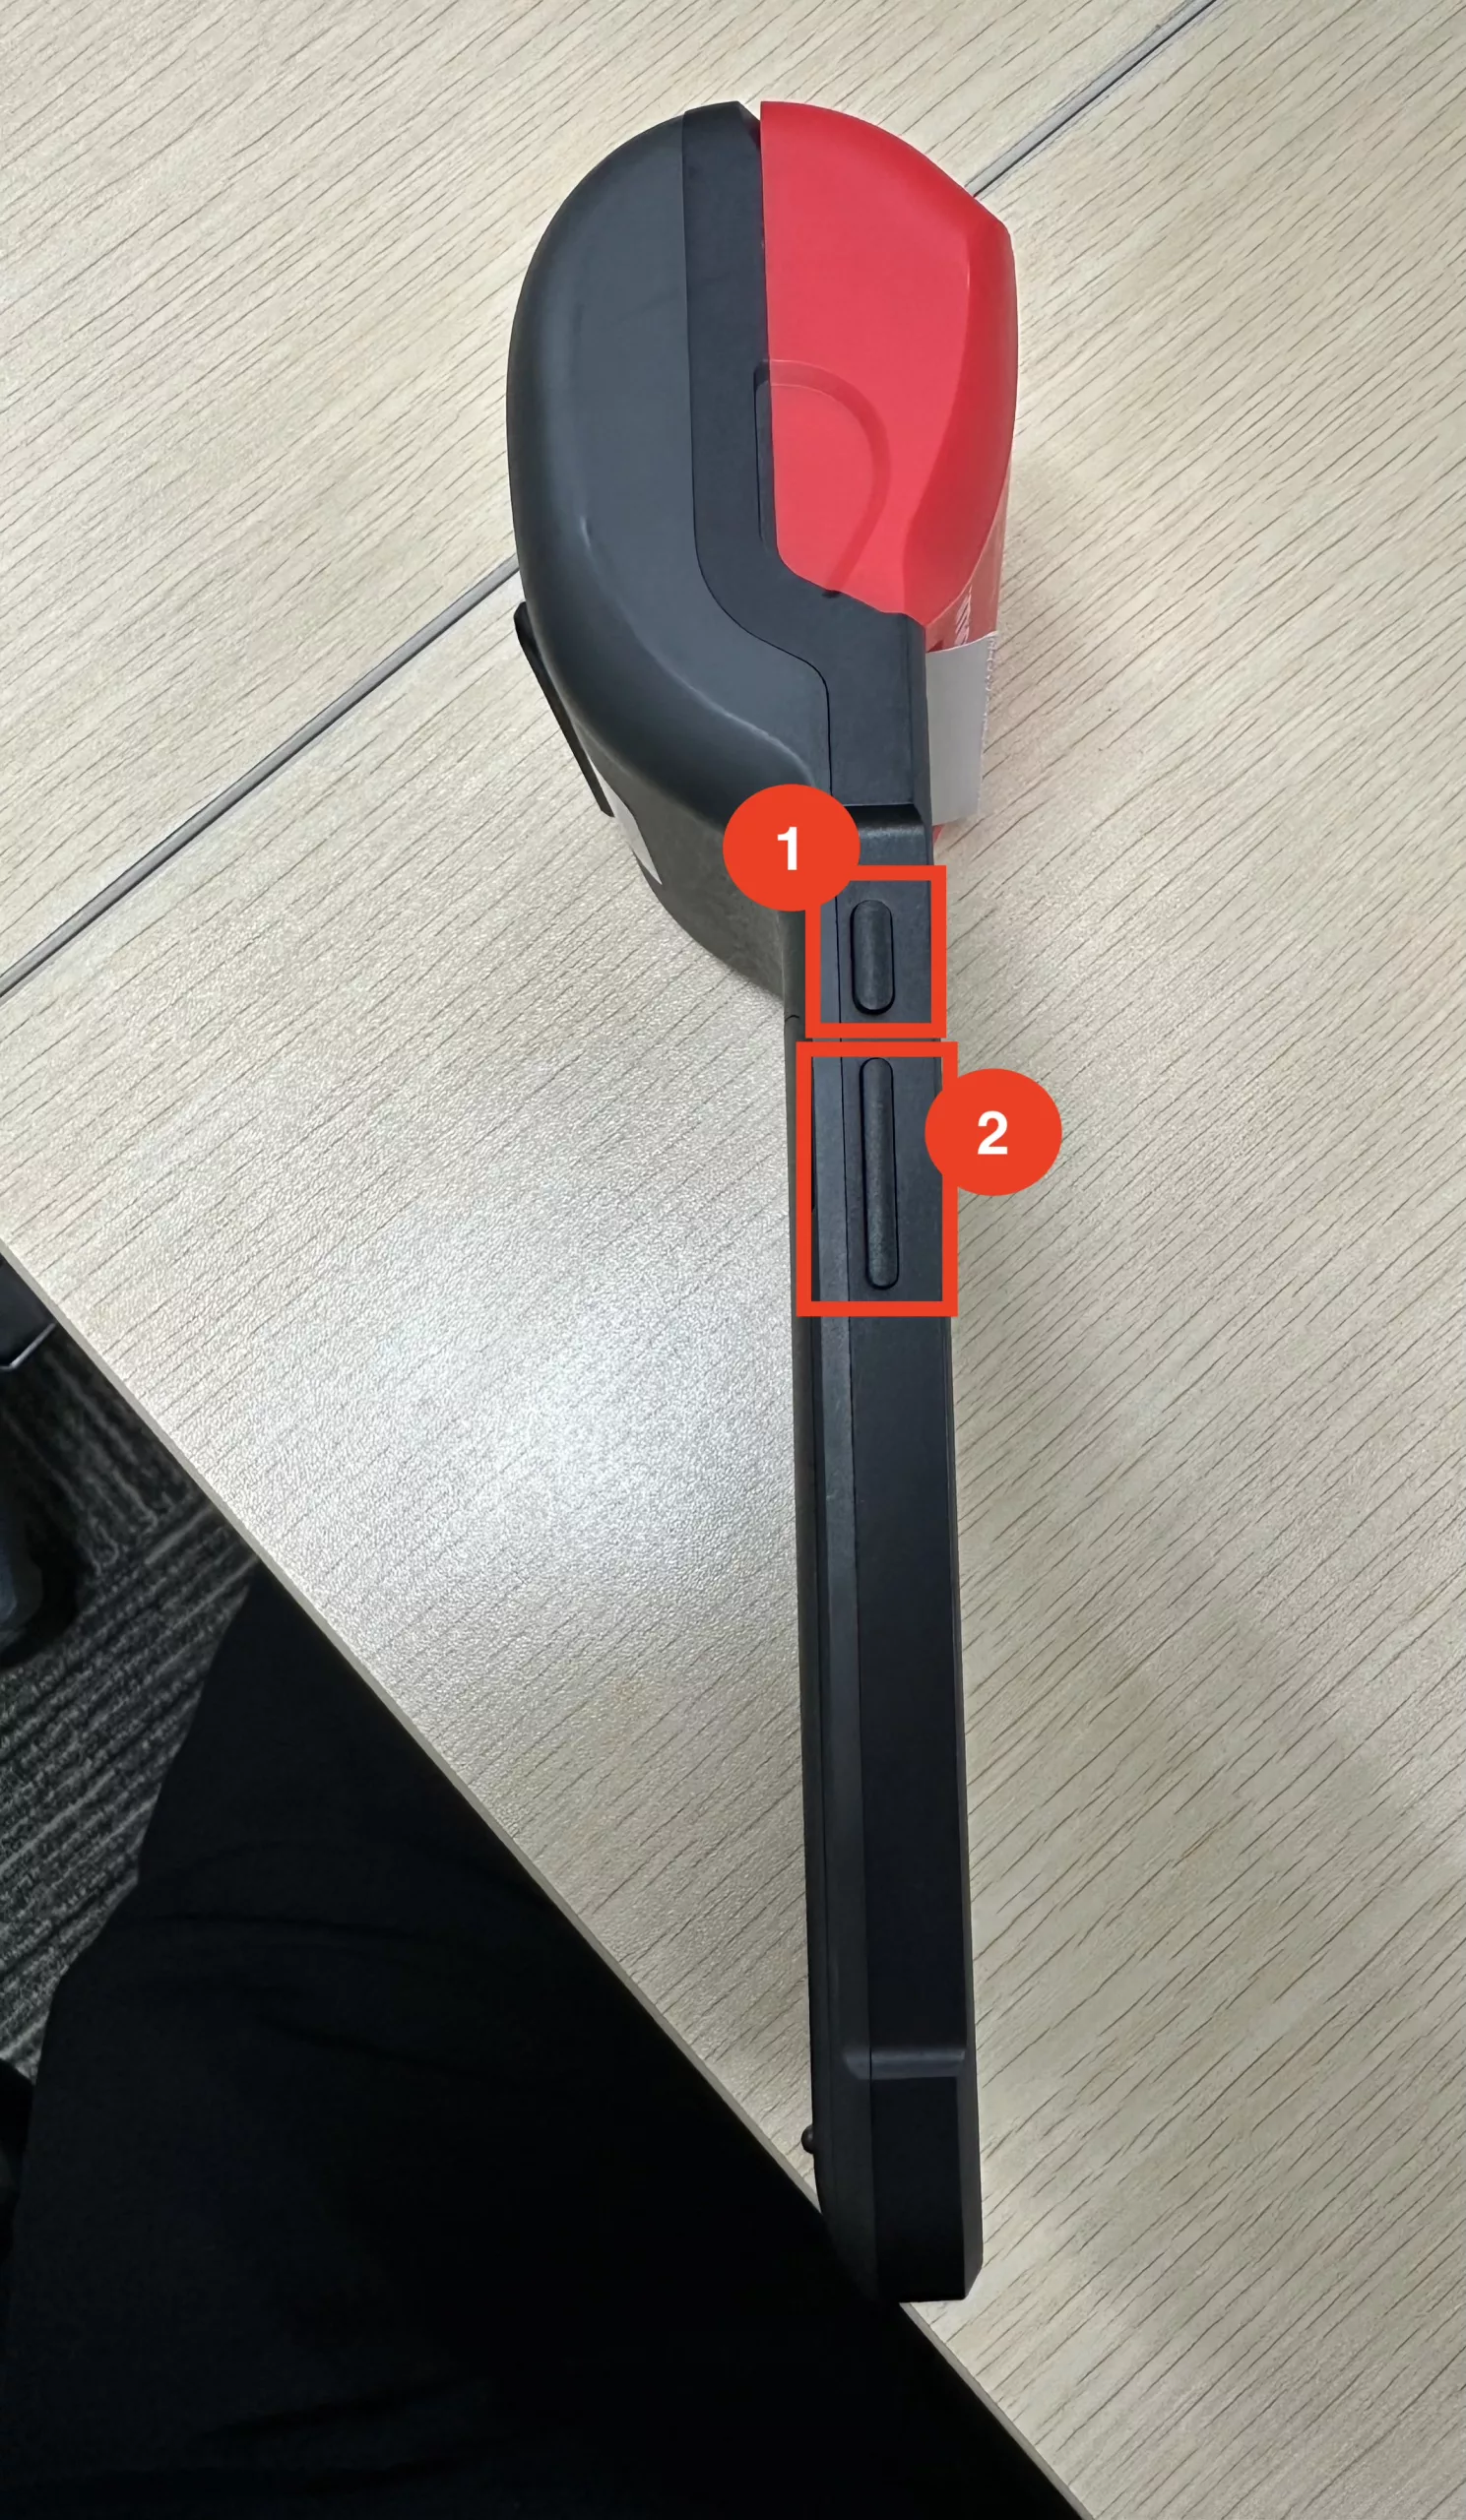
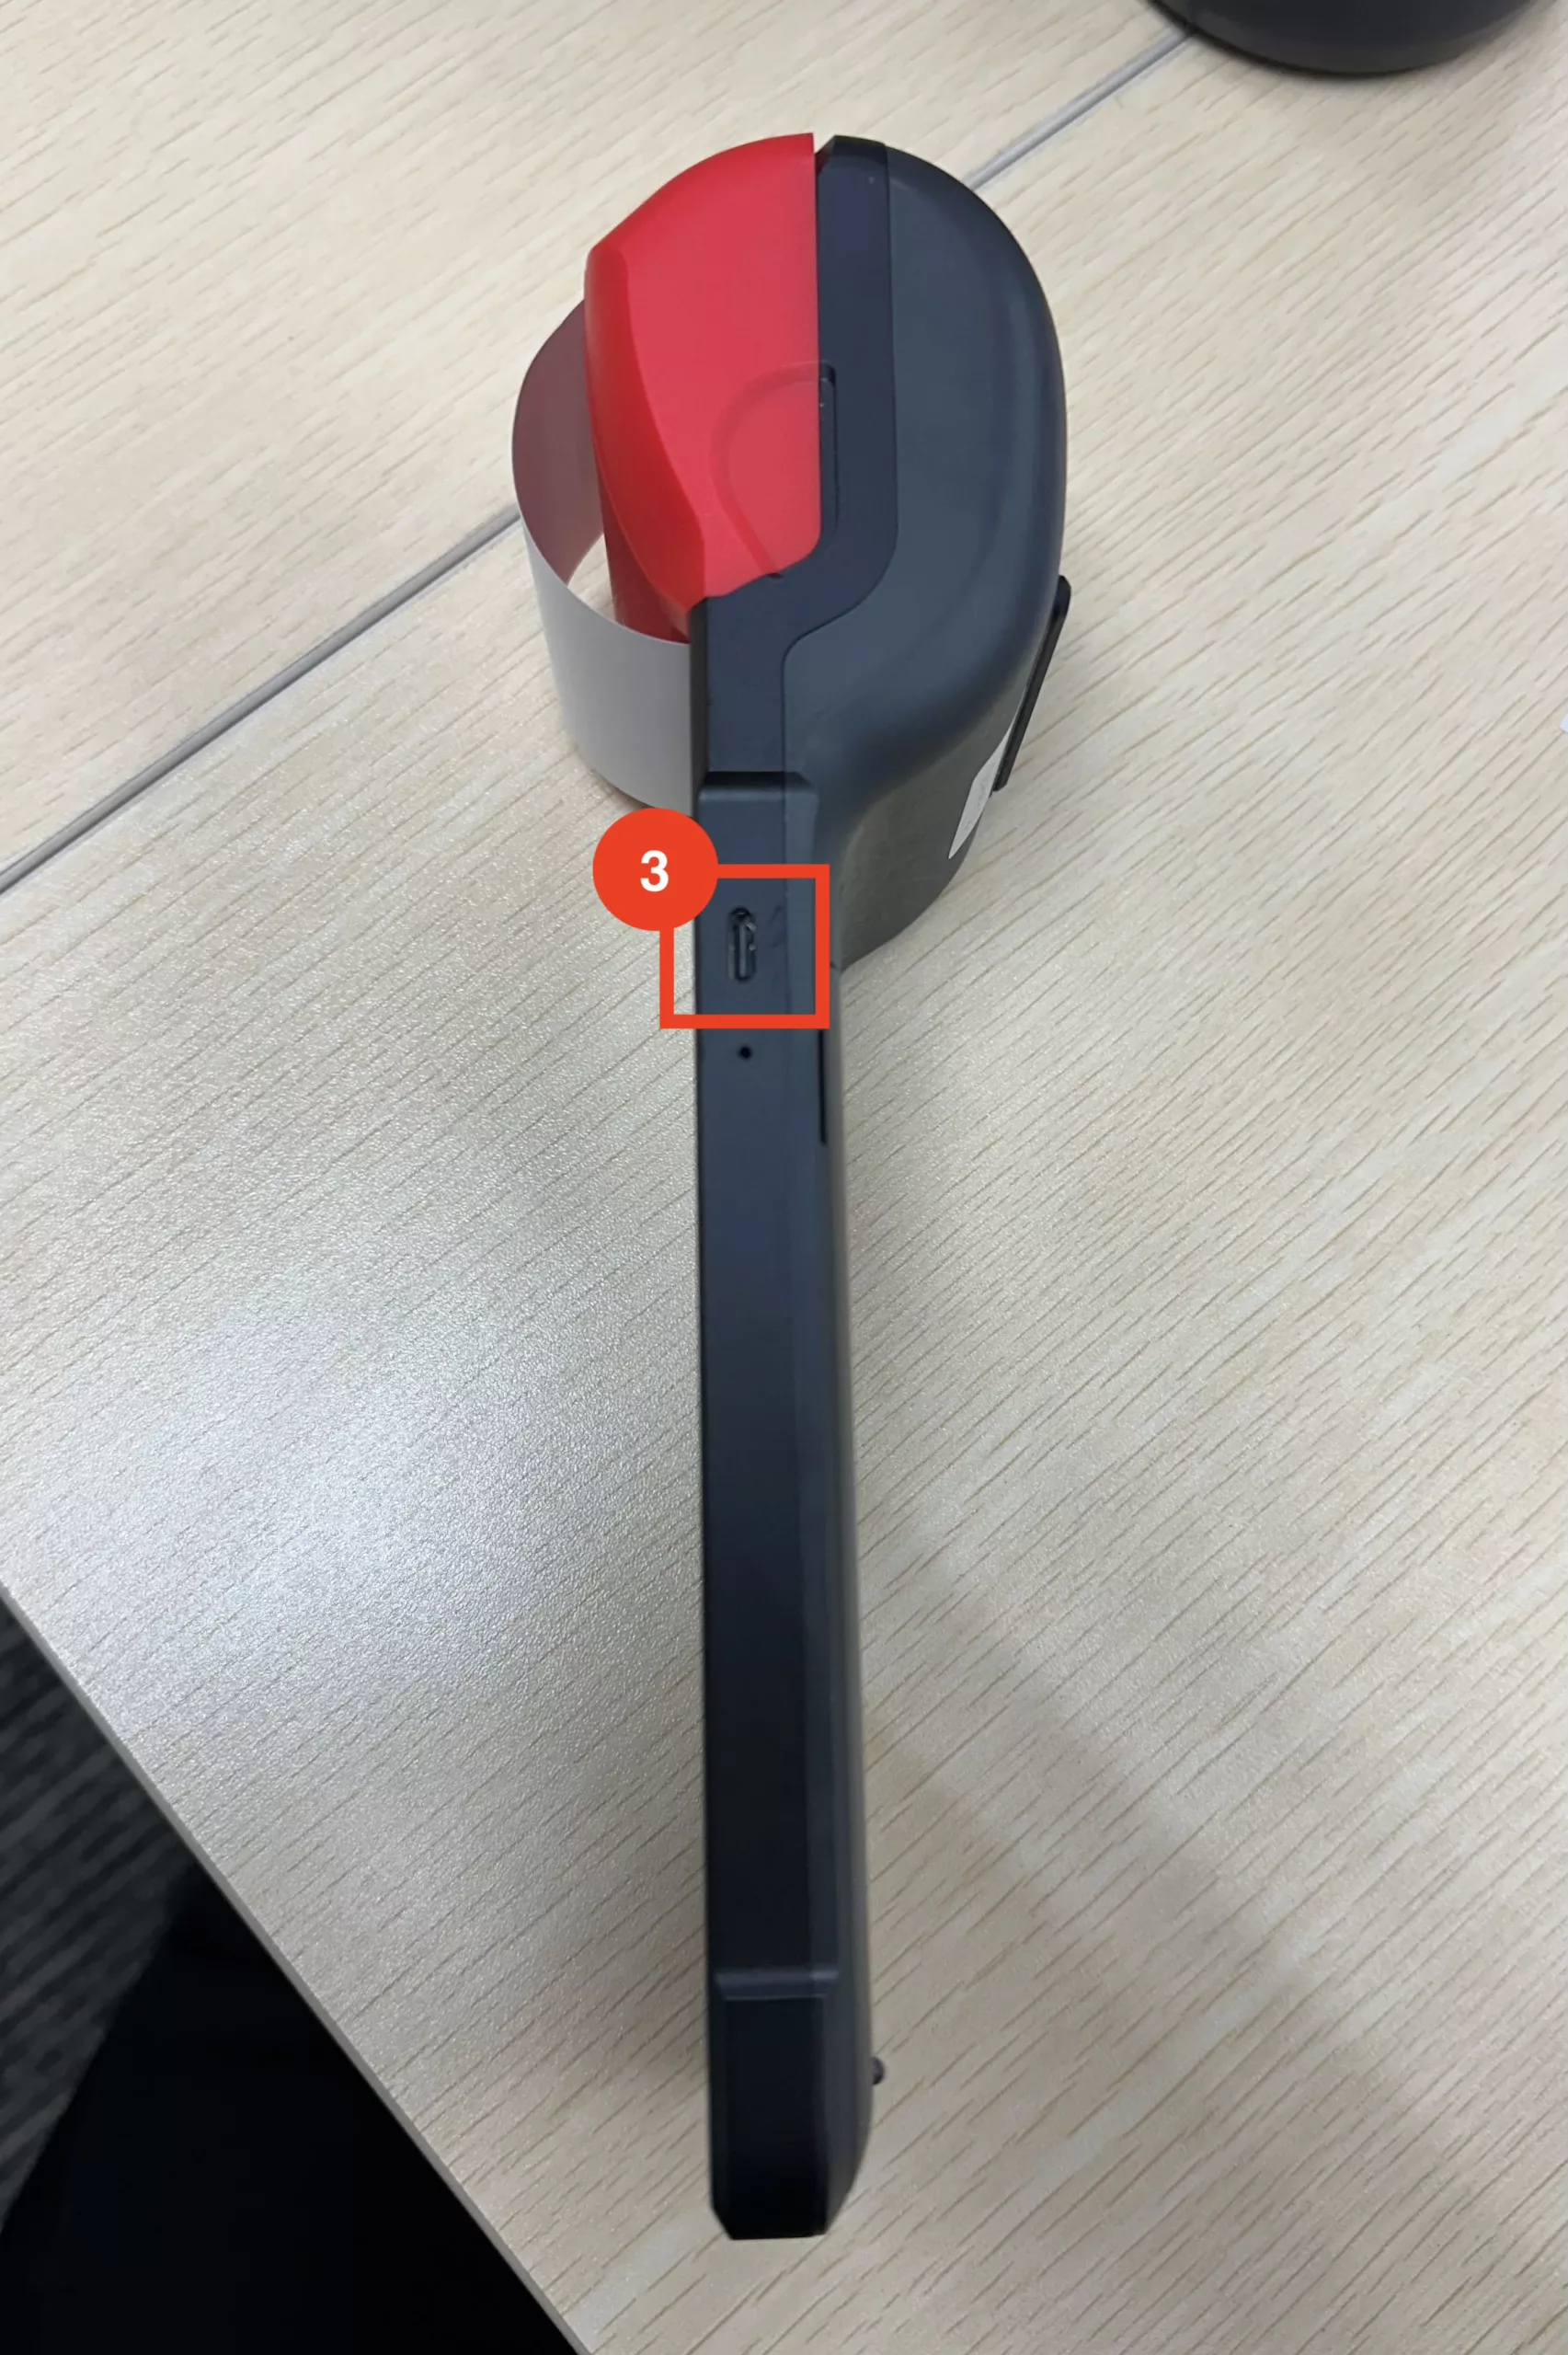
Payment Terminal Hardware
1. Power On Button
2. Volume Button
3. Charging Slot → Type – C cable used
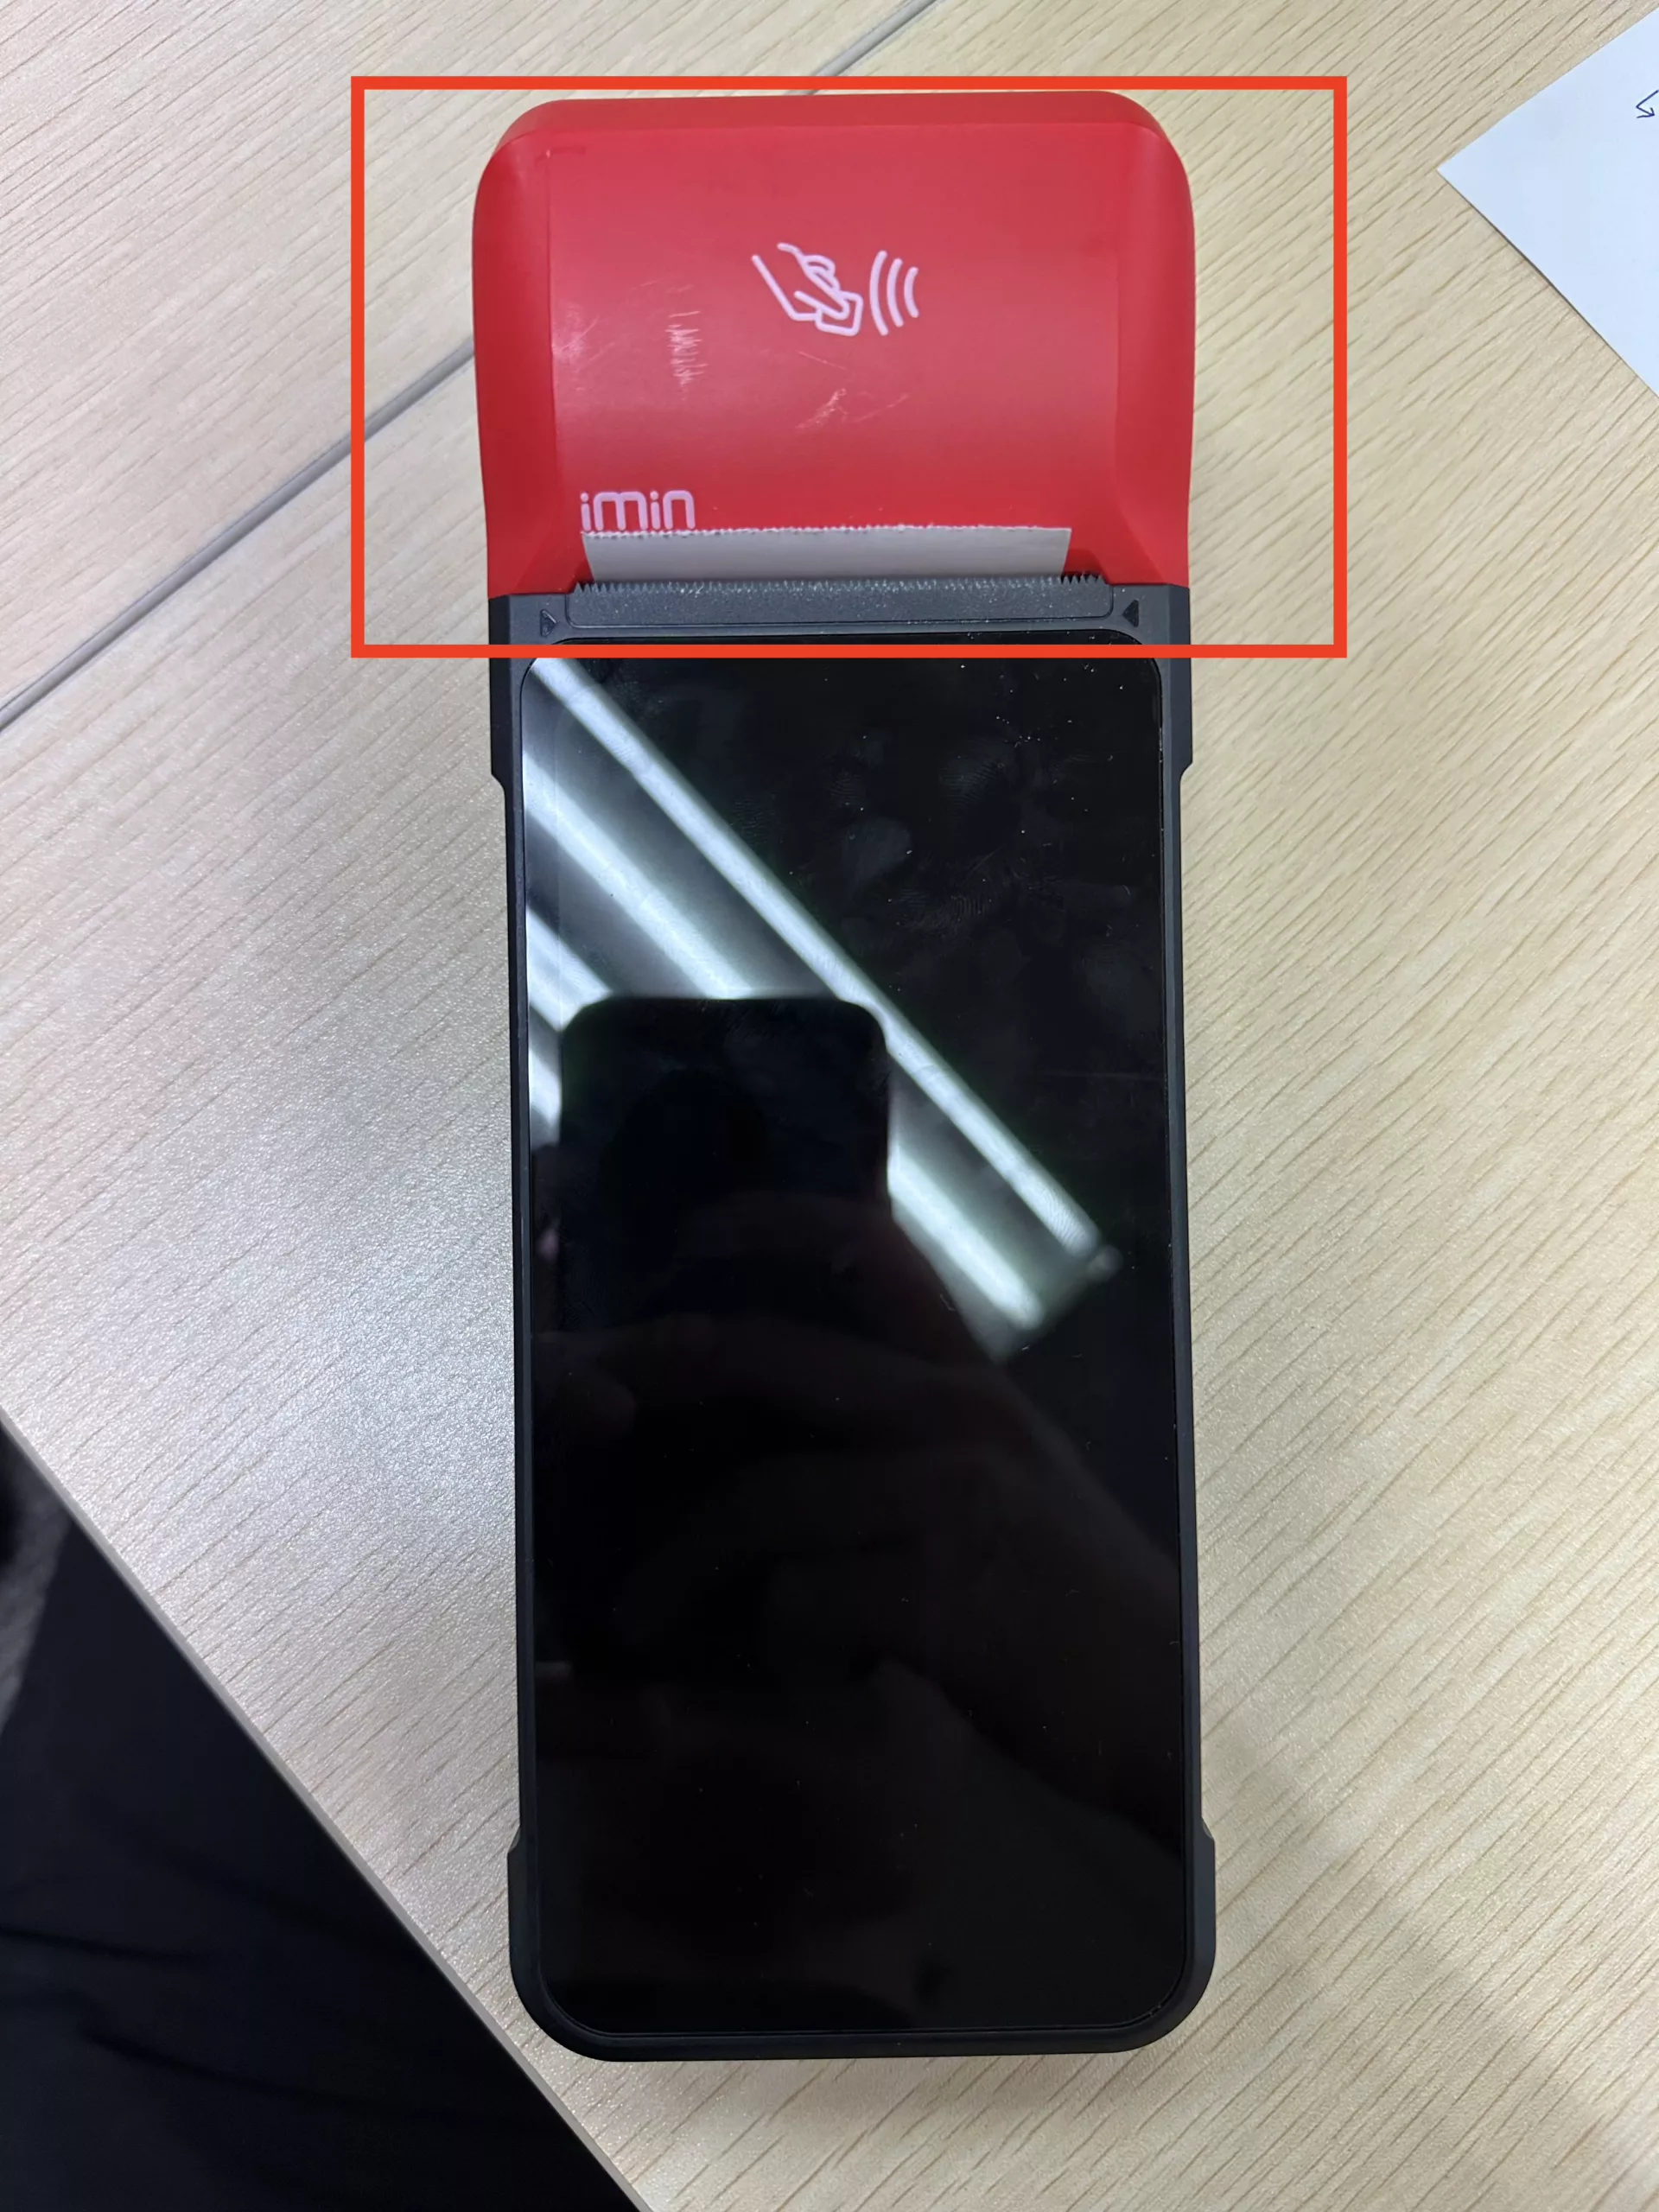
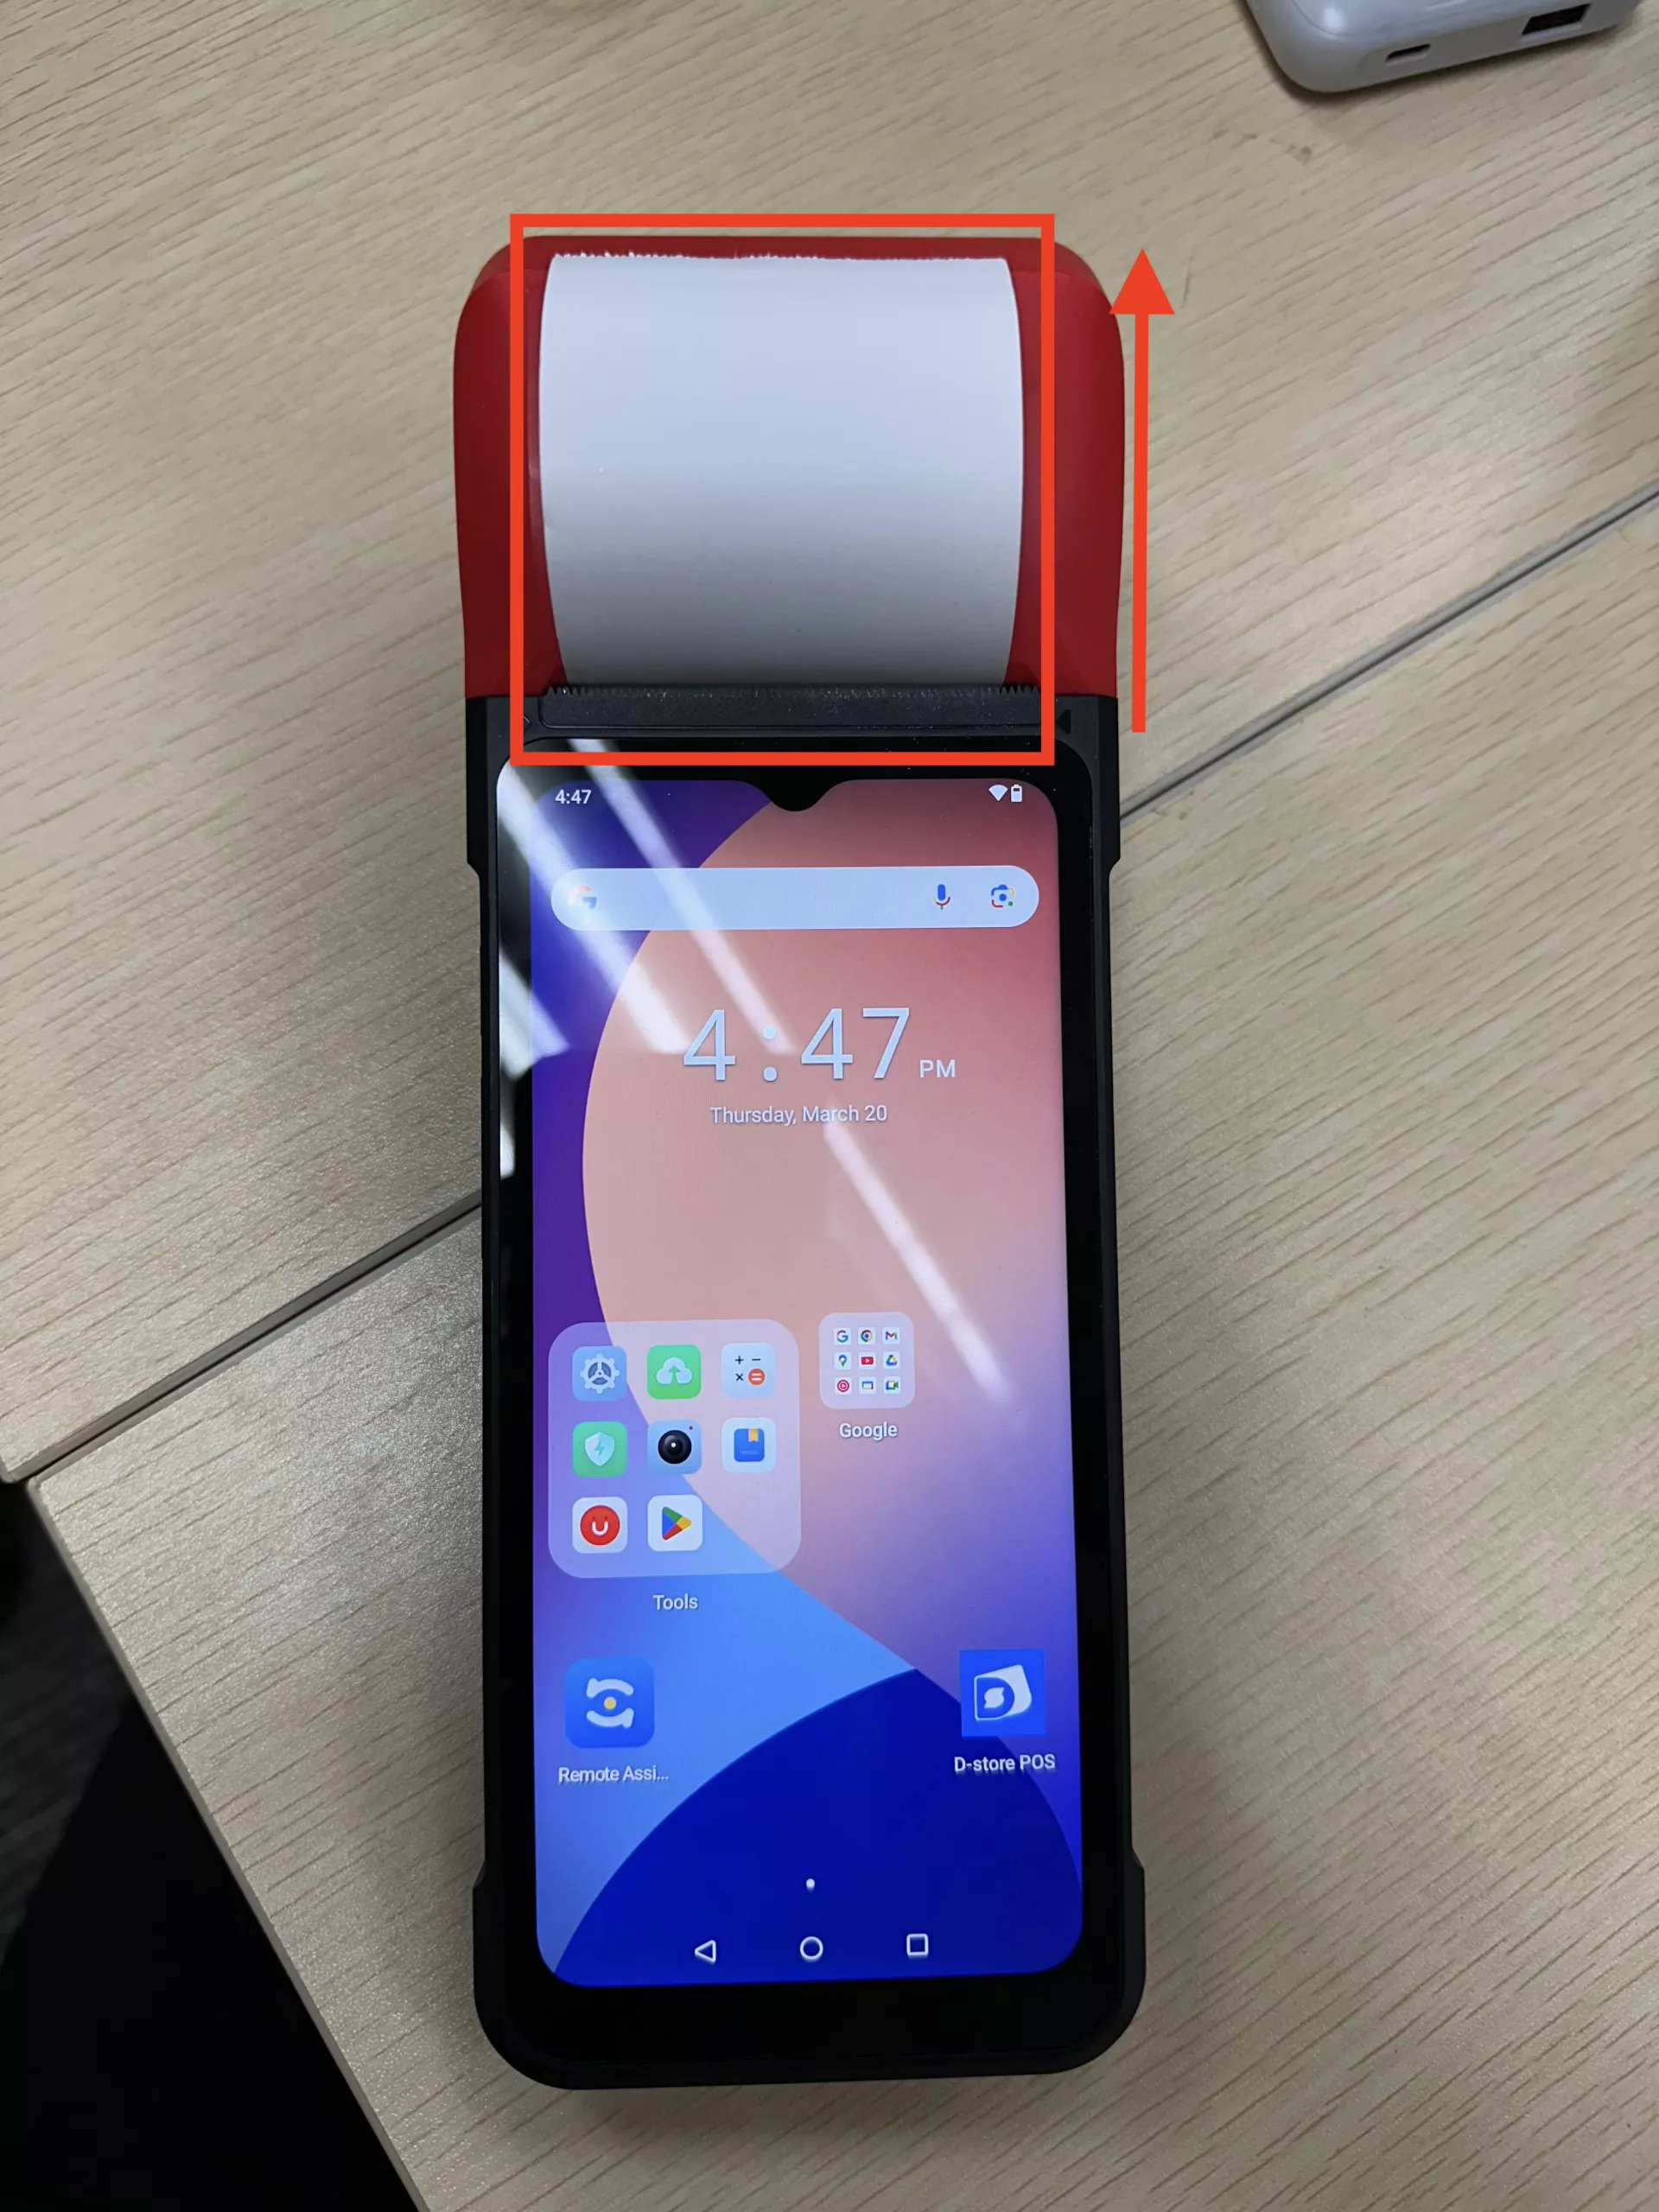
Changing the Receipt Roll
1. Open the Cover: Lift the cover of the payment terminal to access the receipt roll.
2. Remove the Old Roll: Take out the used receipt roll from the compartment.
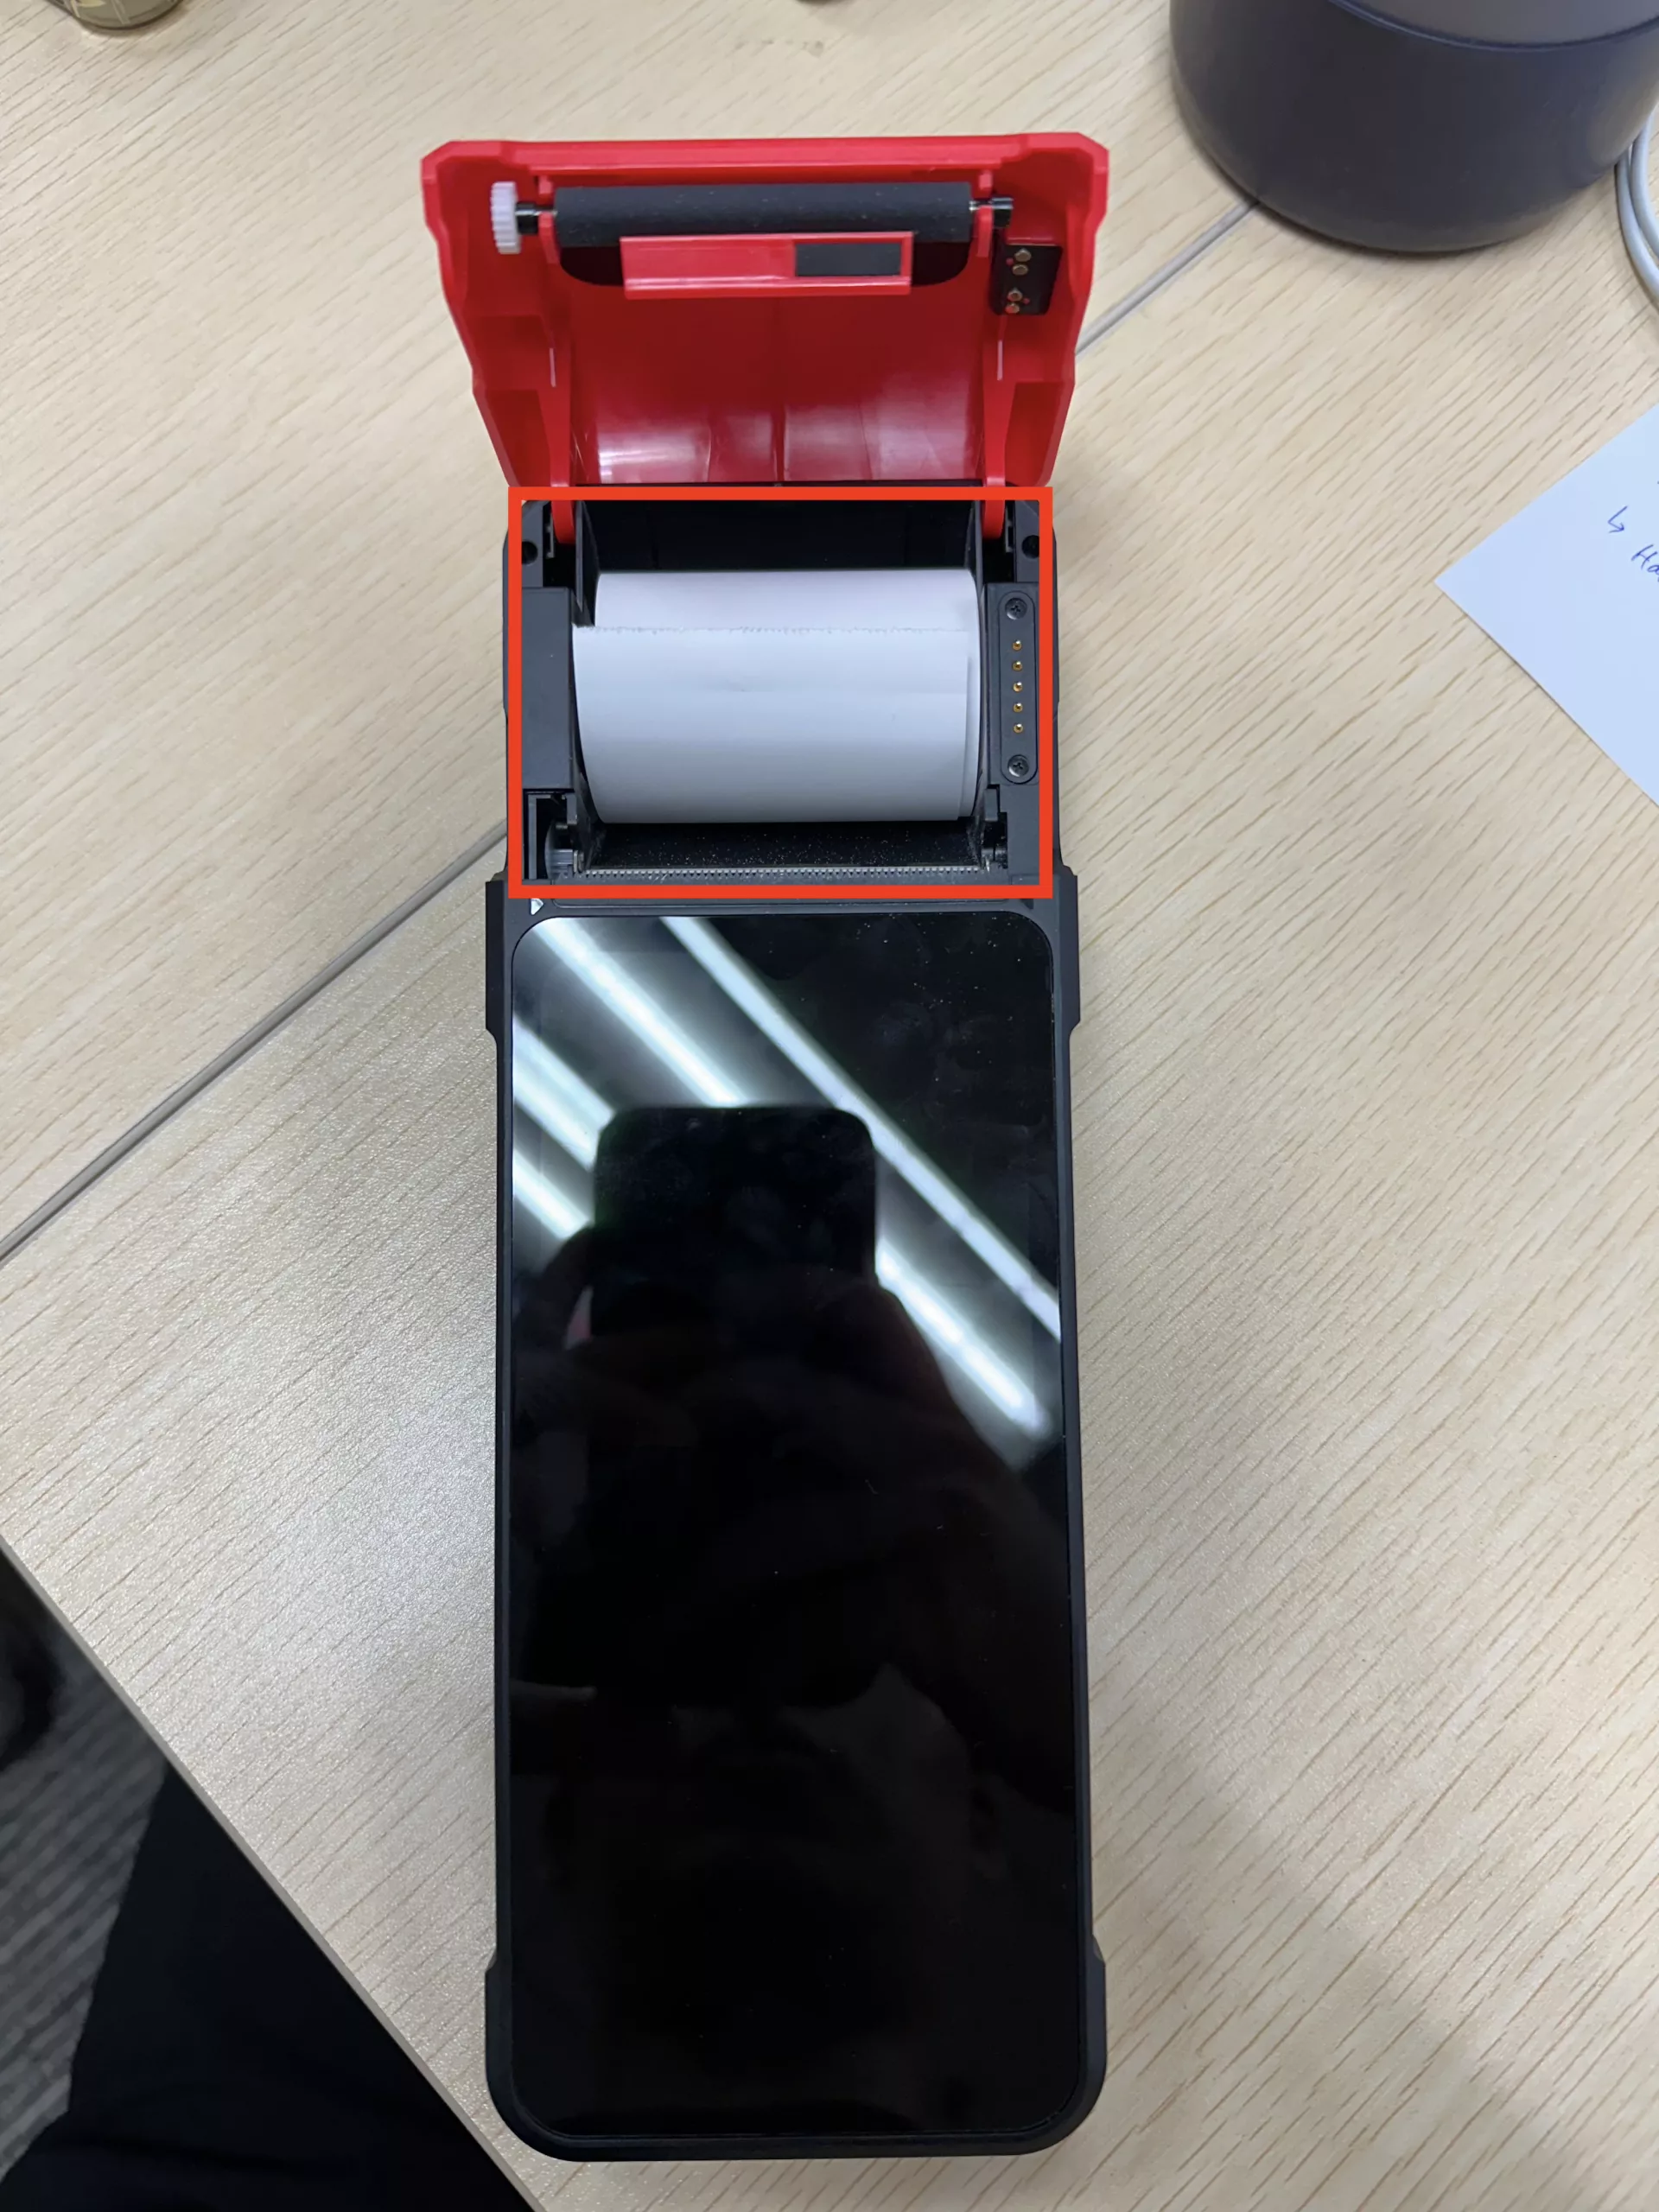
3. Insert the New Roll: Place the new roll in the compartment, ensuring the paper roll is facing upwards as shown below.
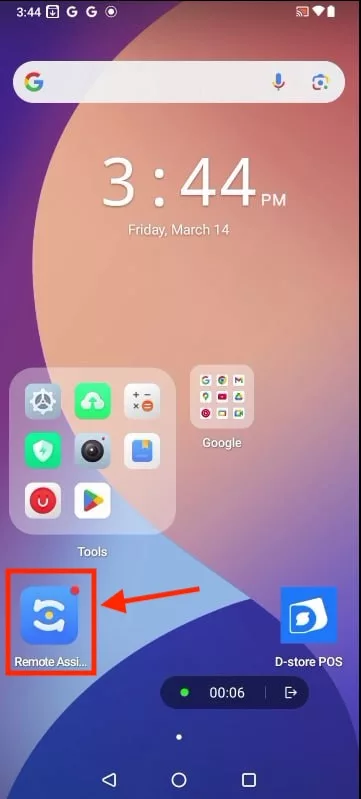
Enabling Remote Assistance
Enabling Remote Assistance allows our team to remotely assist you with configuration or troubleshooting, ensuring quick and efficient resolution of any issues with the payment terminal.
1. Select the Remote Assistance App on the Payment Terminal as shown.
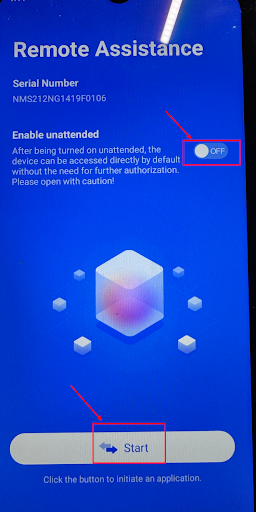
2. Turn on ‘Enabled unattended’ toggle and click on ‘Start’ button
This section will cover the following functions of our Payment Terminal
- How to disable Automatic Sales Receipt Printing
- How to lock/unpin the D-store app on the home screen of the payment terminal
- How to do standalone payment
- How to resolve payment terminal connection failure
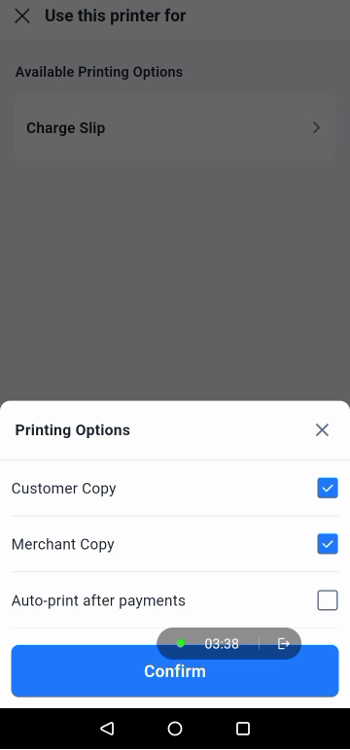
How to disable Automatic Sales Receipt Printing
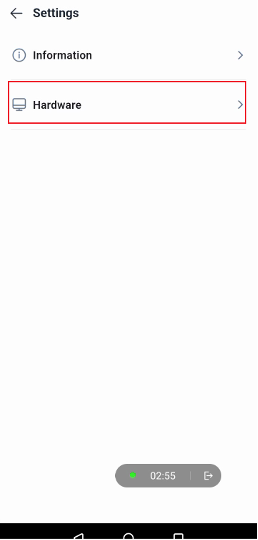
1. On the Dstore home screen, go to Settings
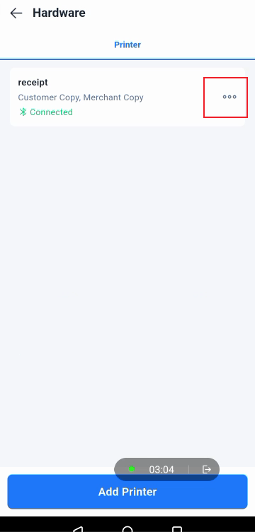
2. Click on ‘Hardware‘
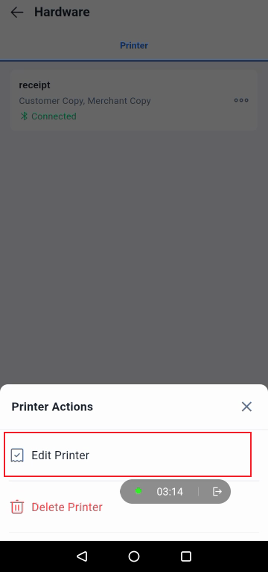
3. Click on the 3 dots.
4. Click on ‘Edit Printer’
5. Click on ‘Use this printer for’
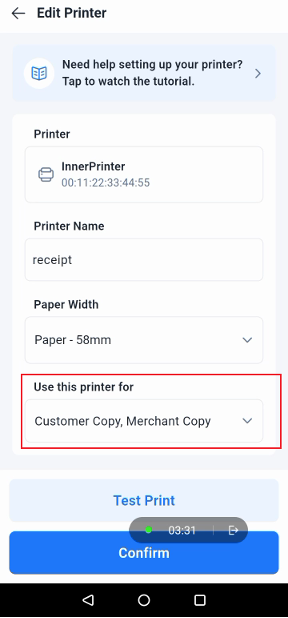
6. Uncheck the box on the right of “Auto-print after payment”.
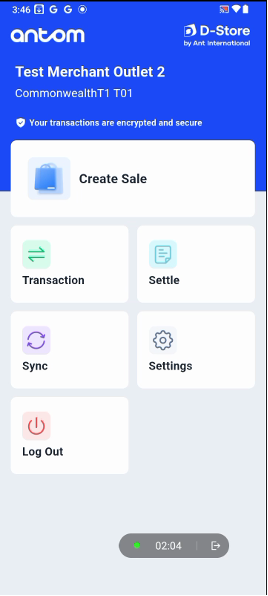
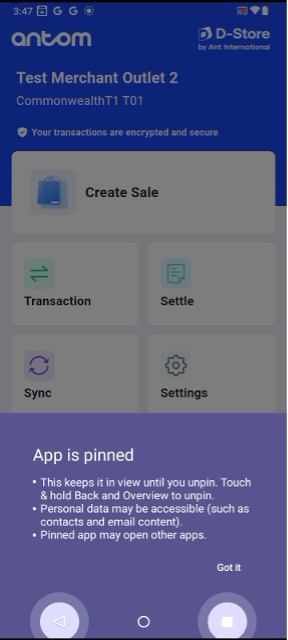
How to lock the D-store app on the home screen of the payment terminal
1. Tap the square (overview) button to view all apps currently running in the background as shown below.
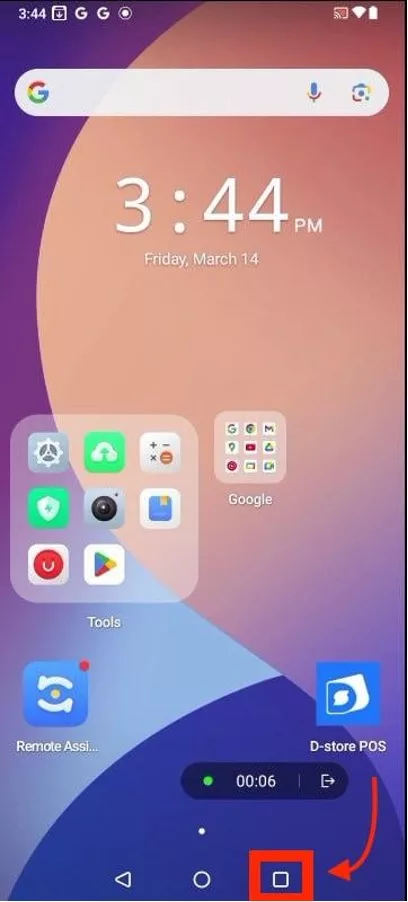
2. Locate the Dstore app, then press and hold its icon.
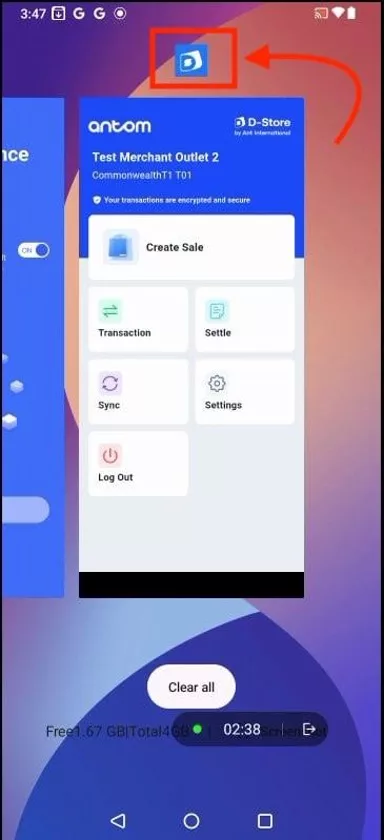
3. The following options will then appear, select the “Pin” option.
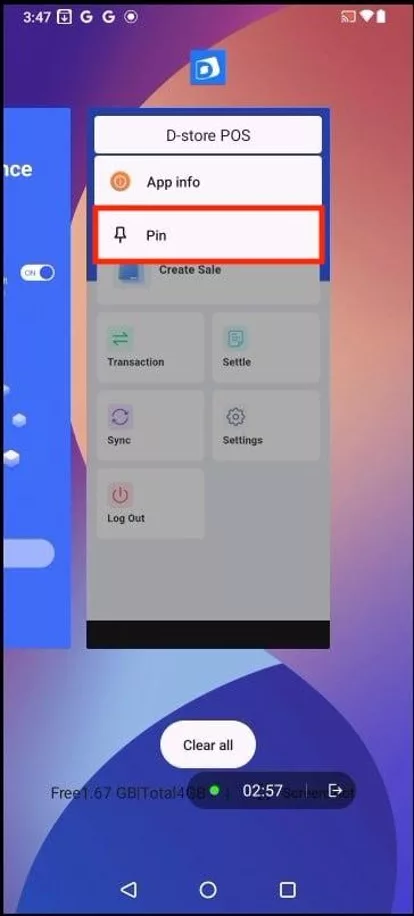
4. Once pinned, the Dstore platform will remain continuously displayed on the screen.
How to unpin the D-store app
1. To unpin the app, press the back and square buttons together as shown.

2. The device will return to its original lock screen, and from there, you can operate the phone as usual.
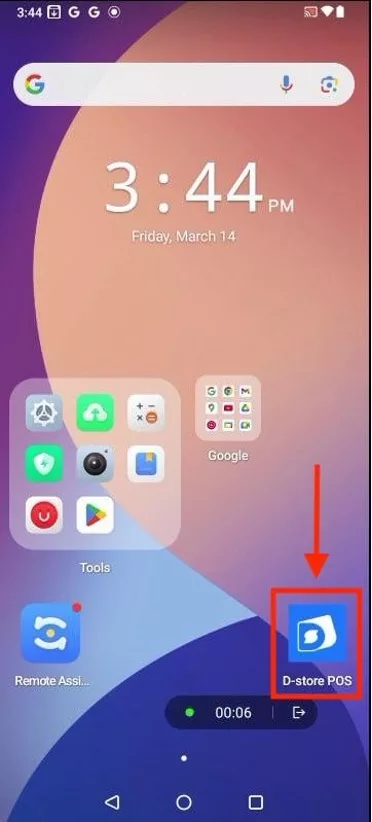
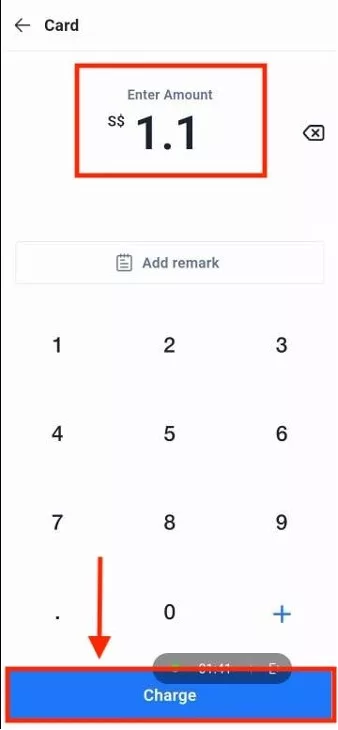
How to do standalone payment
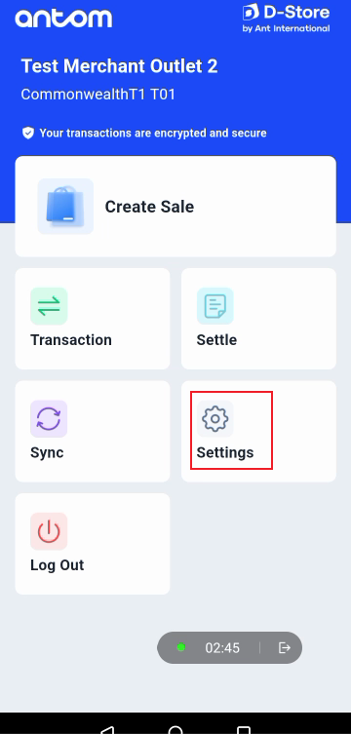
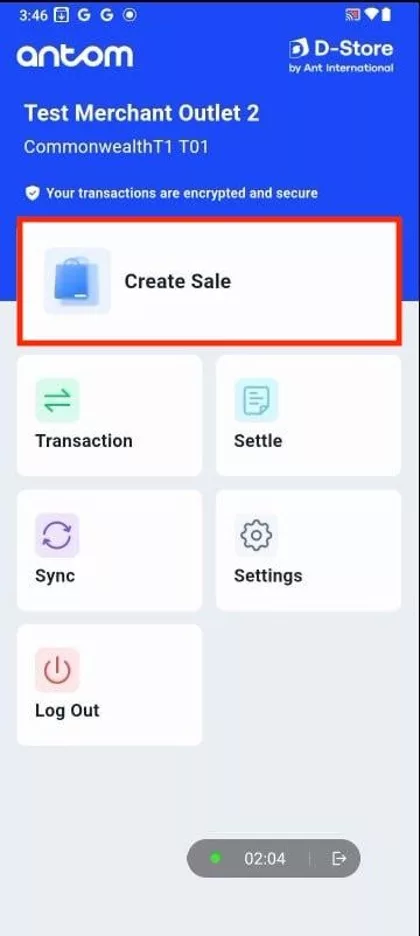
1. Launch the D-store app on the device.
2. Select the “Create Sale” option from the main menu.
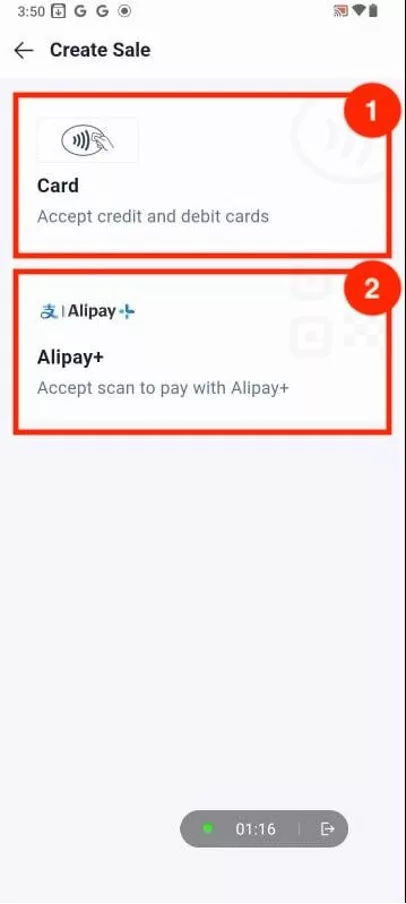
3. You will be presented with two payment methods:
- Debit/Credit Card (Visa, Mastercard)
- Alipay (for E-Wallet)
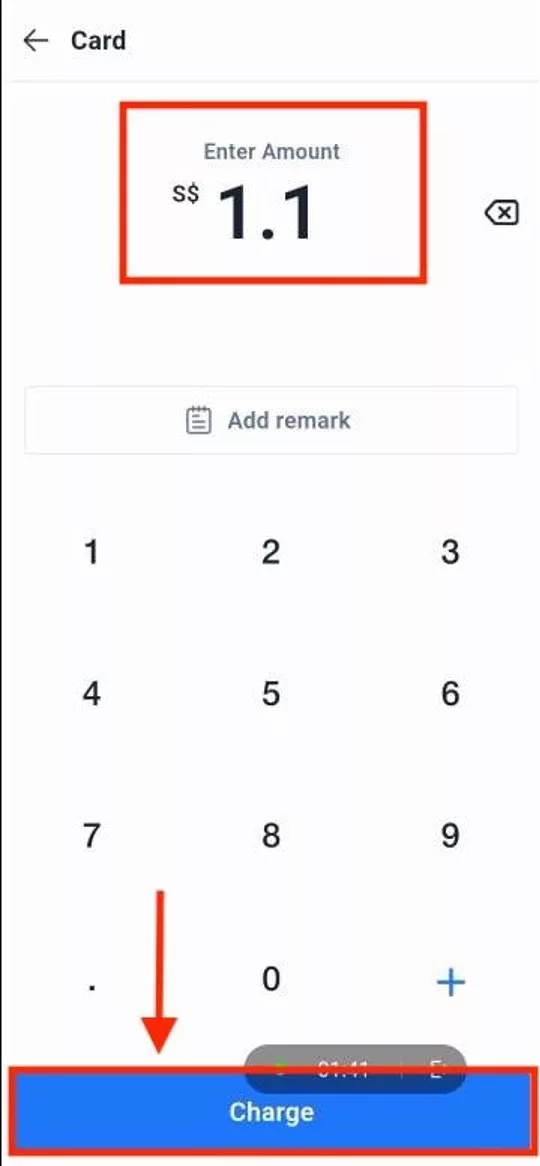
4. If the customer chooses Debit/Credit Card:
- Proceed to enter the payment amount.
- Press “Charge”
- The customer can then proceed to make the payment using the payment terminal.

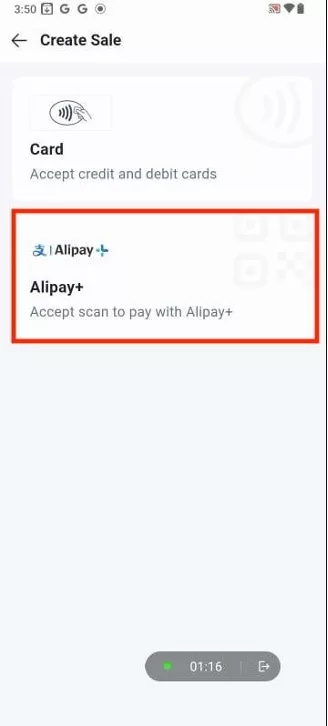
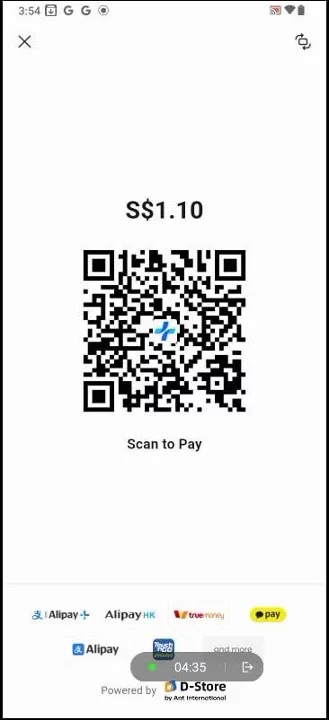
5. If the customer chooses Alipay (E-Wallet):
- Enter the payment amount.
- Press “Charge”
- A QR code will be generated, reflecting the exact amount.
- The customer can scan the QR code to complete the payment via Alipay.
How to resolve payment terminal connection failure
1. Ensure that POS and payment terminals are connected using the same WIFI
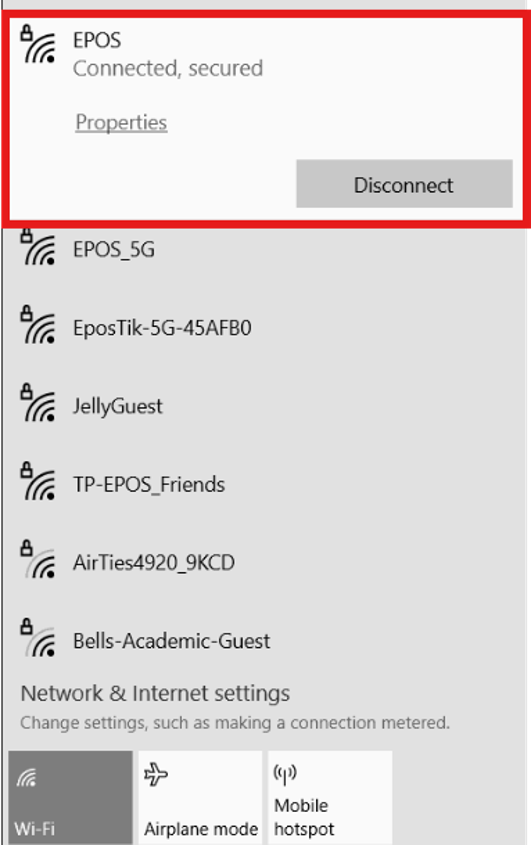
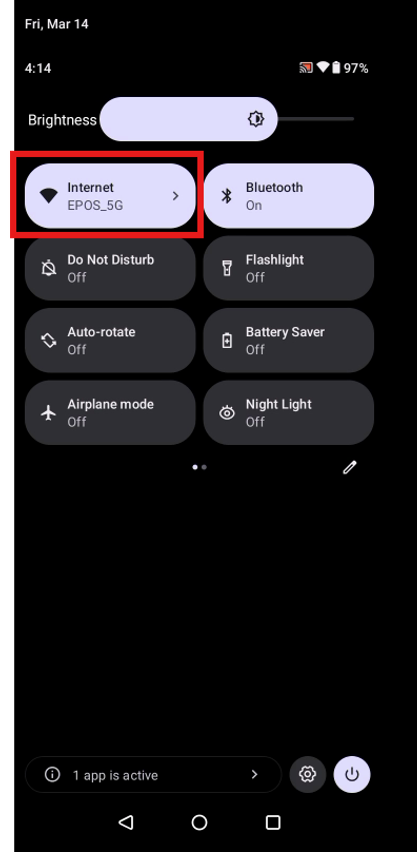
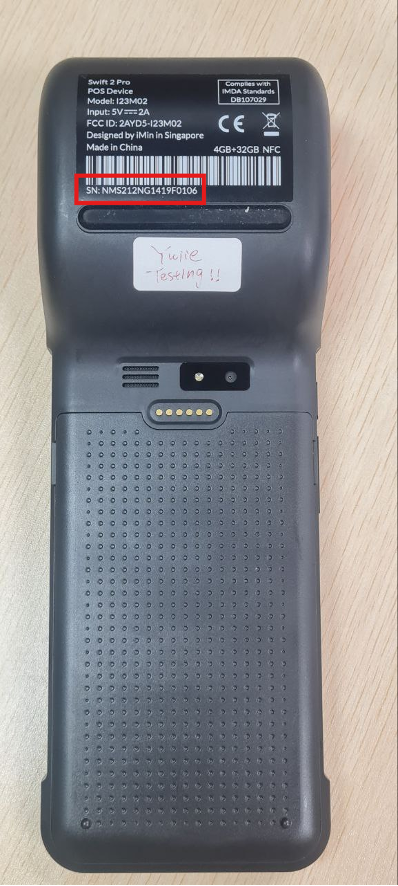
2. Check the hardware configuration settings in EPOS POS.
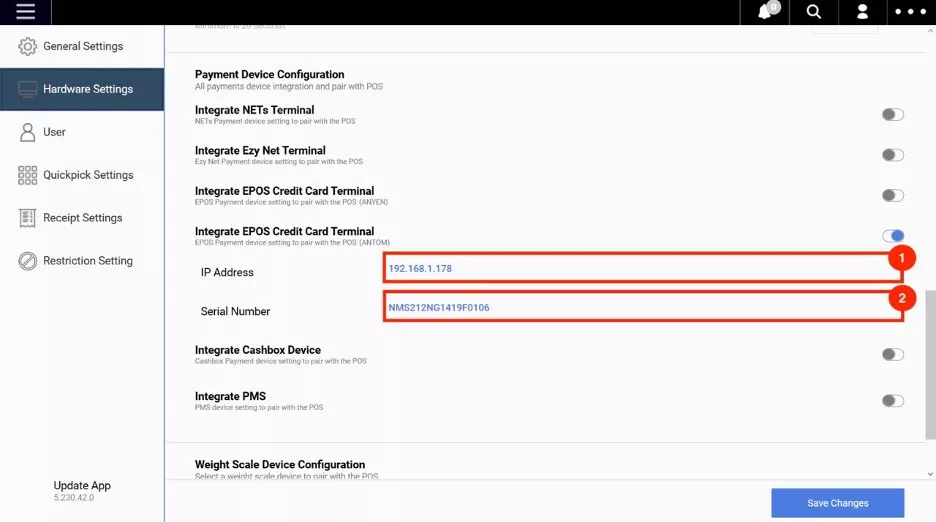
- IP Address: Ensure that the IP address matches the payment terminal’s IP address.
- Serial Number: Check the back of the payment terminal to see the serial number