No products in the cart.
December 2024
This December, several features across our POS, Backend, and Web Ordering App have implemented features to enhance the experience of both the users and customers.
What’s New
Not sure which affects you?
These icons indicate which group of users is impacted by each enhancement: Point of Sale (POS) users, Backend users, or Web Ordering App users.
( 🖥️ POS — ⚙️ Backend —📱 Web Ordering App —🤖 Android POS —👨🍳 Kitchen Display System (KDS))
(Backend/POS) A4 Sales E-Receipt - Print Footer Image ⚙️🖥️
You can now include footer images in the A4 Sales e-Receipt, allowing you to add images to the footer section.
Backend Configuration:
Go to Backend > Setup > Outlet and Registers, select an outlet, click the gear icon on the right, and choose Edit POS Receipt or Edit Sales e-Receipt. Then, upload an image under Footer Image Display and click Save Changes.
To view the A4 Sales e-receipt, follow these steps:
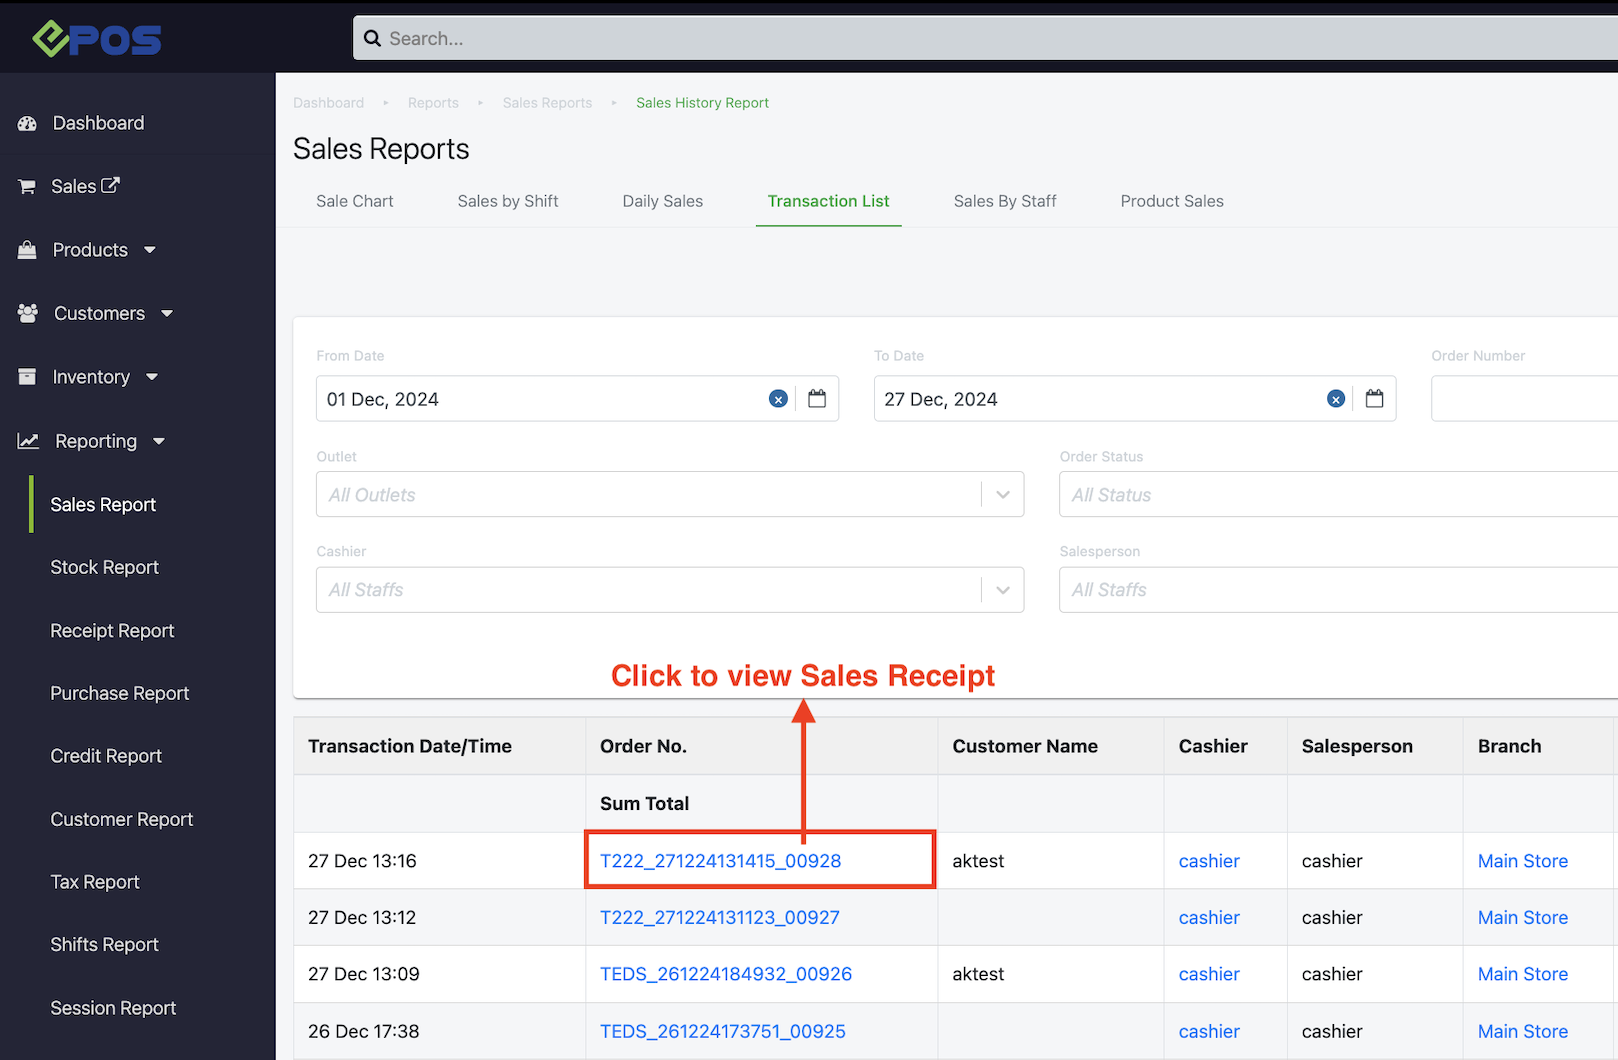
- Go to Backend > Report > Sales Report > Sales History Report > Transaction List.
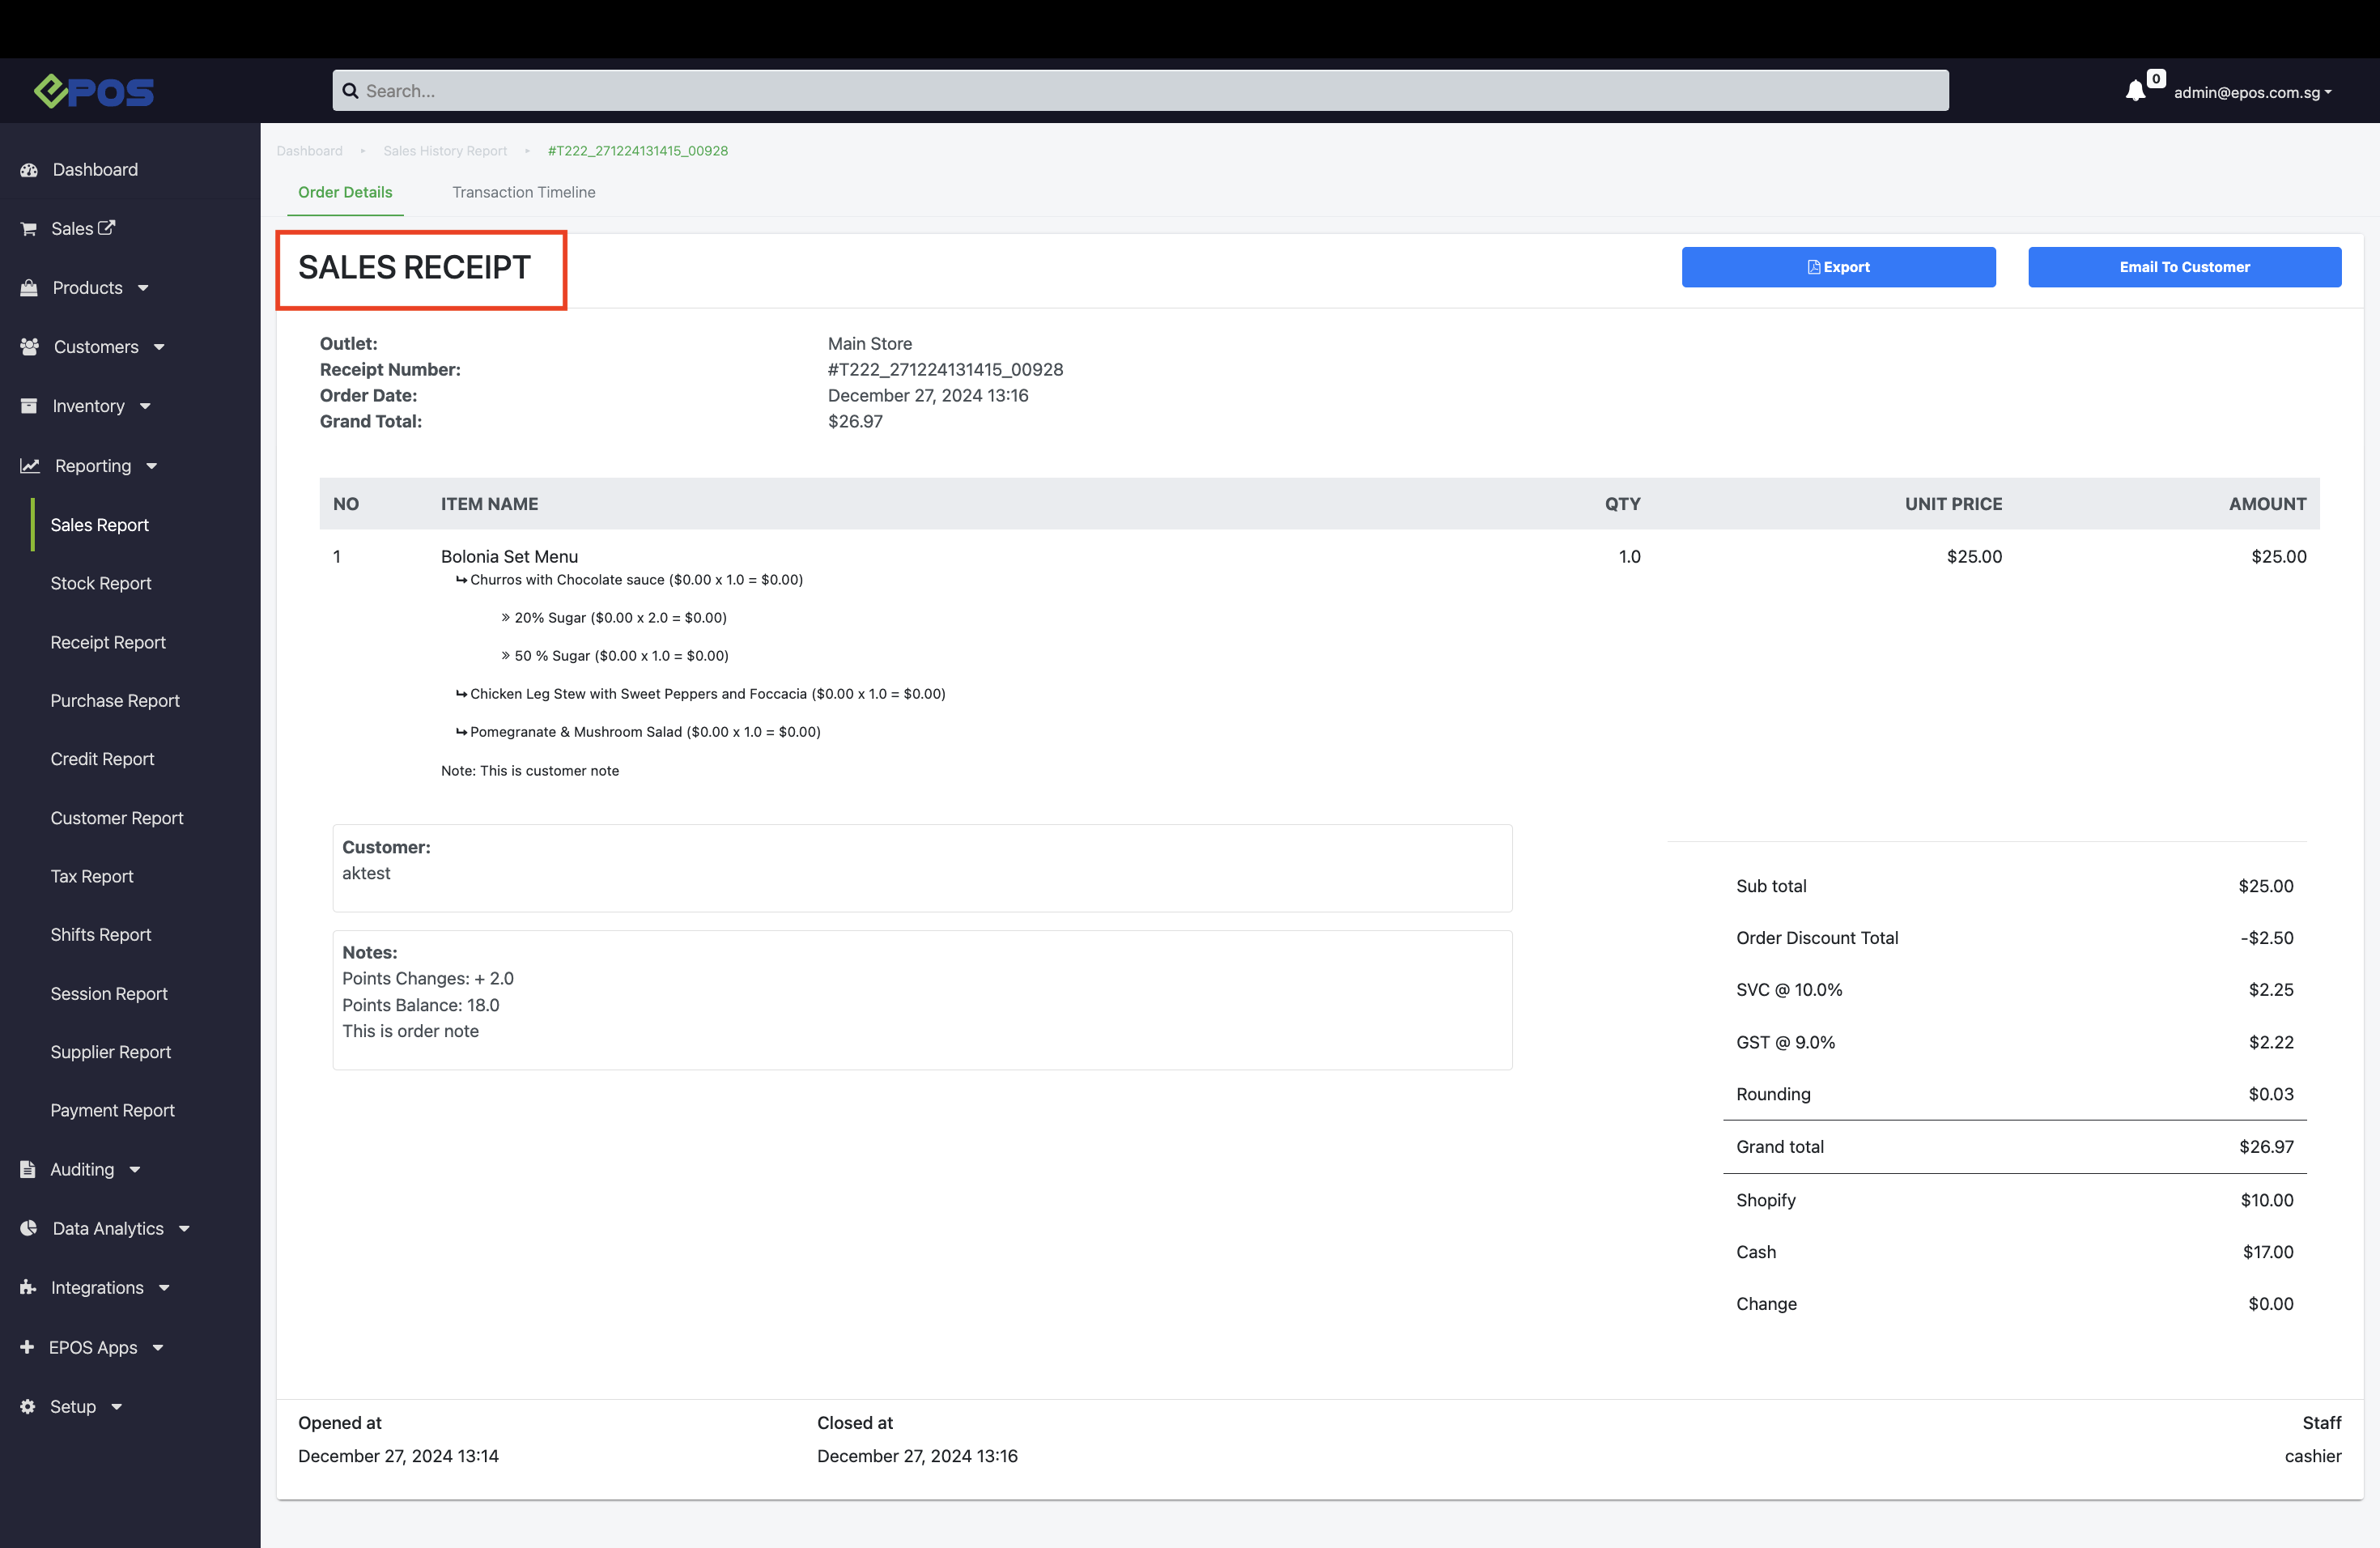
- Click the Order No. to export or email the receipt.
- Open the exported A4 Sales e-receipt to view the footer image.
Click here for more details on backend configuration.
(Backend) ERP Sales Module - Include SKU number in Exported PDF ⚙️
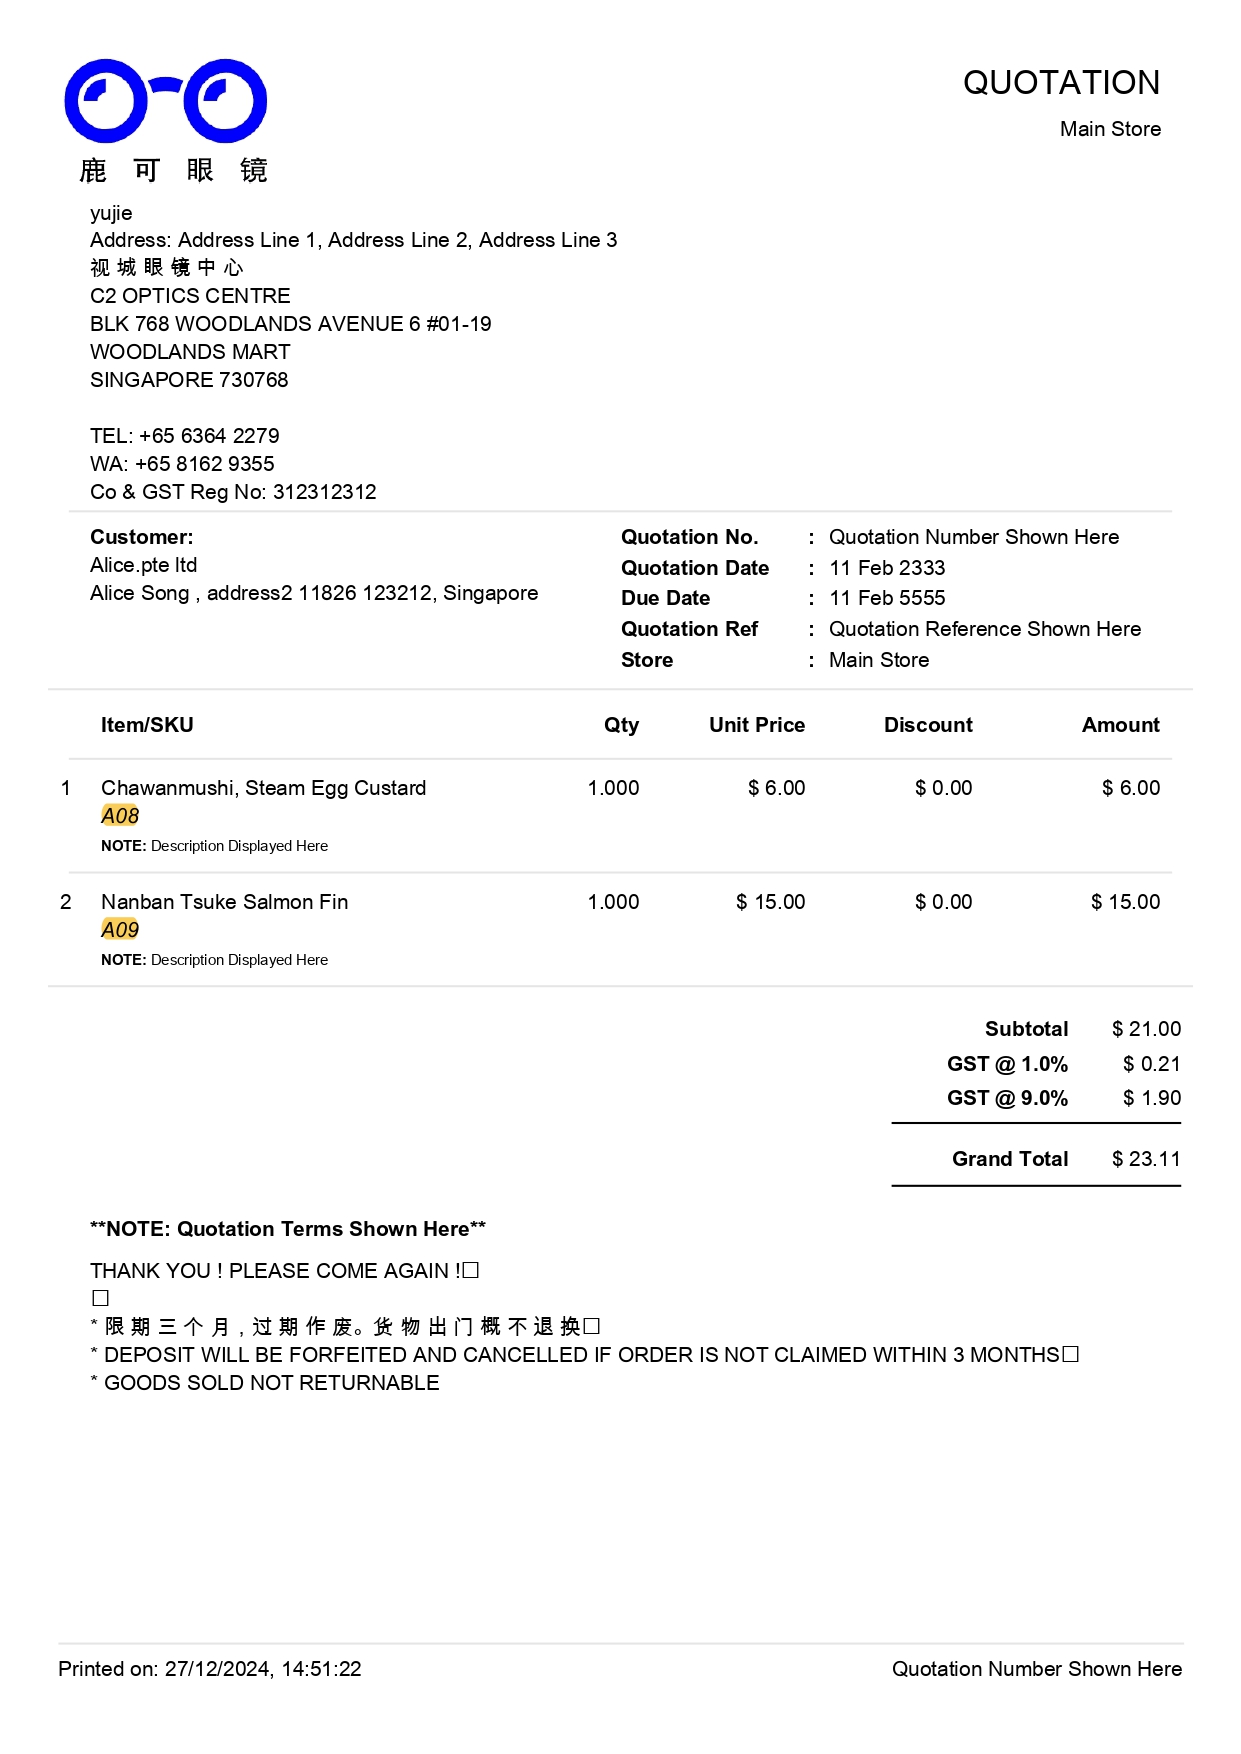
SKU numbers are now included in the exported PDF and email versions of the Quotation, Invoice, and Delivery Order.
Backend Configuration:
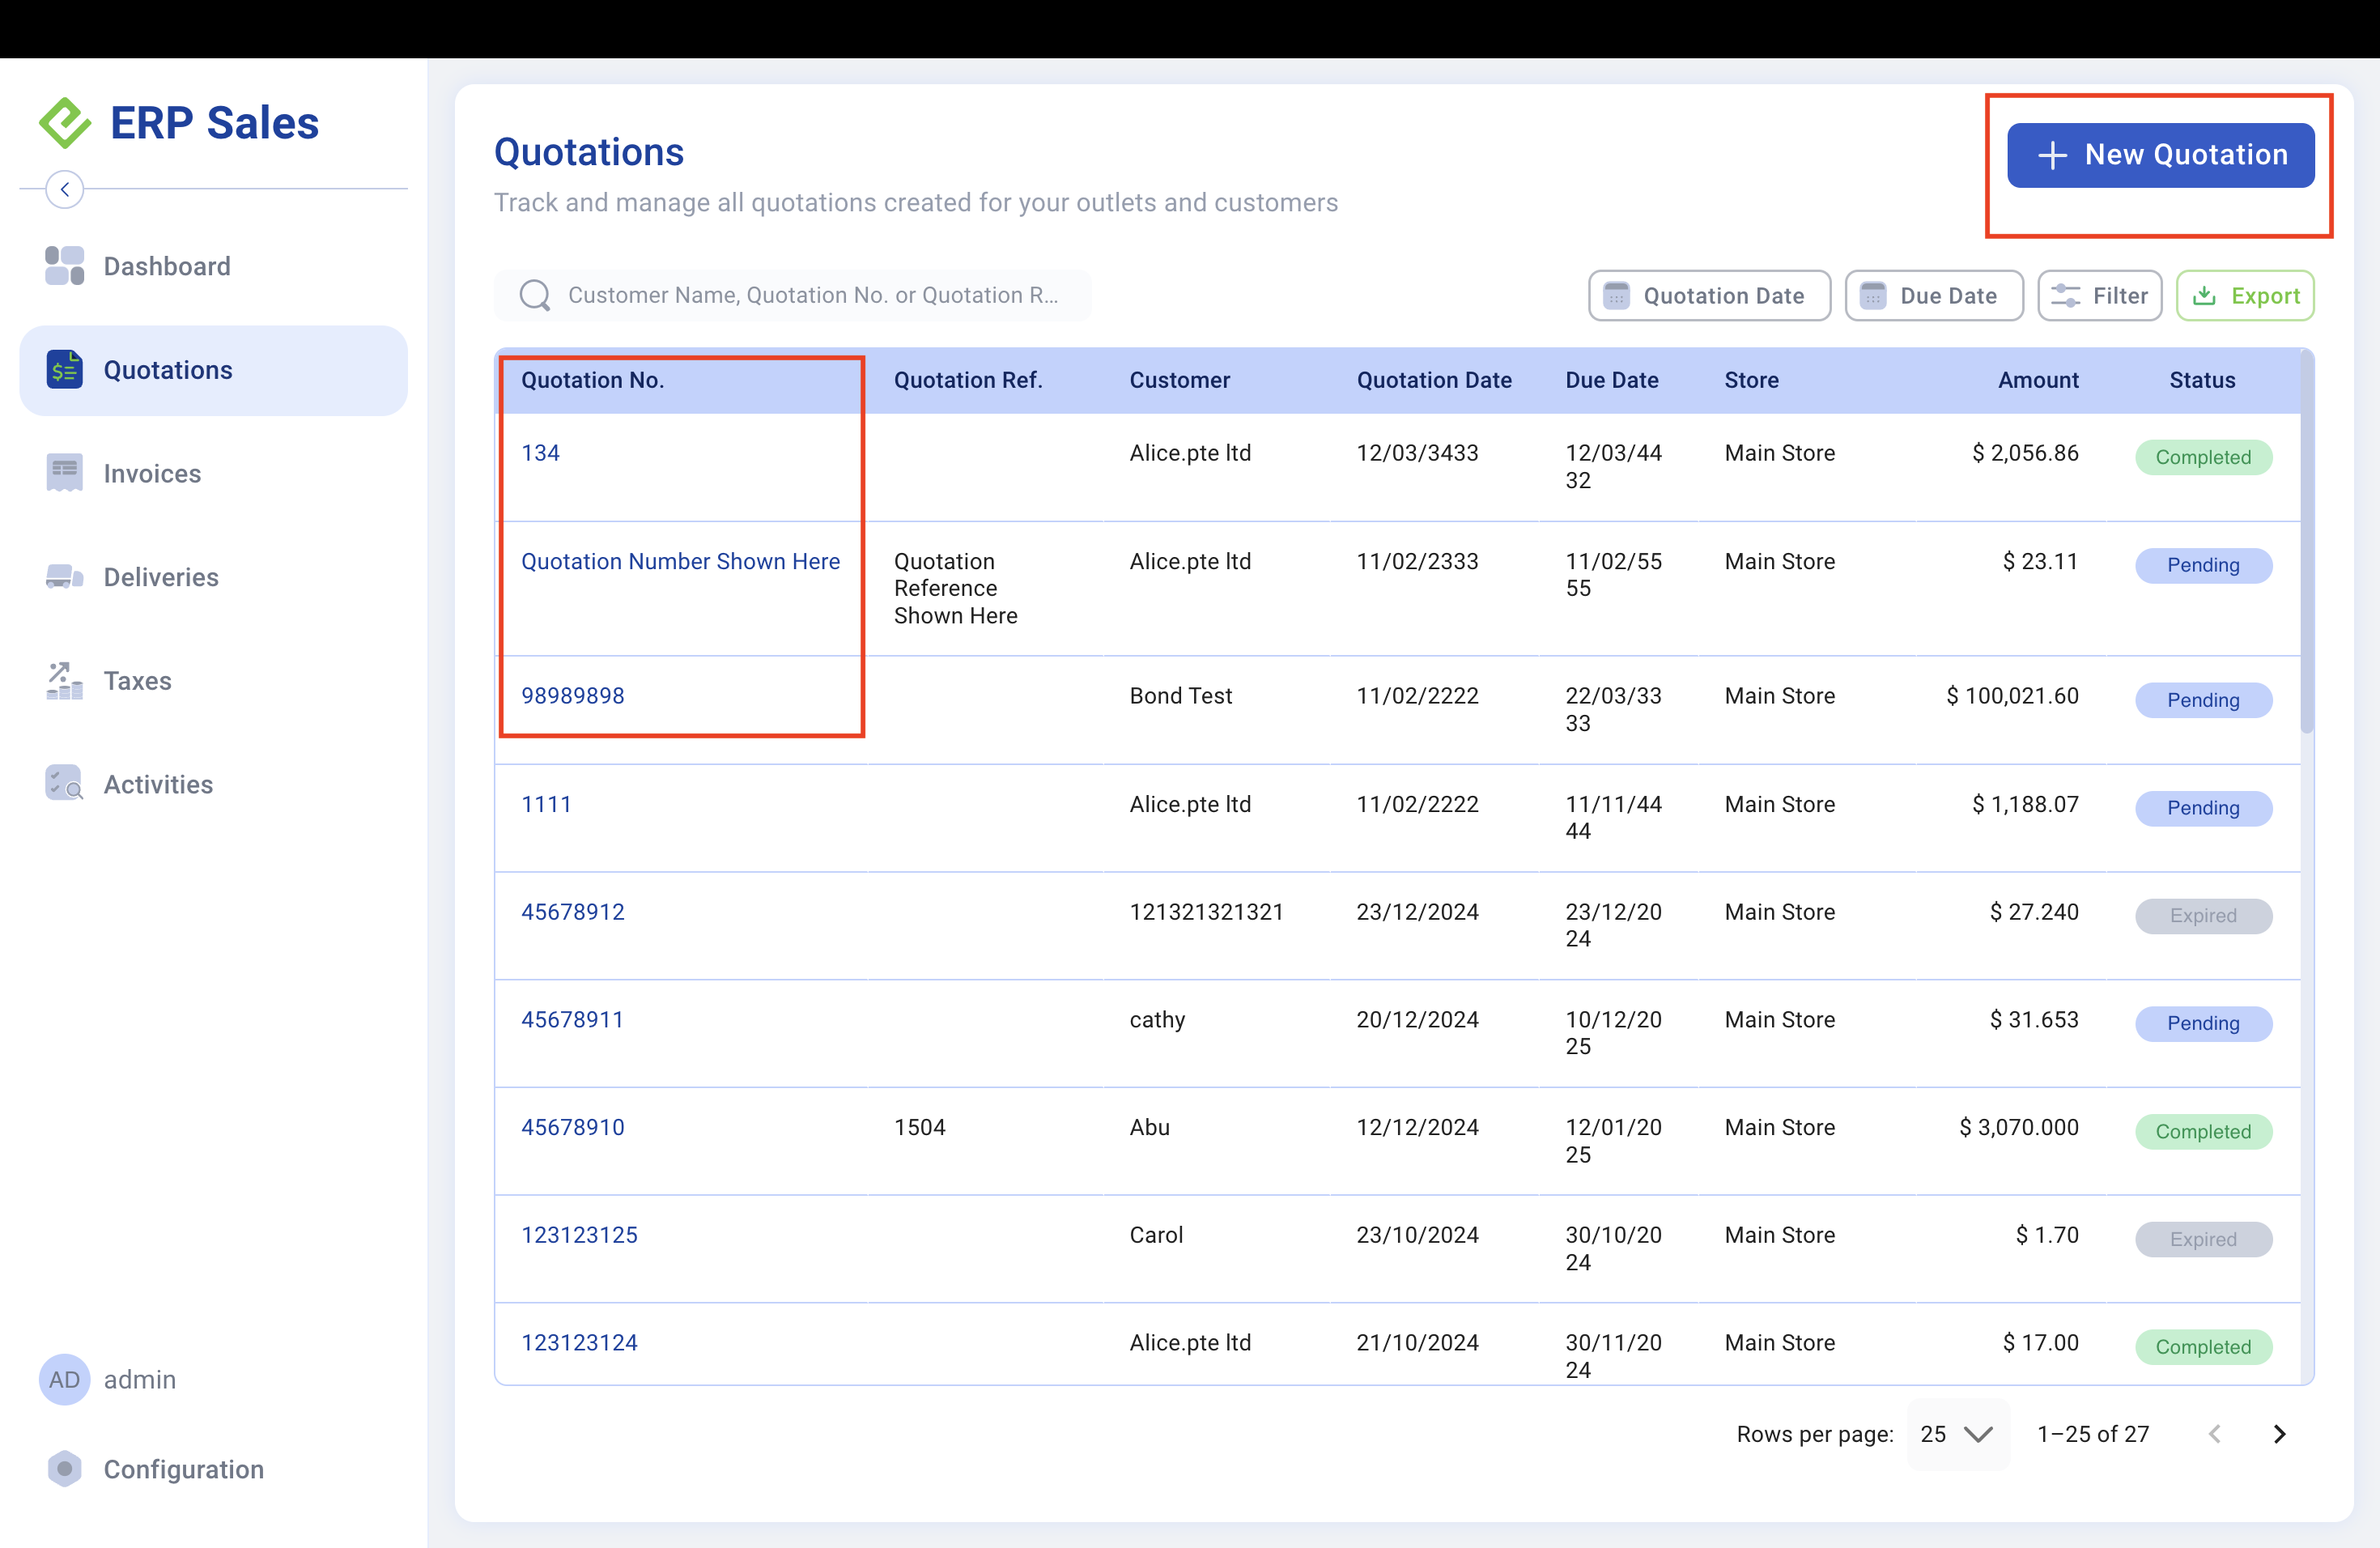
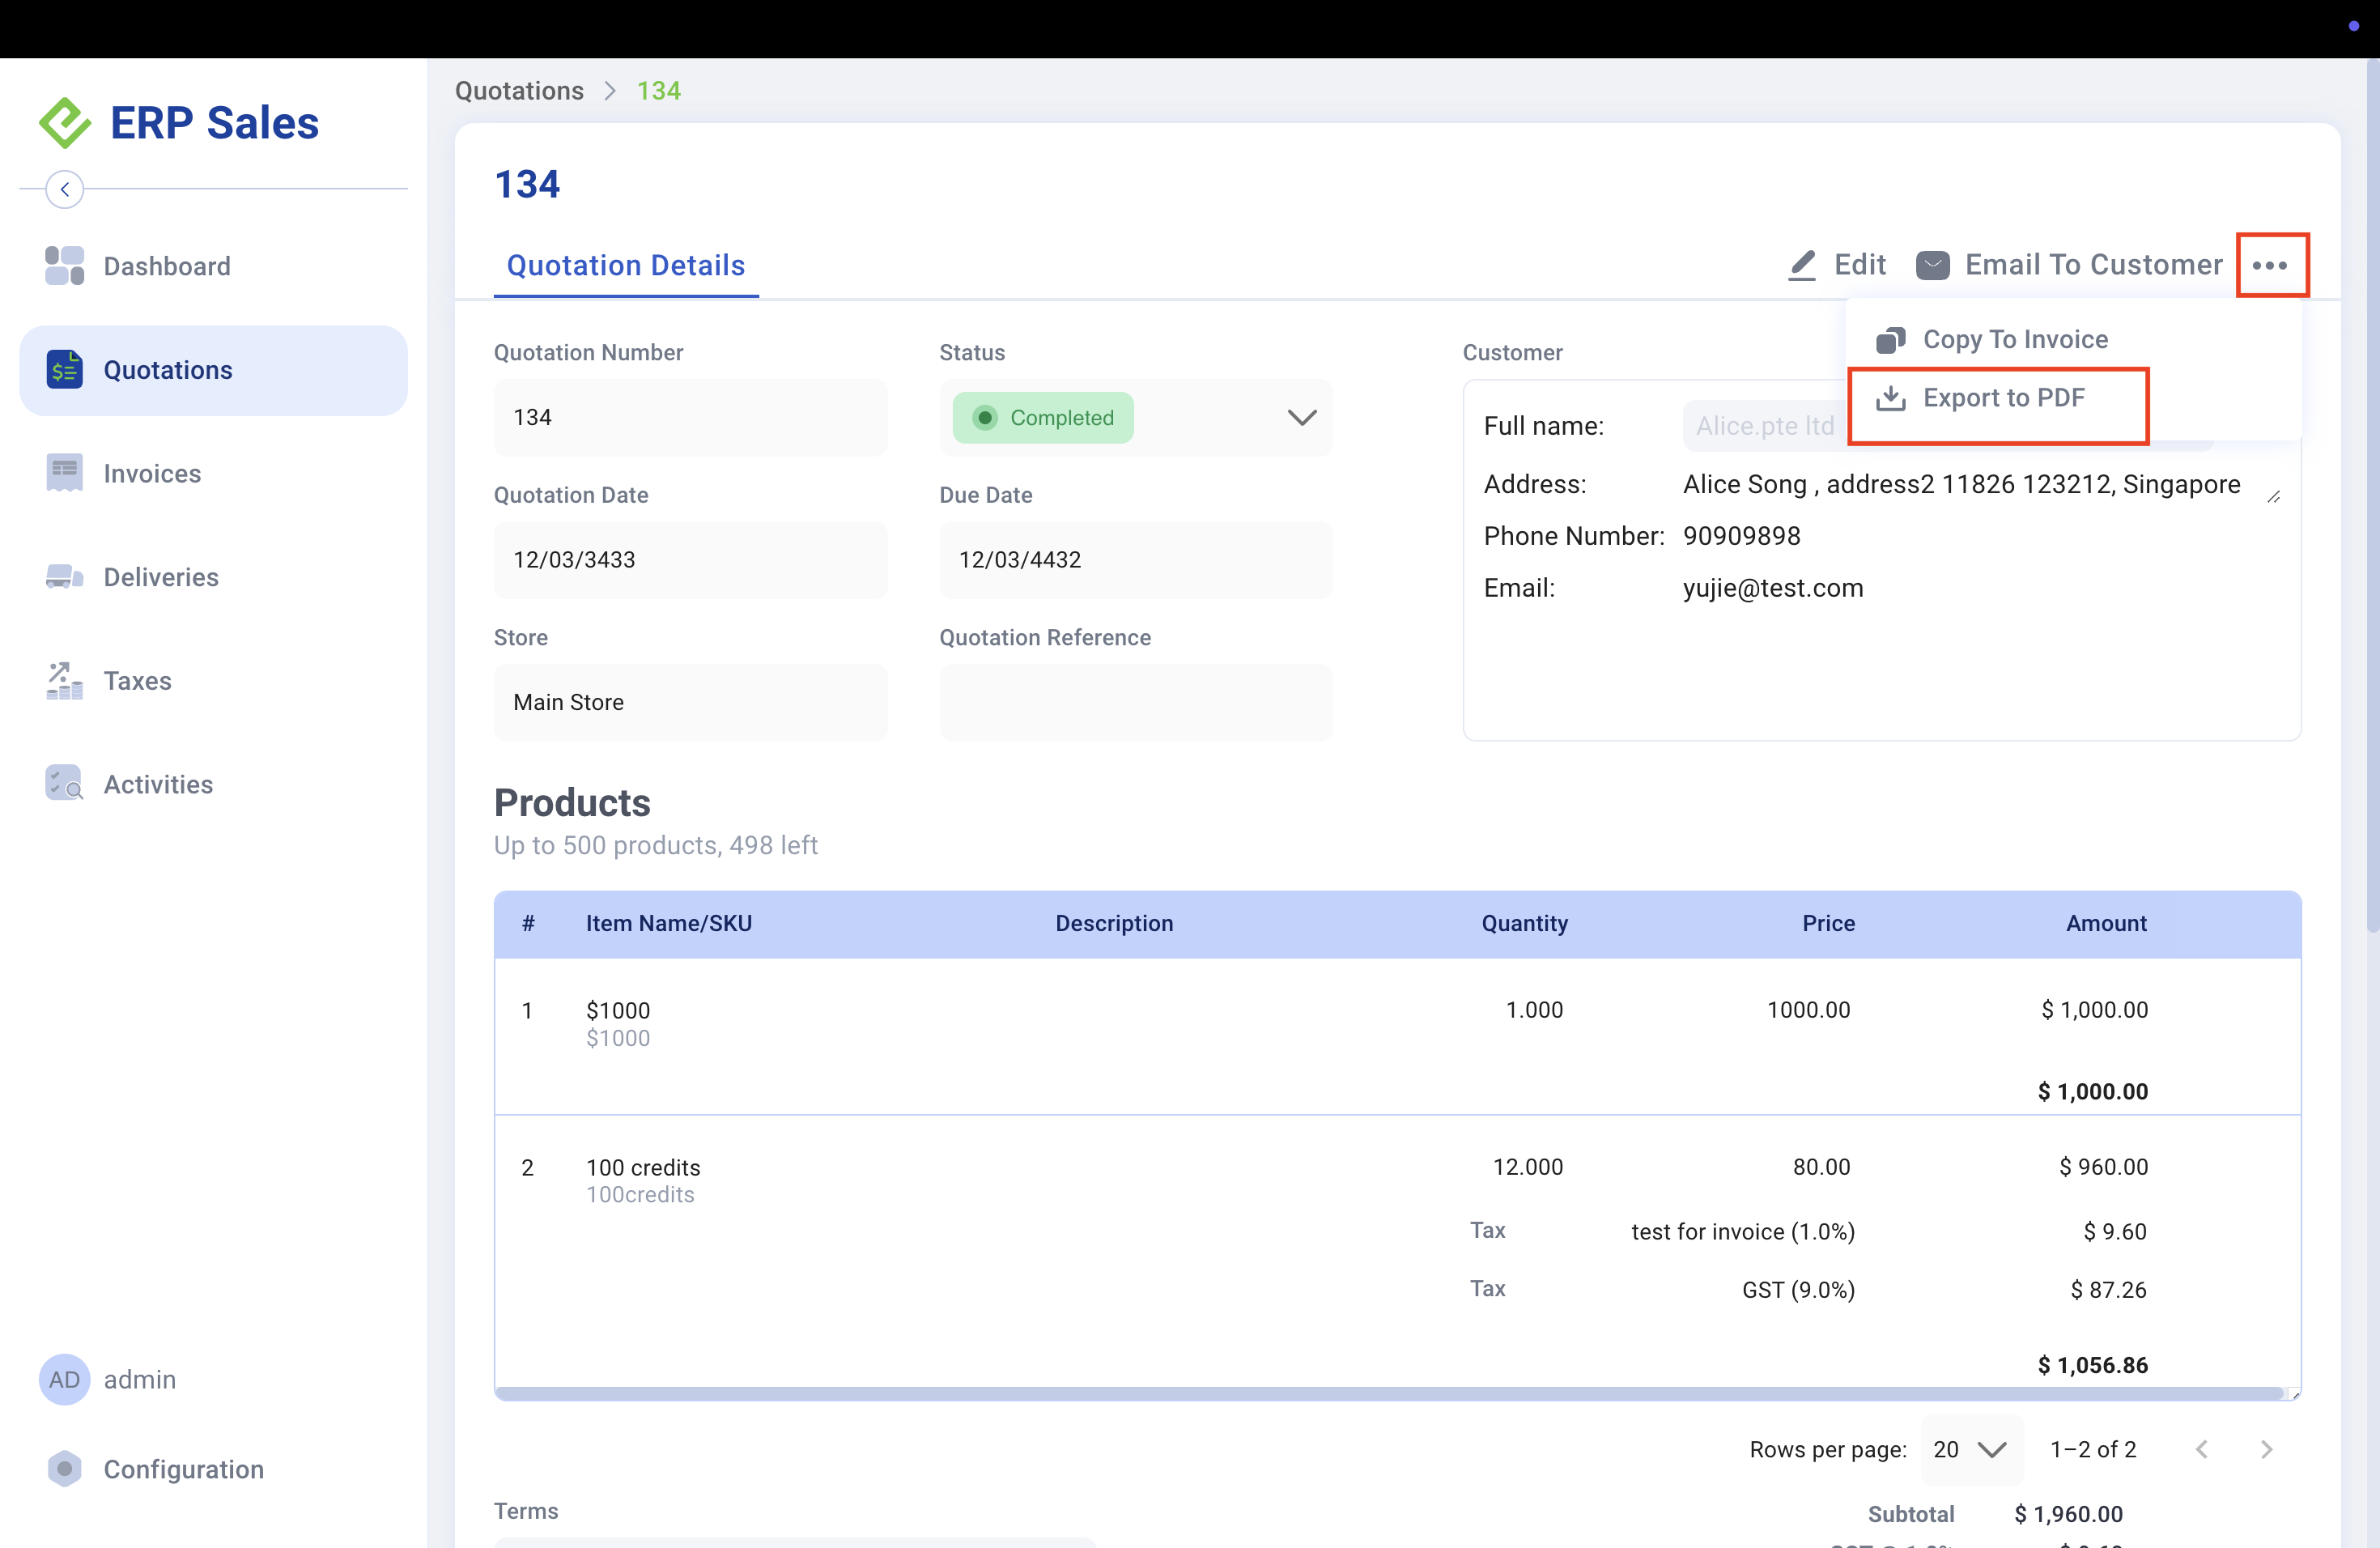
Go to Backend > Sales > Create Quotation or select an Existing Quotation No., click the 3 dots icon at the top right, and choose Export PDF.
This process is the same for Invoices and Delivery Orders as well.
The SKU is shown in the table between the item name and description. It’s written in italics to make it easy to spot. As highlighted in the image below.
(POS/Android) Return Mode - Allow Refund for Open Price Product 🖥️🤖
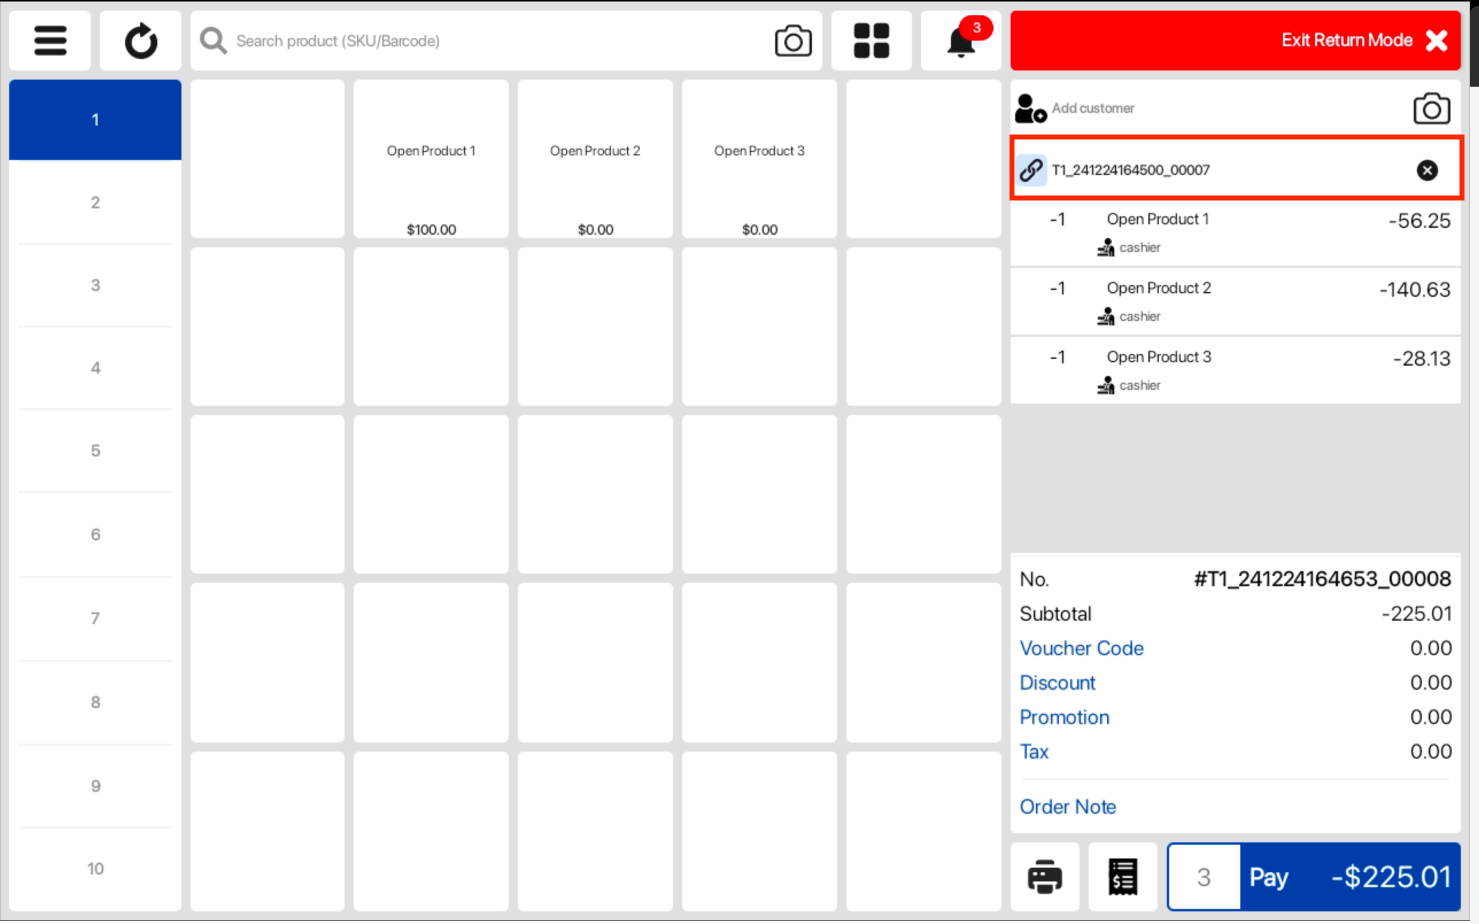
You can now process refunds for open-price products directly from the POS. When refunding, the system will automatically use the exact price the customer originally paid.
To refund an open-price item directly from the POS, follow these steps:
- Go to the Sales View in the POS system.
- Click the three dots icon at the top right and select Return Mode.
- Search for the order number.
- Click on the selected open-price item.
- Choose “Link to this Order”.
This will link the item to the order and show the correct price the customer originally paid.
The order for these refunded items will appear above the list of items, as shown in the images below.
Window POS:
Android POS:
(Backend) Loyalty Module - Climb The Rank ⚙️
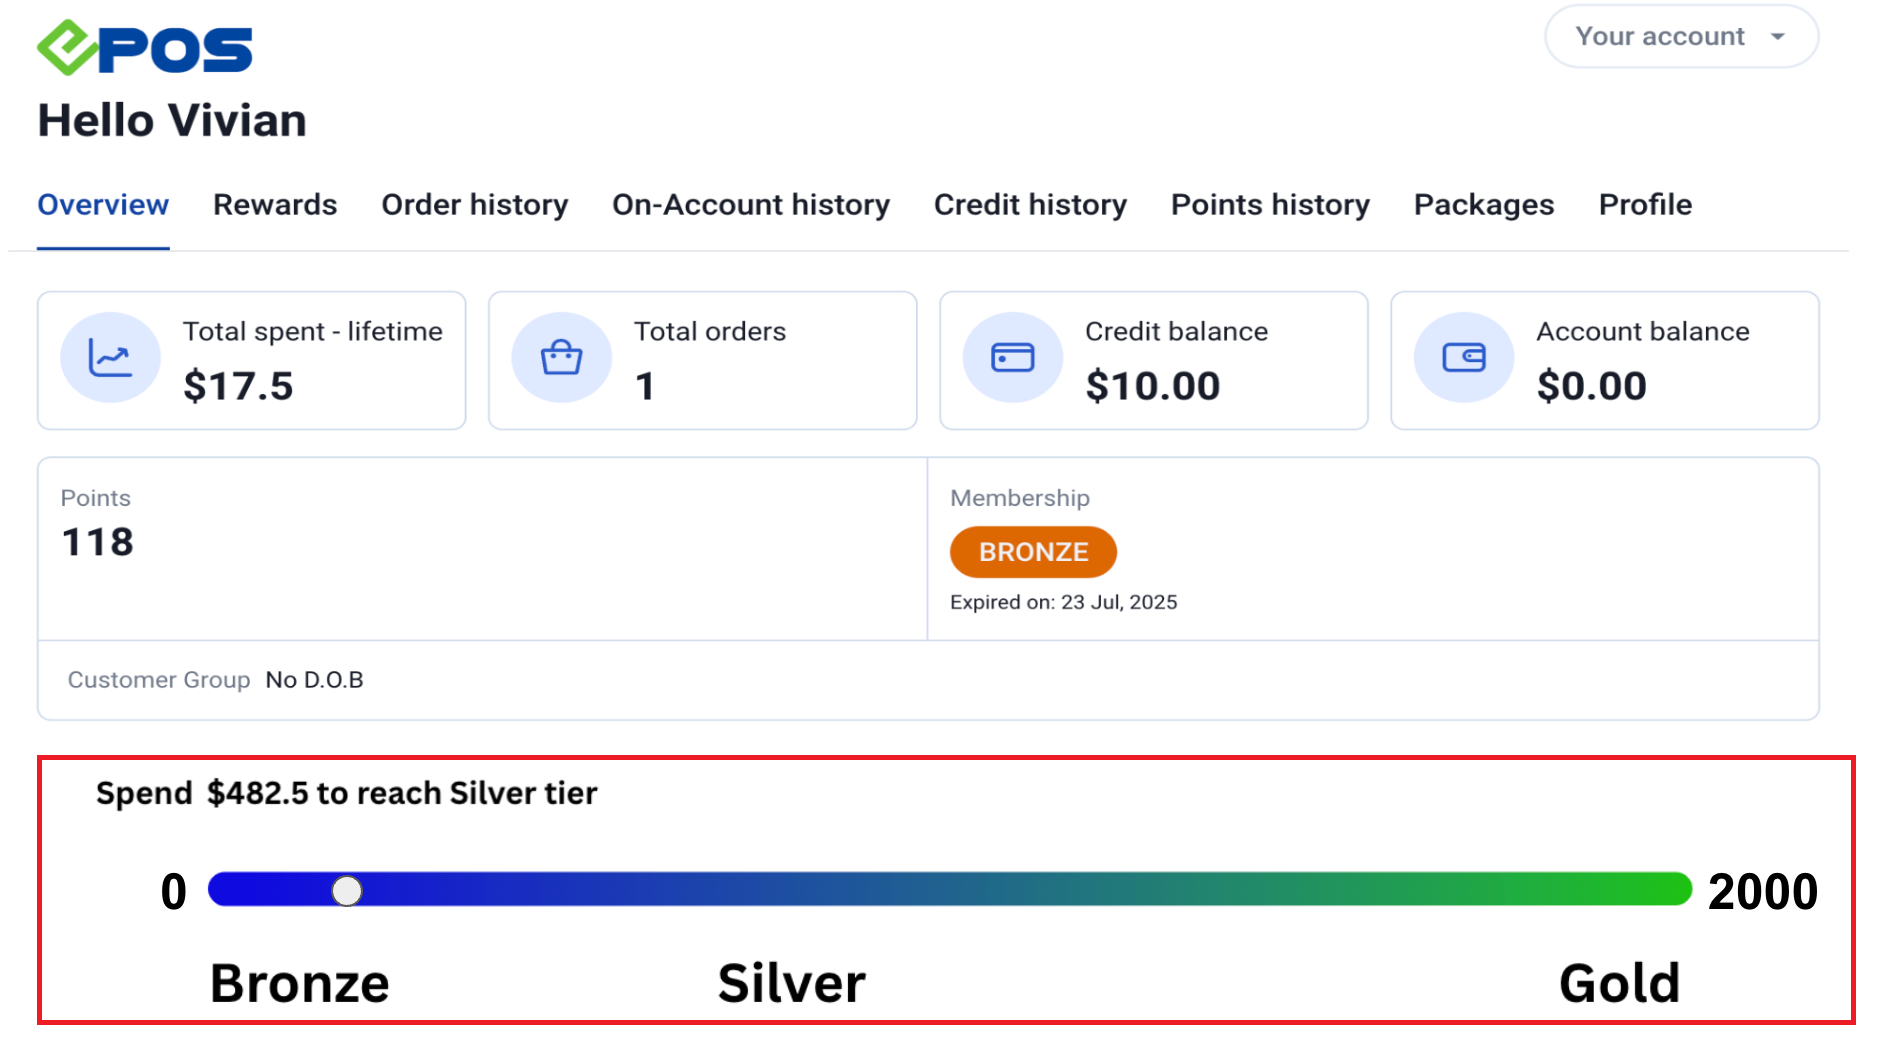
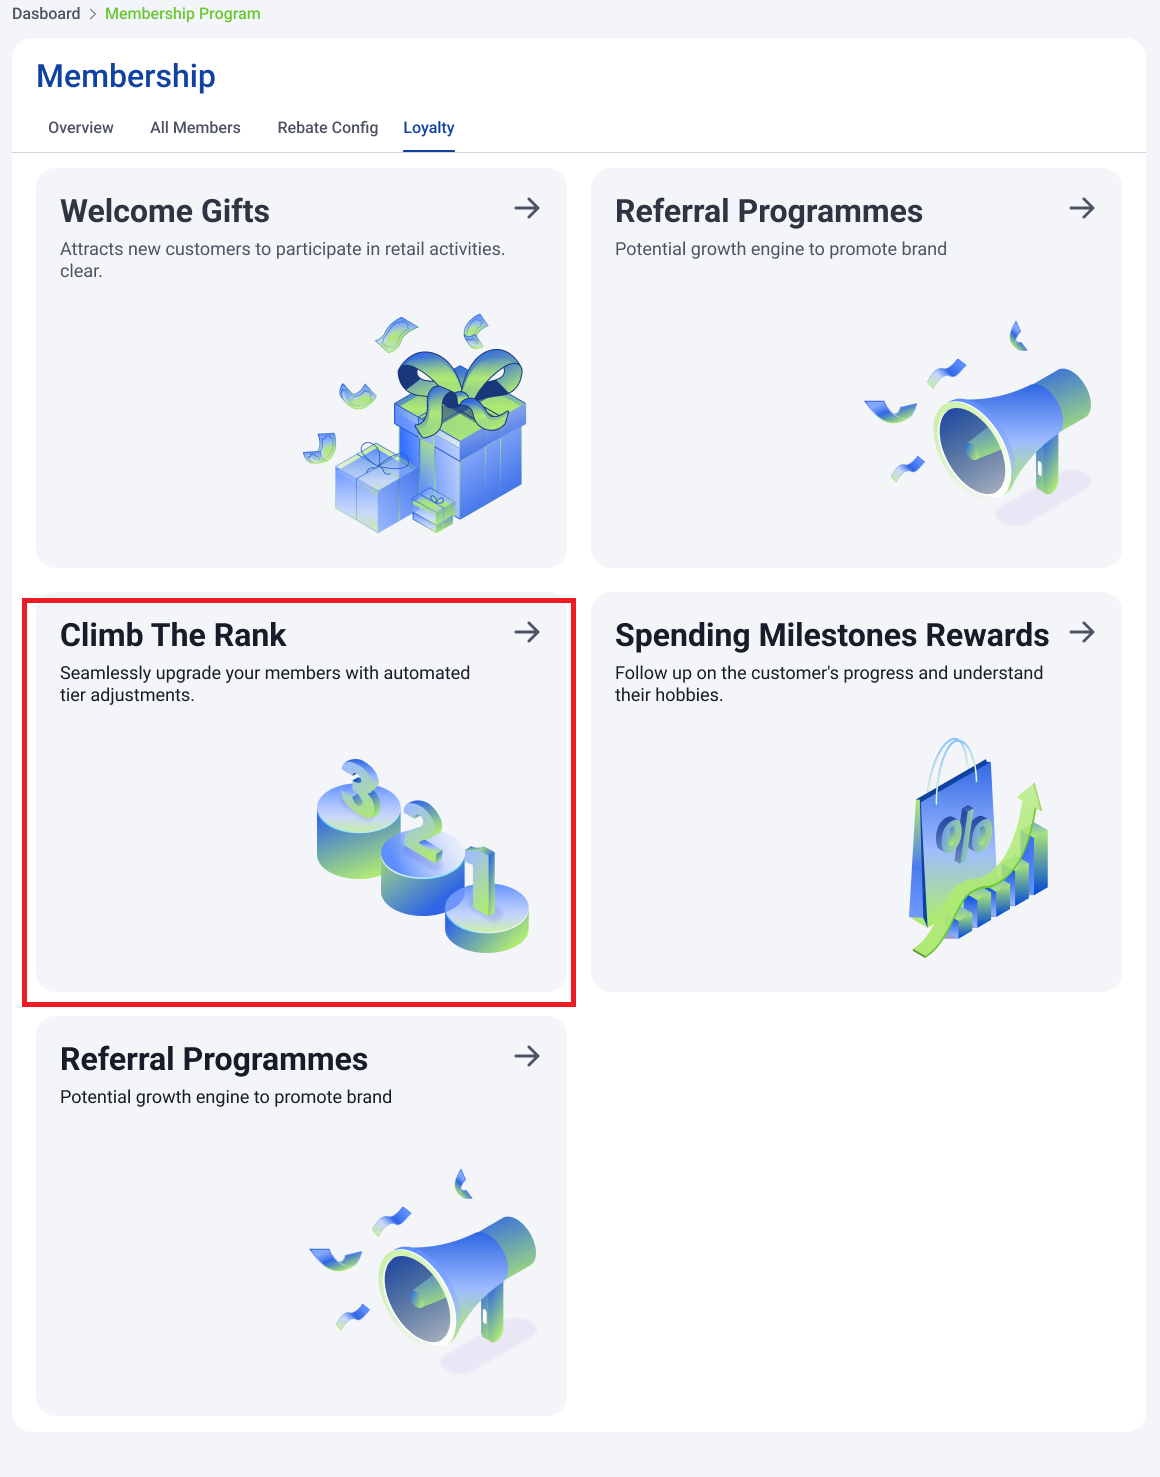
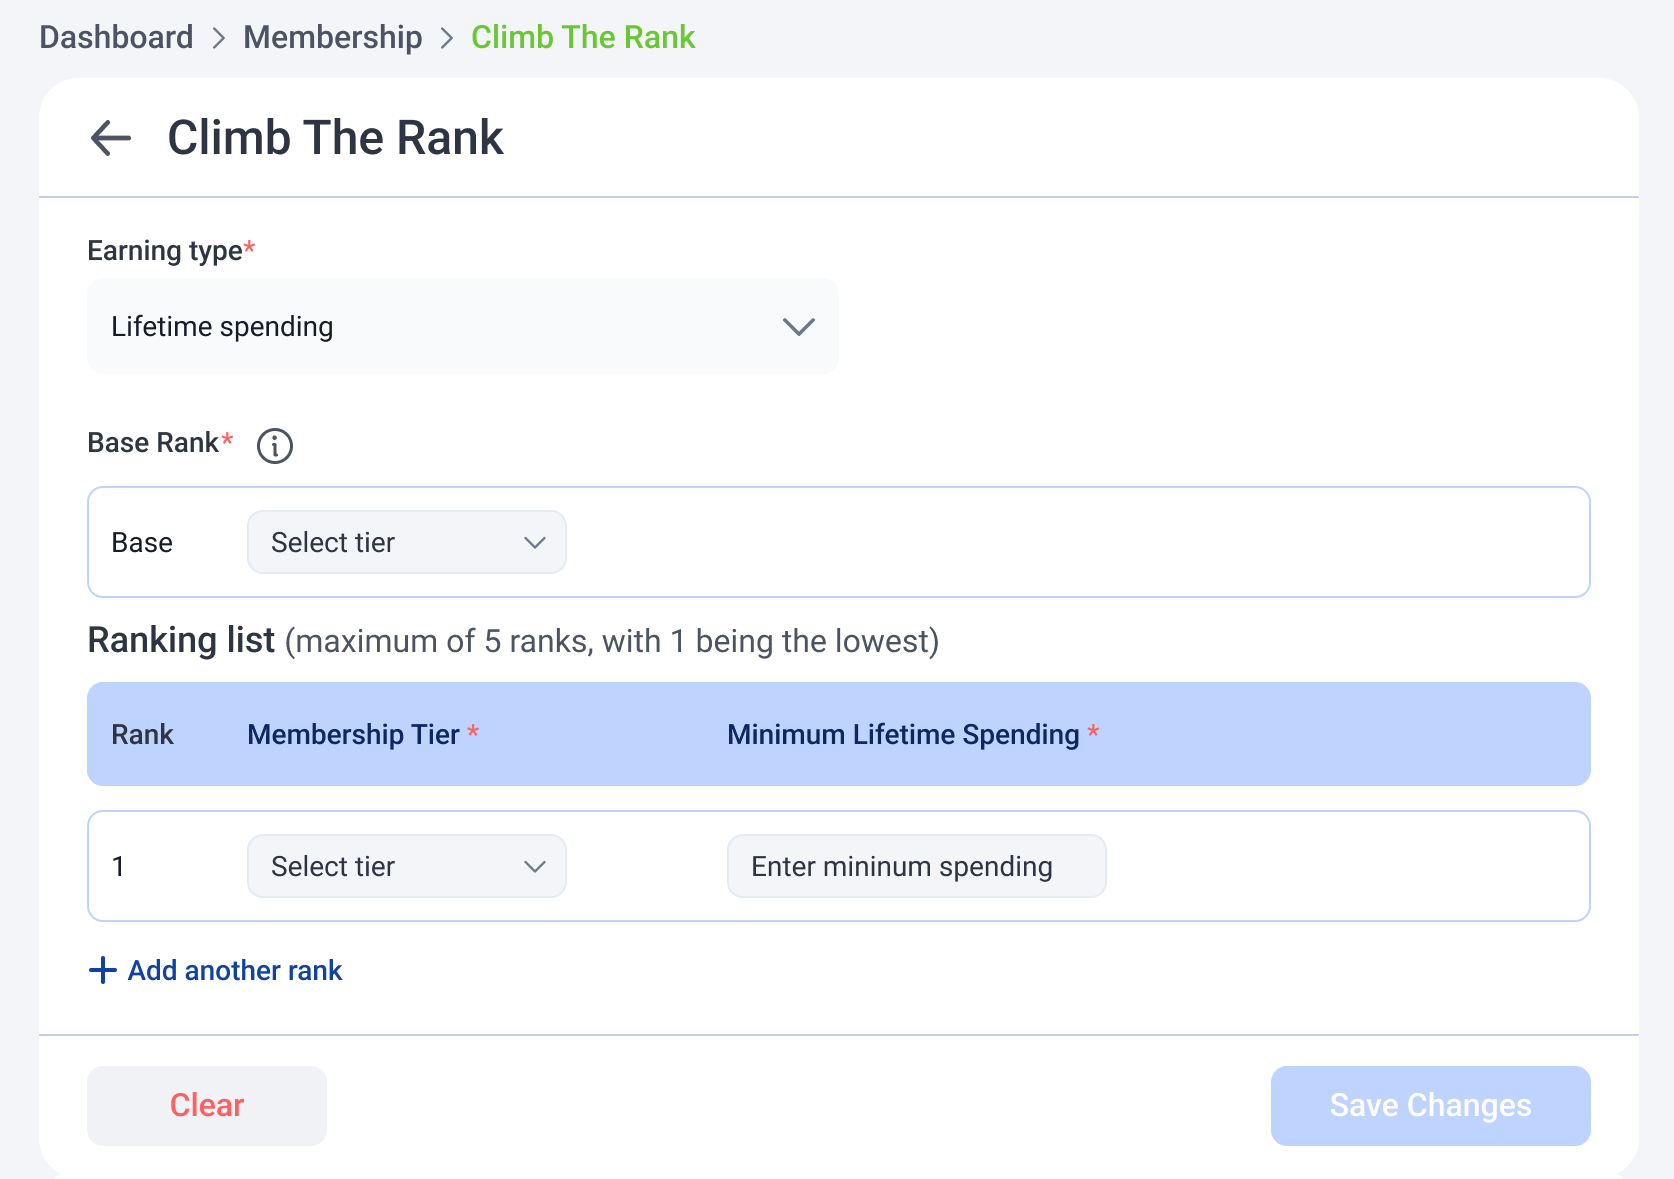
Our system now allows business owners to automatically upgrade members to the next membership tier once they reach the specified spending threshold for each tier.
- Go to the “Climb the Rank” section in the loyalty module.

- Configure the minimum spending thresholds for each membership tier and set up entry-level ranks for participation.
- Then, assign a membership tier to each spending threshold.
- Add more tiers by clicking “Add another rank”, confirm and save the ranking rules.
- Once saved, rankings are locked and can only be removed in descending order.
💡Track members’ progress through the Activity Log.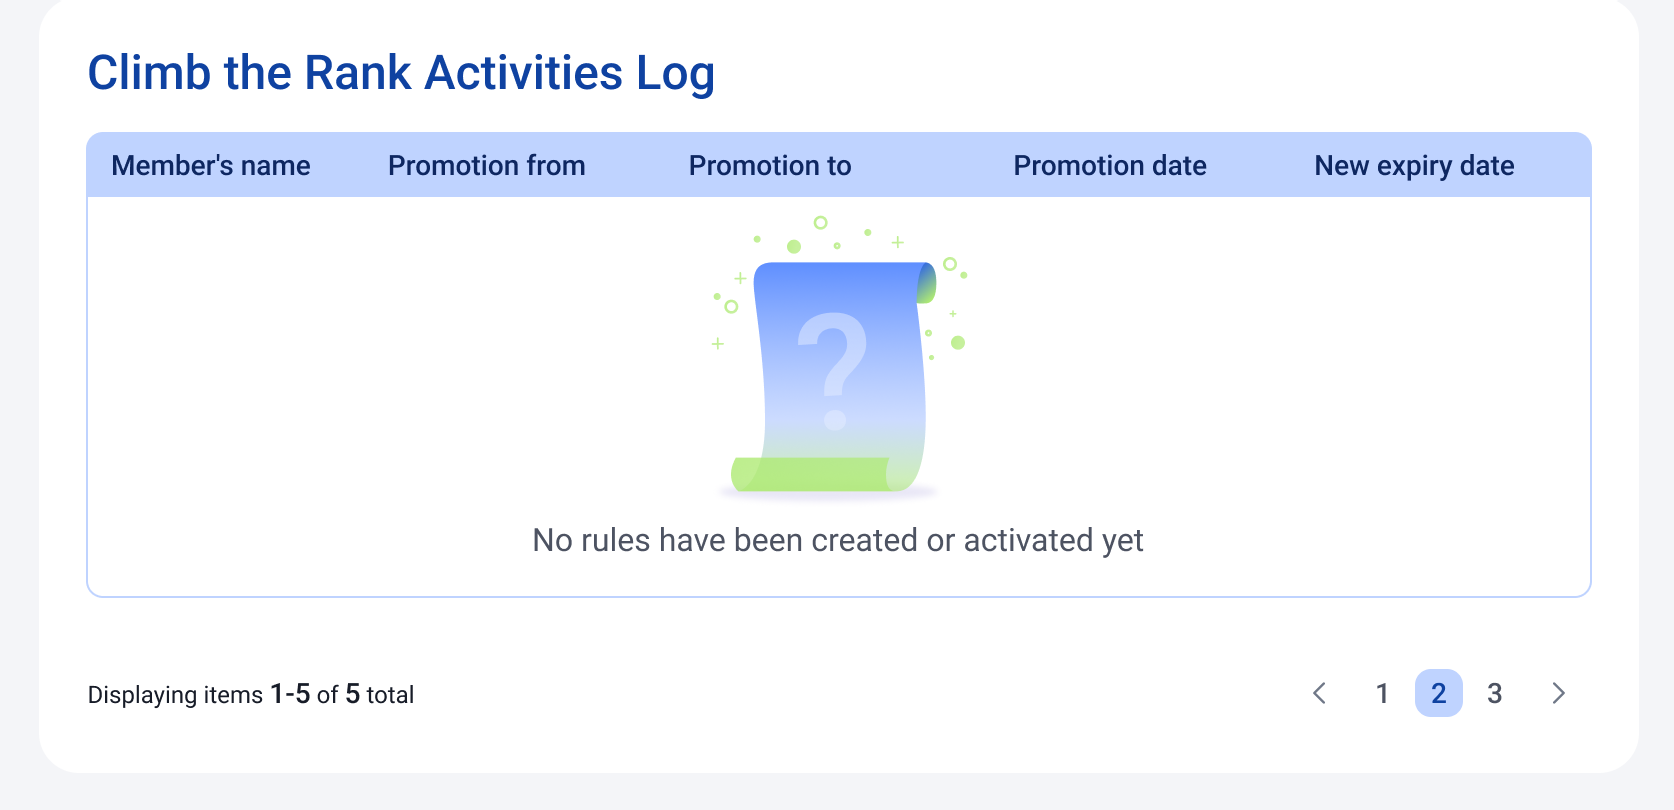
💡This enhancement eliminates the need for manual tier adjustments, ensuring accurate and timely upgrades
(Backend/POS/Android) Allow Customer Credit and Account Transactions ⚙️ 🖥🤖
Now user can set the “Allow Credit Transaction” and “Allow Account Transaction” by default whenever create a new customer.
Once customer is created, system auto tick/untick and enable/disable credit transaction and account transaction. Customer can use Customer Credit as a payment method.
Backend
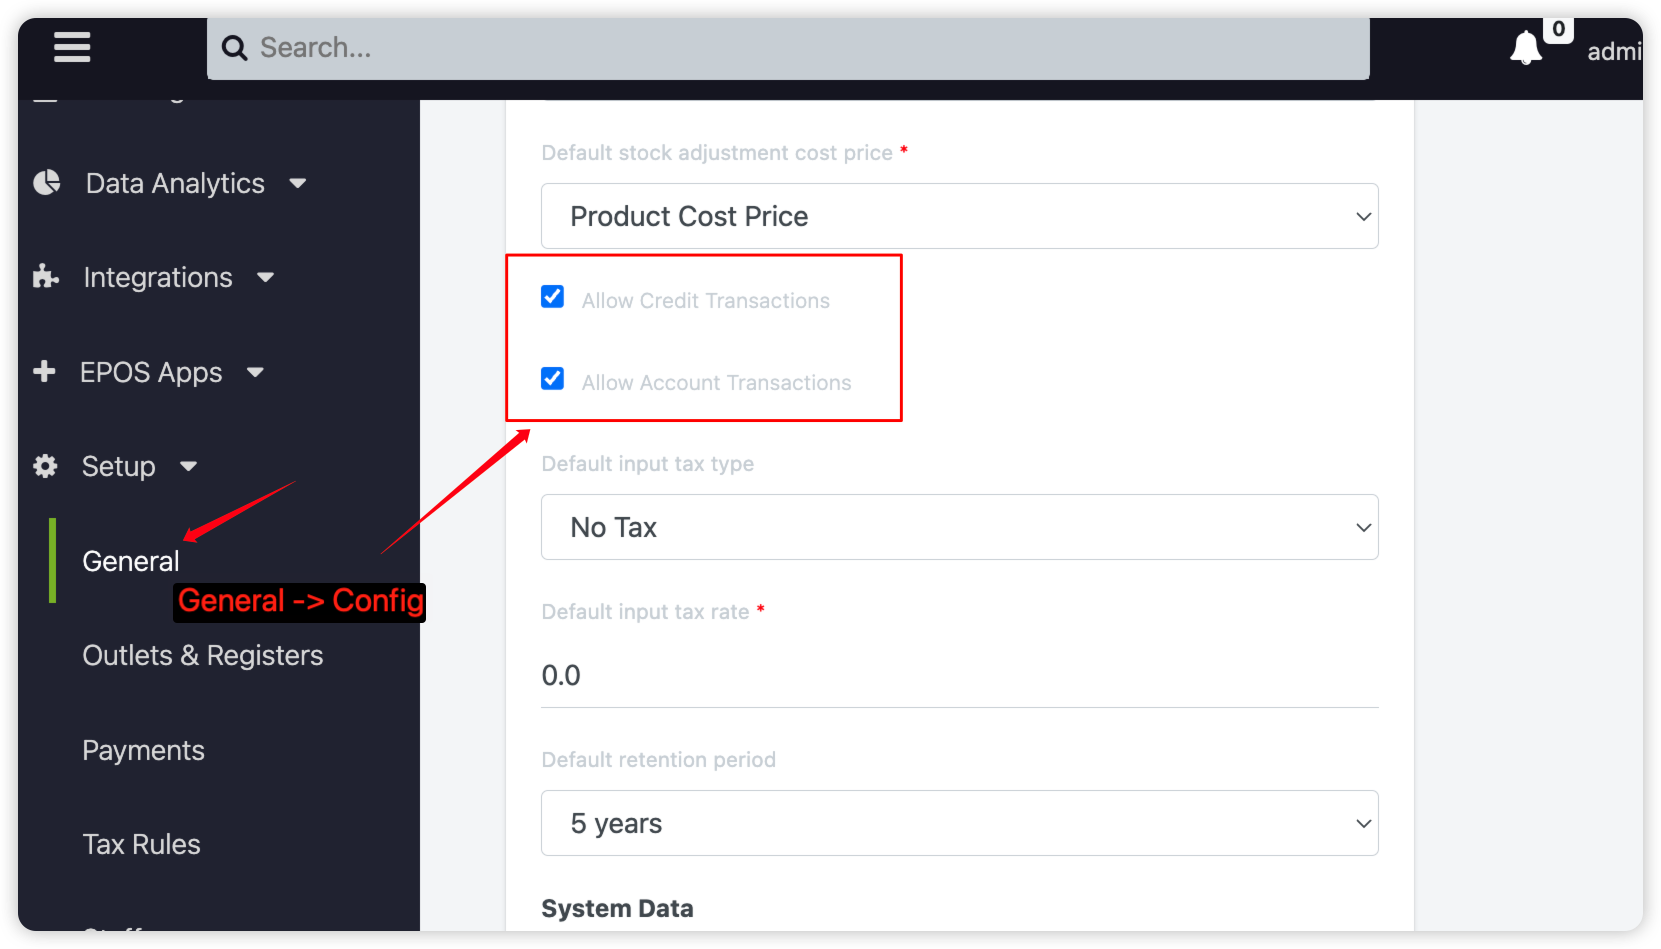
1. User can set the general config (“General” -> “Config”) to enable/disable both credit and account transaction.
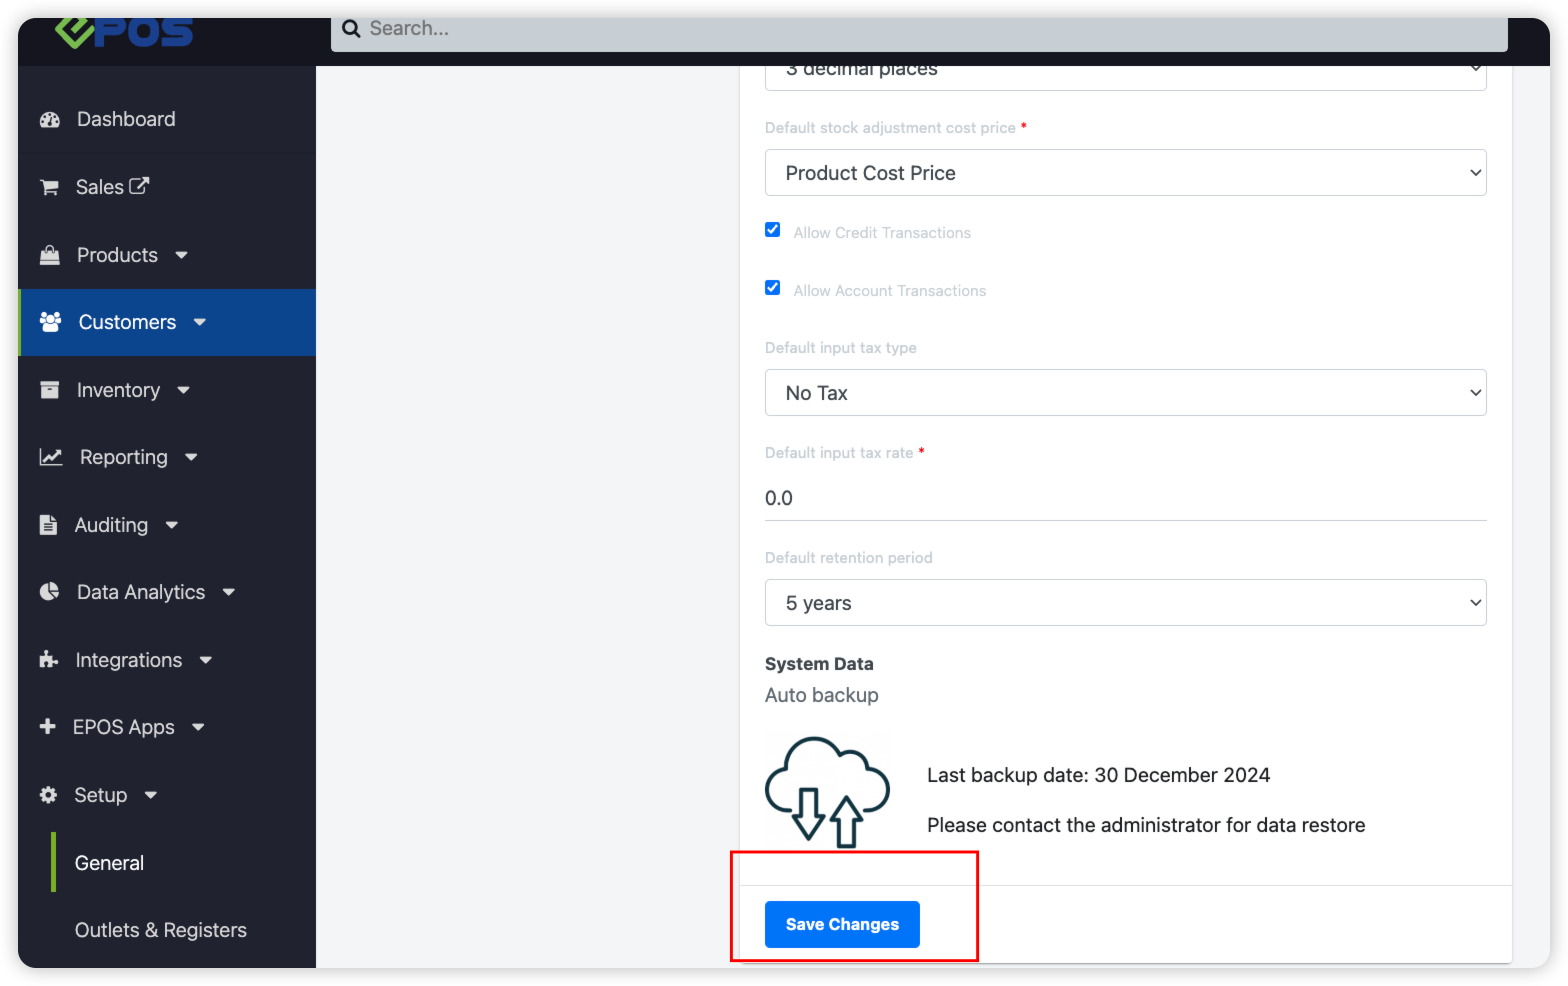
2. Remember to click the “Save Changes” below
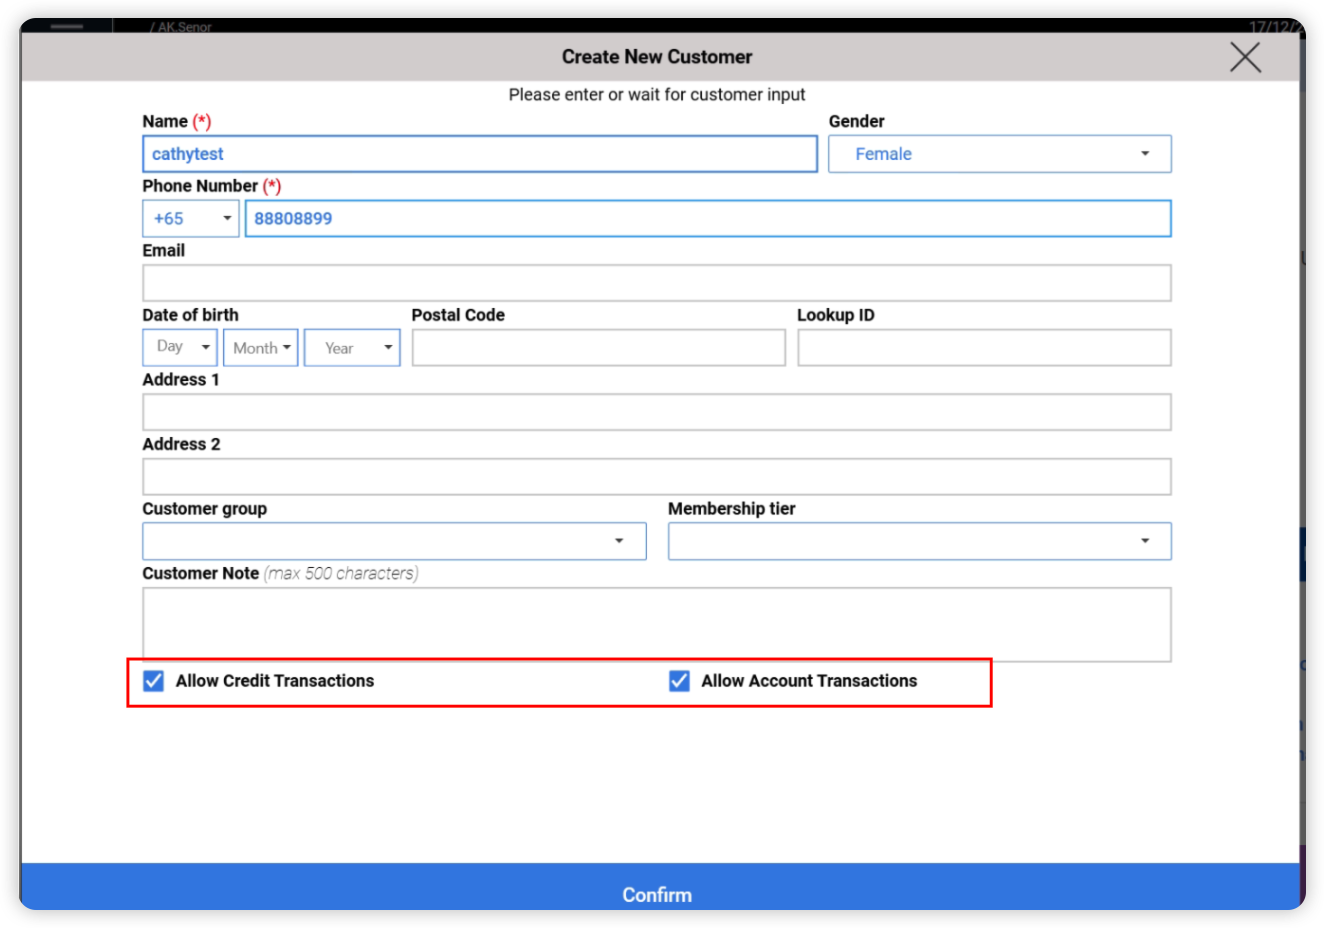
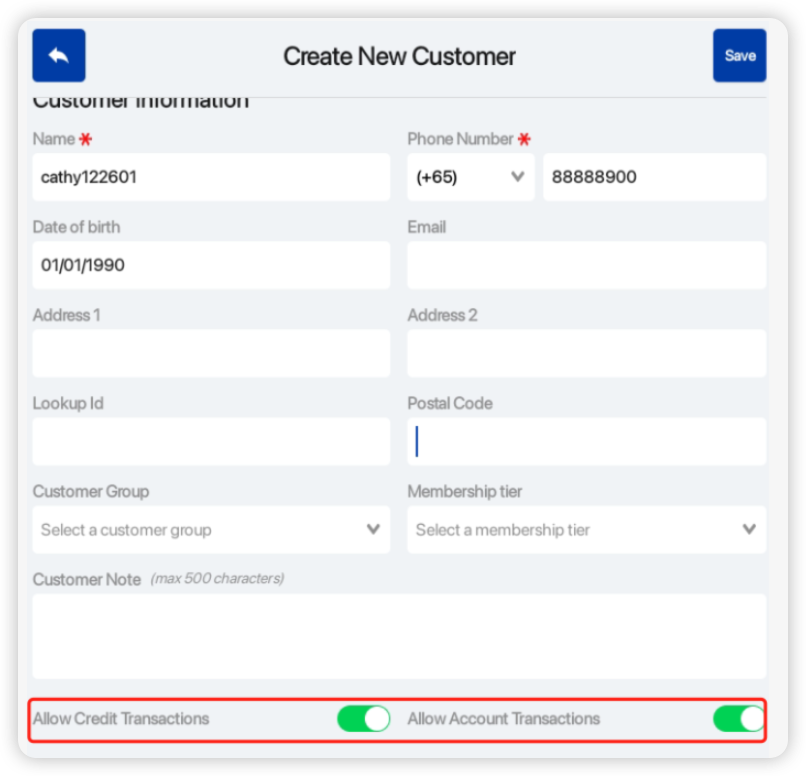
3. Once enable, when creating new customer at the POS/Android POS frontend or ERP backend, it would automatically ticked on the two boxes.(see at frontend view below)
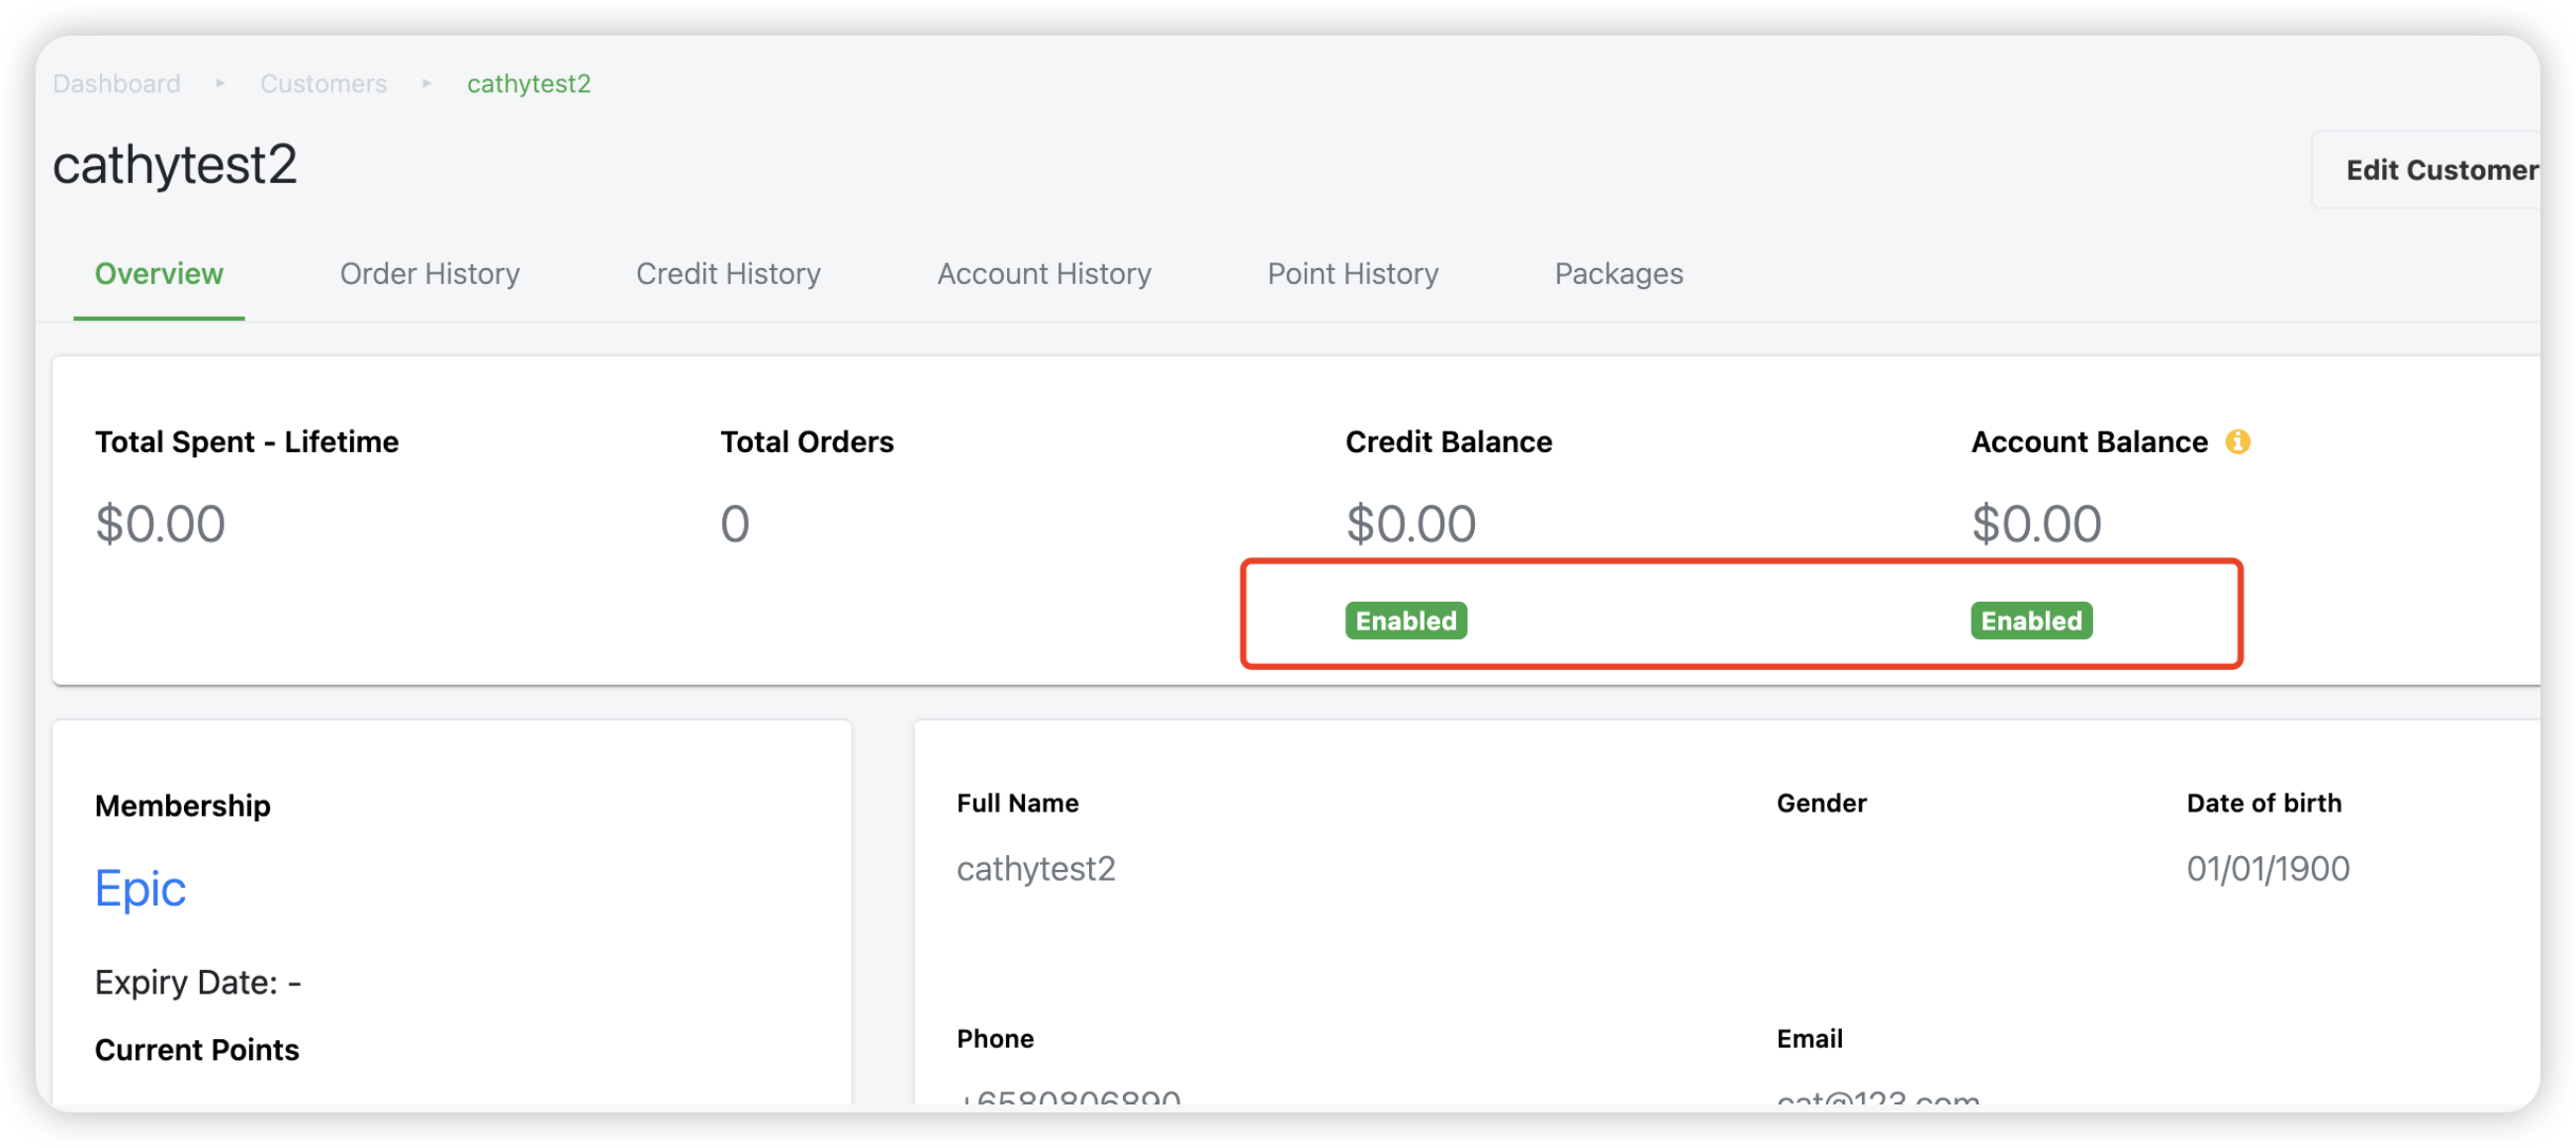
When the customer being created, you can see “Credit Balance” & “Account Balance” both showing enabled.
When the customer being created in the backend Sales-> ERP , also can see “Credit Balance” & “Account Balance” both showing enabled in the backend-> Customers
POS (Frontend)
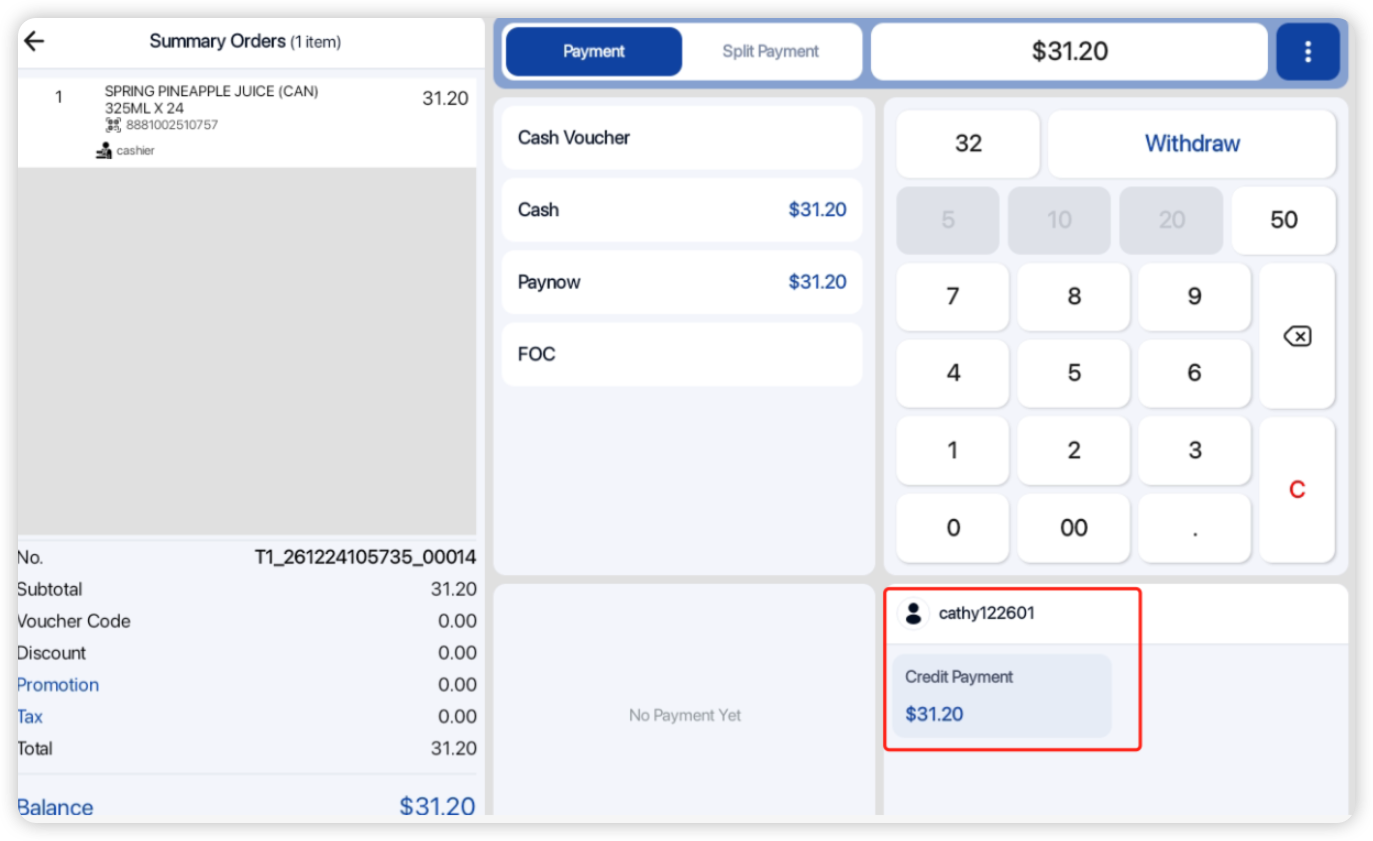
2. With these two boxes ticked, this customer can use Customer Credit as the payment method.
Android POS (Frontend)
1. When user creating new customer at frontend, they can see the two boxes bellow being ticked.
2. With these two boxes ticked, this customer can use Customer Credit as the payment method.
(Backend) ERP Sales module - Create customer directly from quotation / invoice page ⚙️
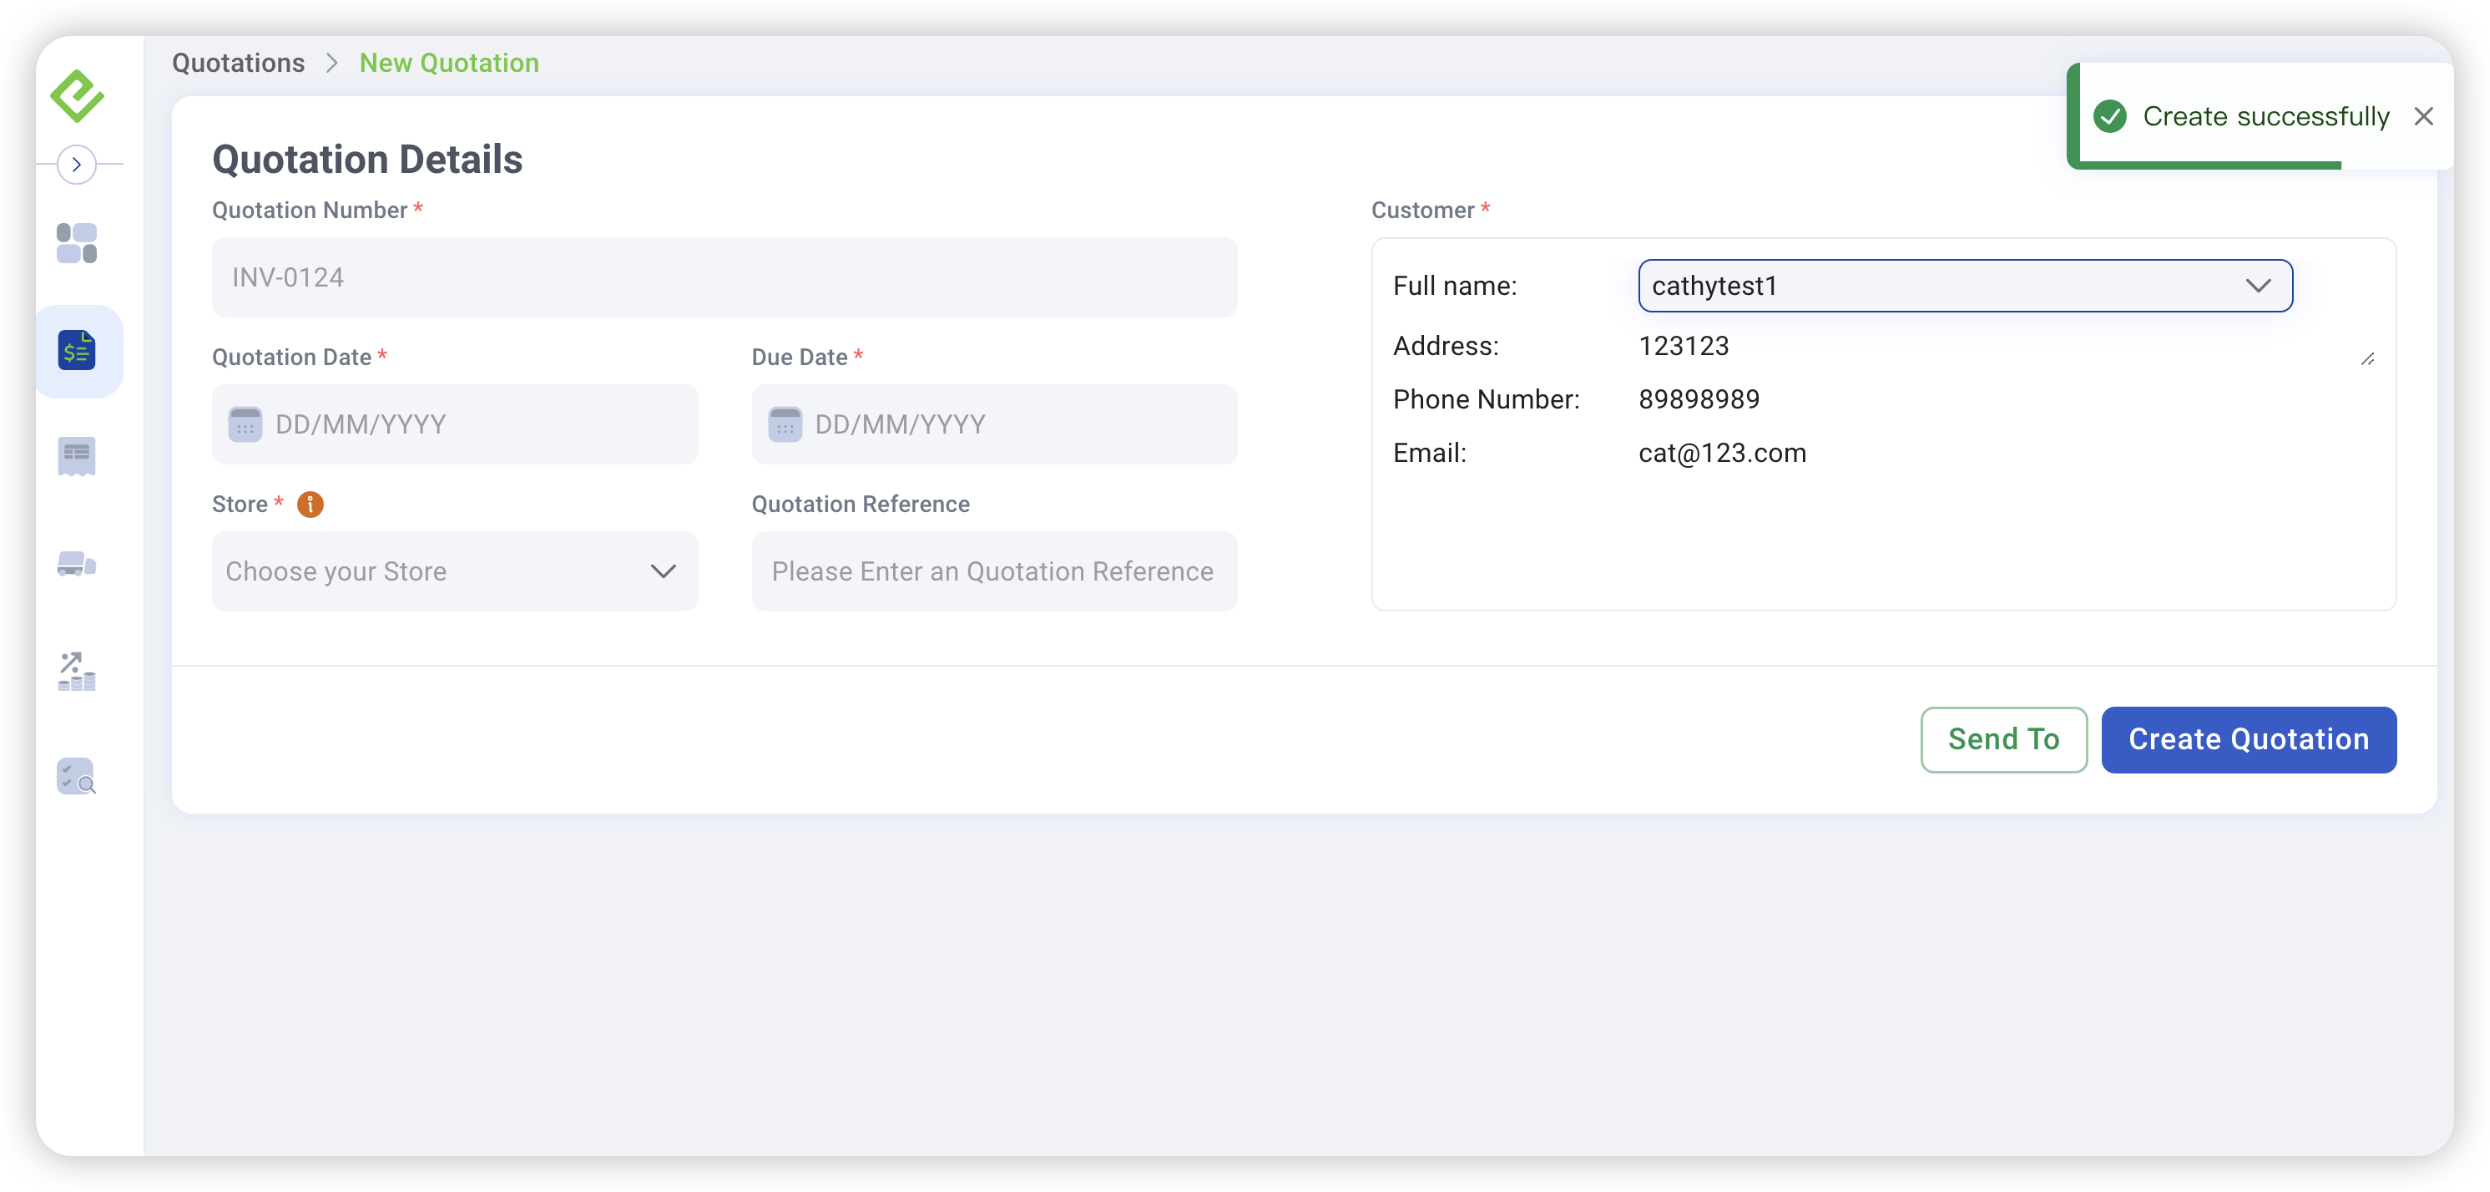
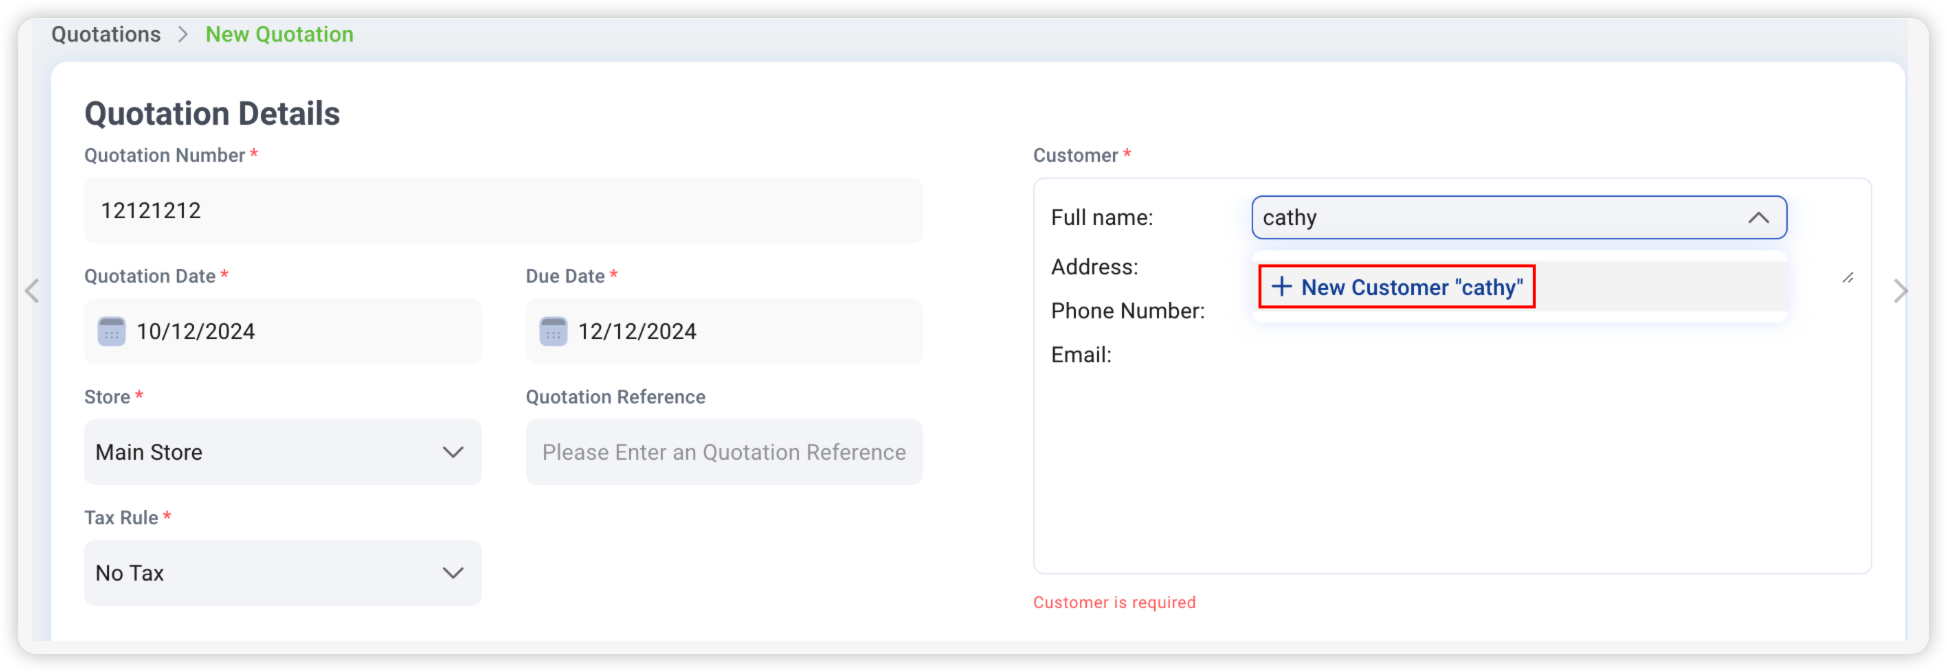
User can now create a new customer directly from quotation / invoice page, not need to navigate to different parts of the backend to issue 1 quotation.
1. User create a new quotation and create a new customer. Customer not found and a ghost button is displayed for user to create a new customer.
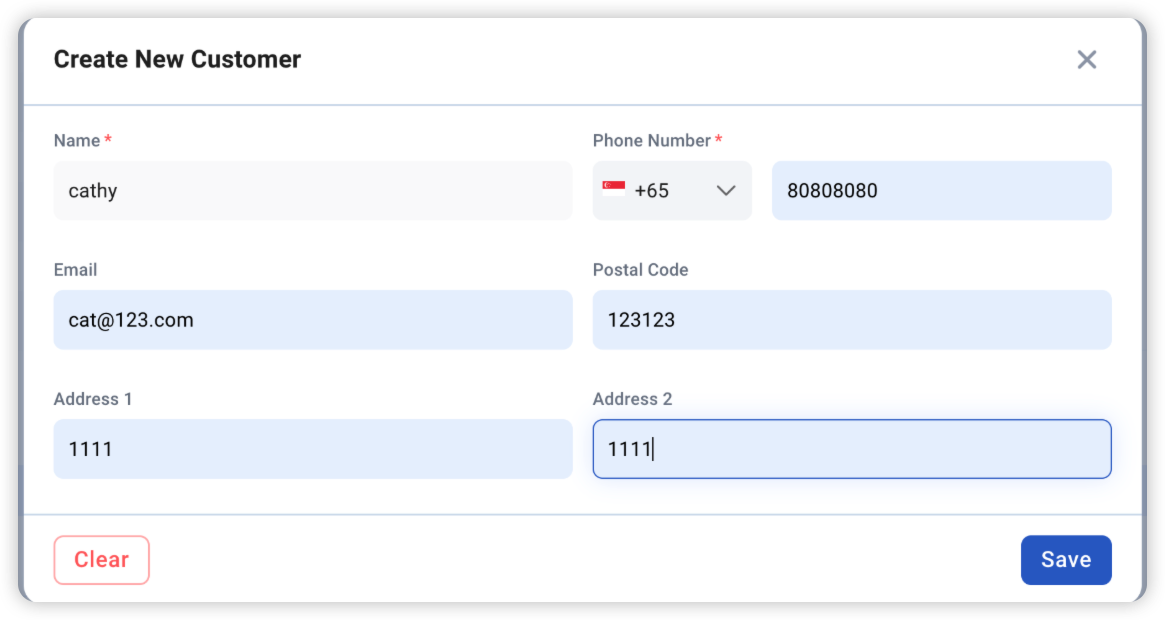
2. Create customer page pops up, need to fill in details of customers correctly and add to the quotation.
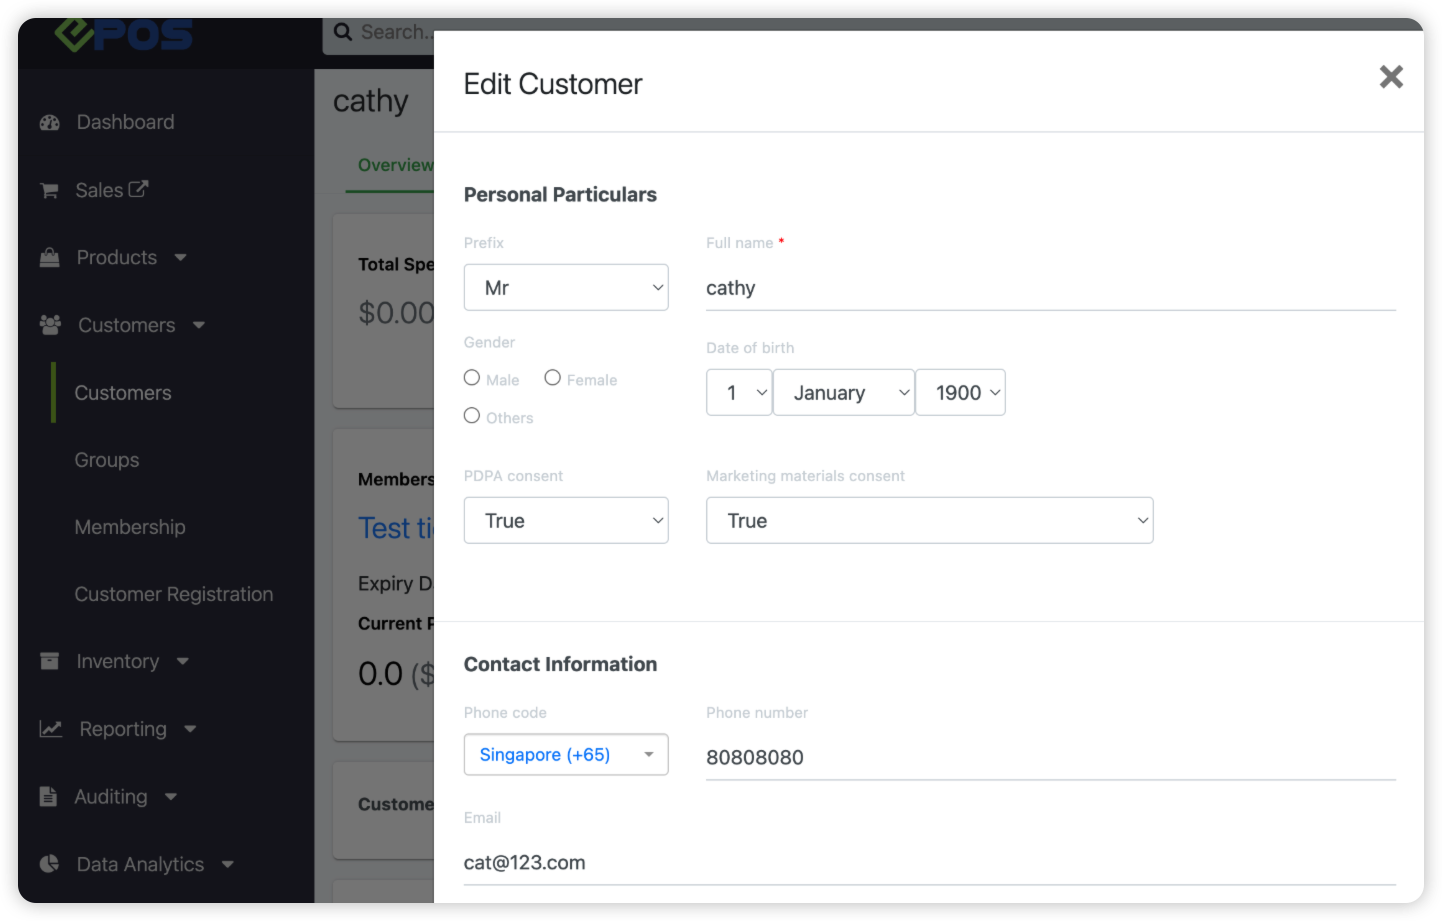
3. Go to backend and check the customer details. User can see new customer is created successfully and customer details are correct.
(Backend) ERP Sales module - Apply Pricebooks to ERP Module ⚙️
User can now add Pricing books when adding products. Don’t need to change prices every time when issuing an invoice!!
1.Set different prices for different customer groups, giving user more pricing options and improving sales.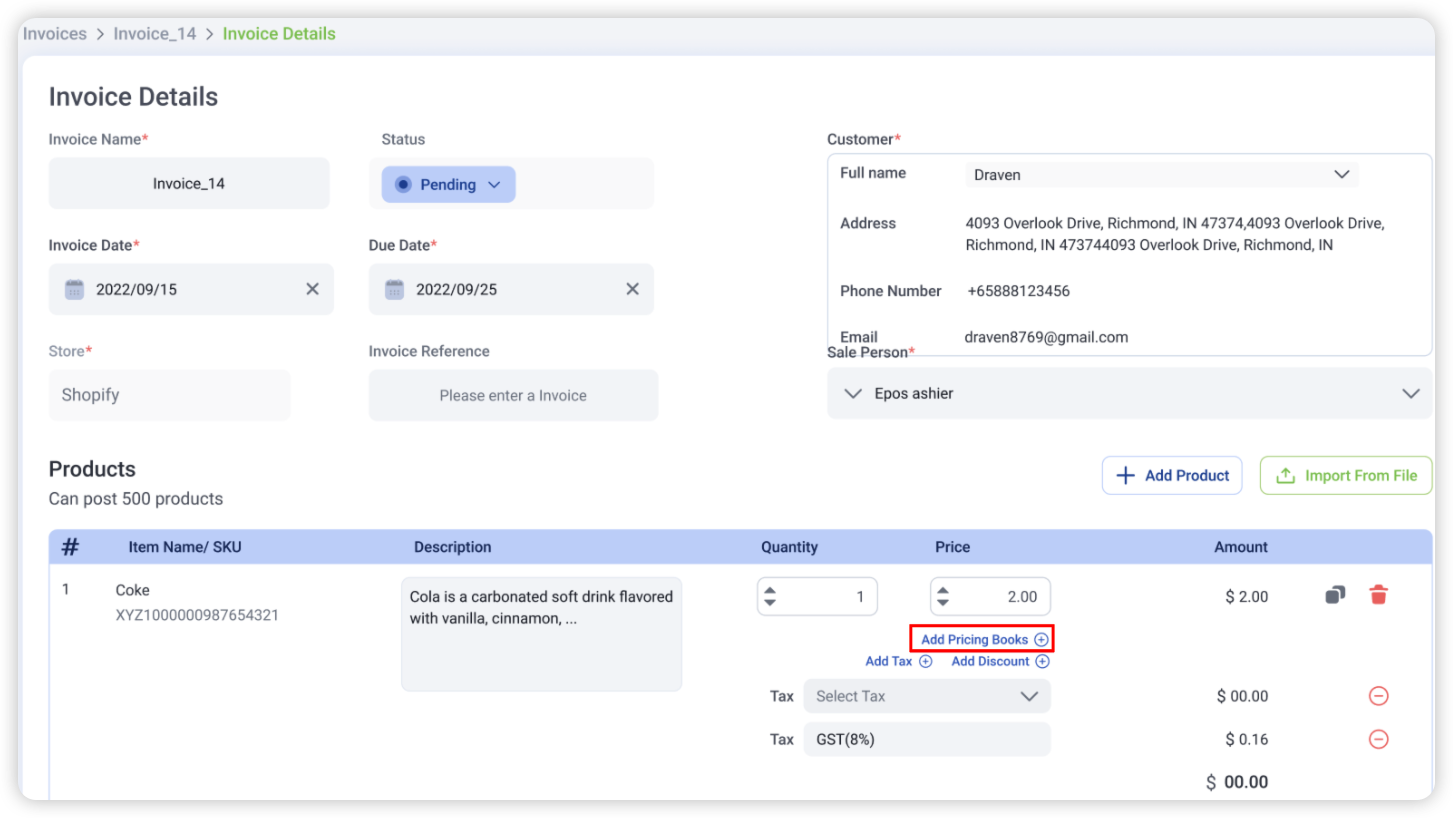
2. After selecting the price book, system auto-applies the highest/lowest price from the price book for each line item.
💡can change & remove the applied price book if needed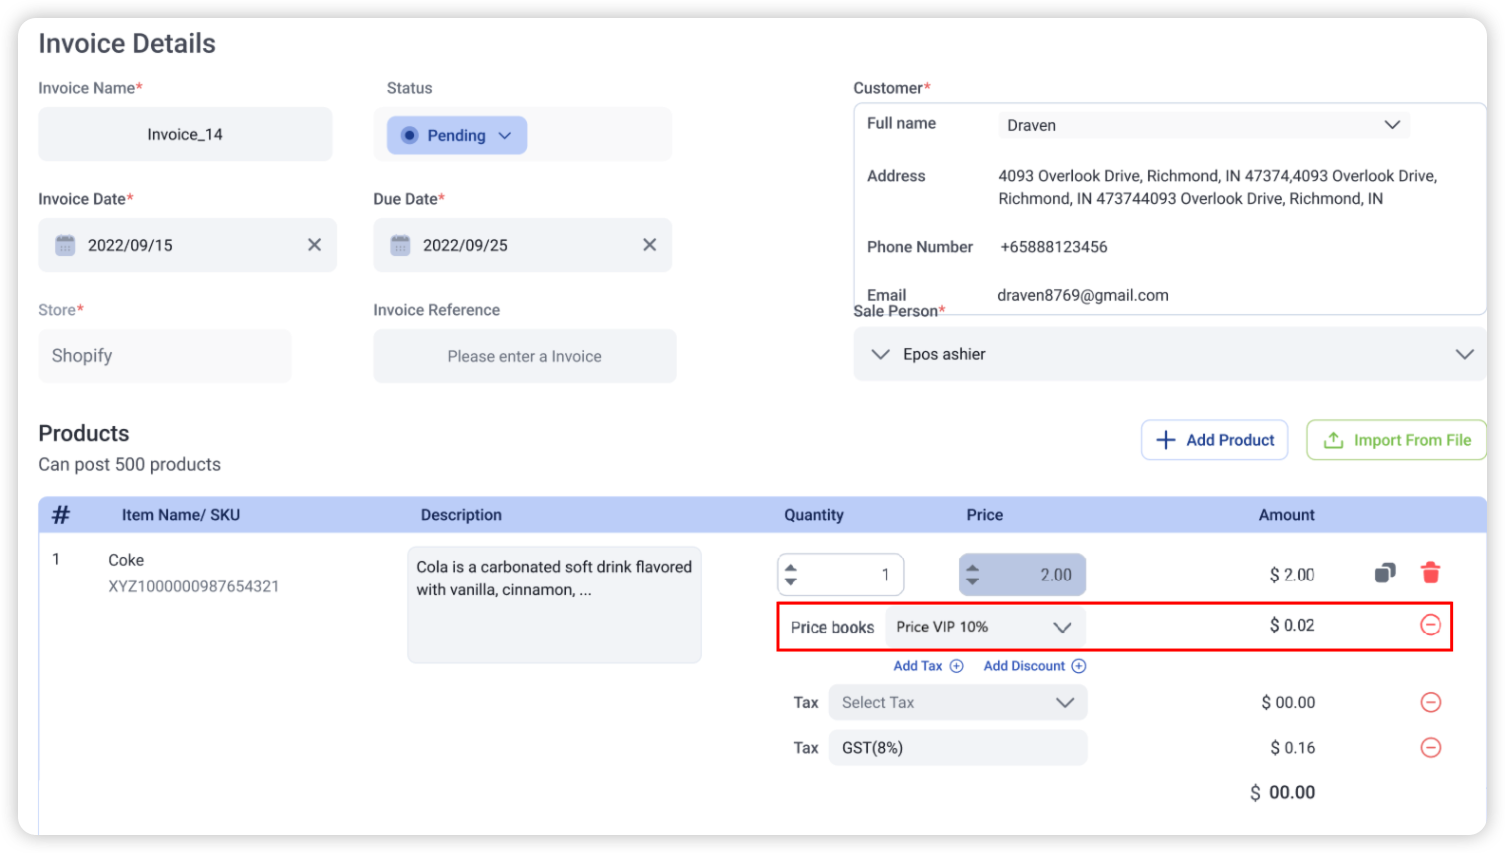
(POS) UI Enhancement - Payment/Sales View/Half Page View 🖥
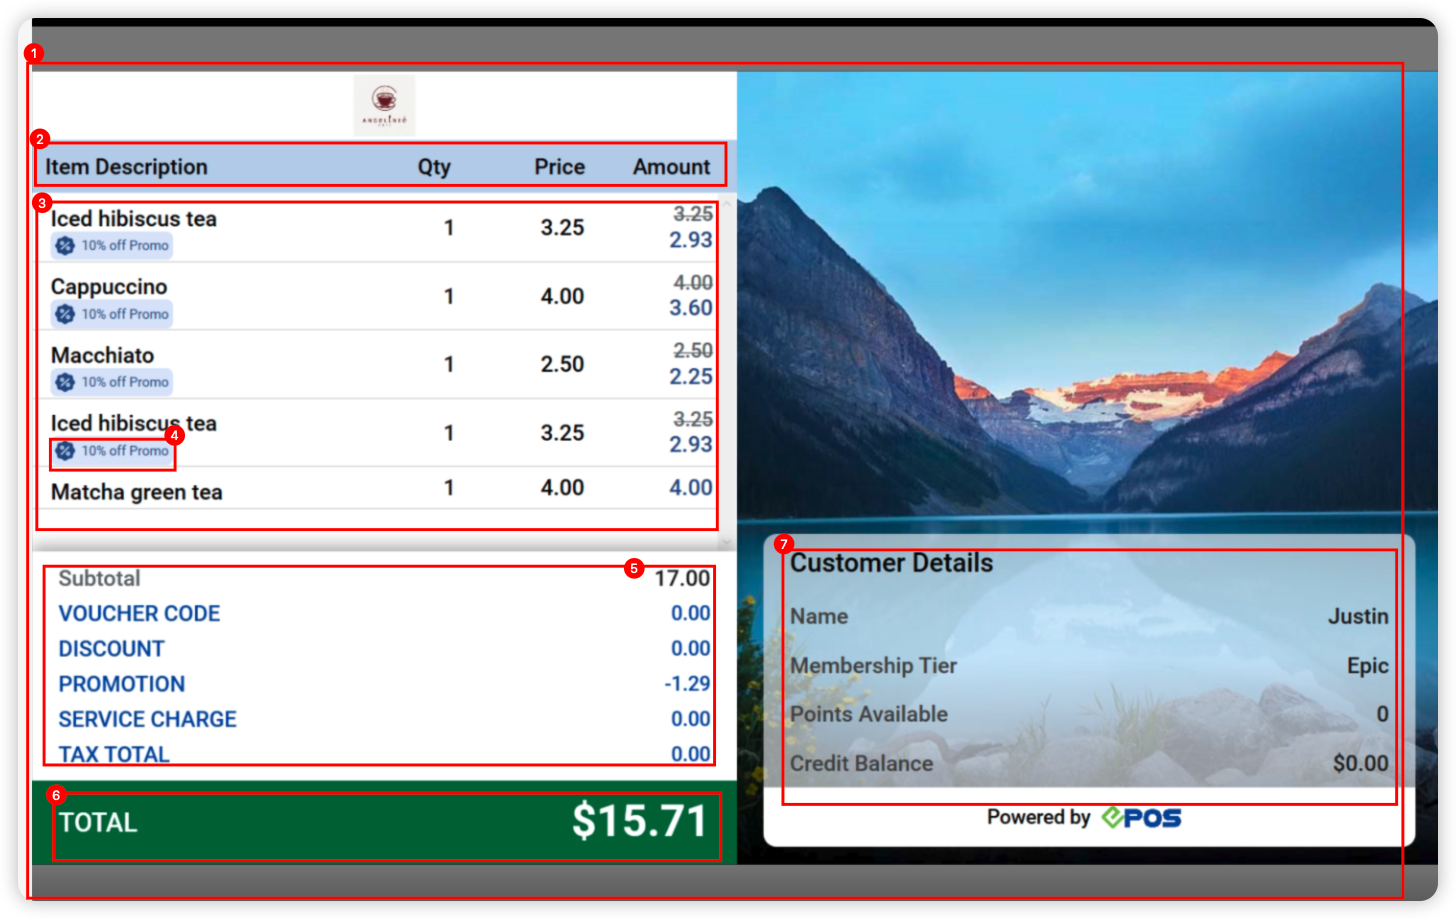
Second Screen – Half Page View
1. Overall layout to scale accordingly at 150% under resolution of 1920 x 1080px
2. Cart header – Include colour to header & bold font
3. Cart items – Increase font size
4. Discount – Highlight discount in a banner
5. Bill information – Increase font size, change colour of segment & font
6. EPOS footer – Remove
7. Customer details – Change banner style, include EPOS footer, customer detail banner to be transparent except for EPOS footer
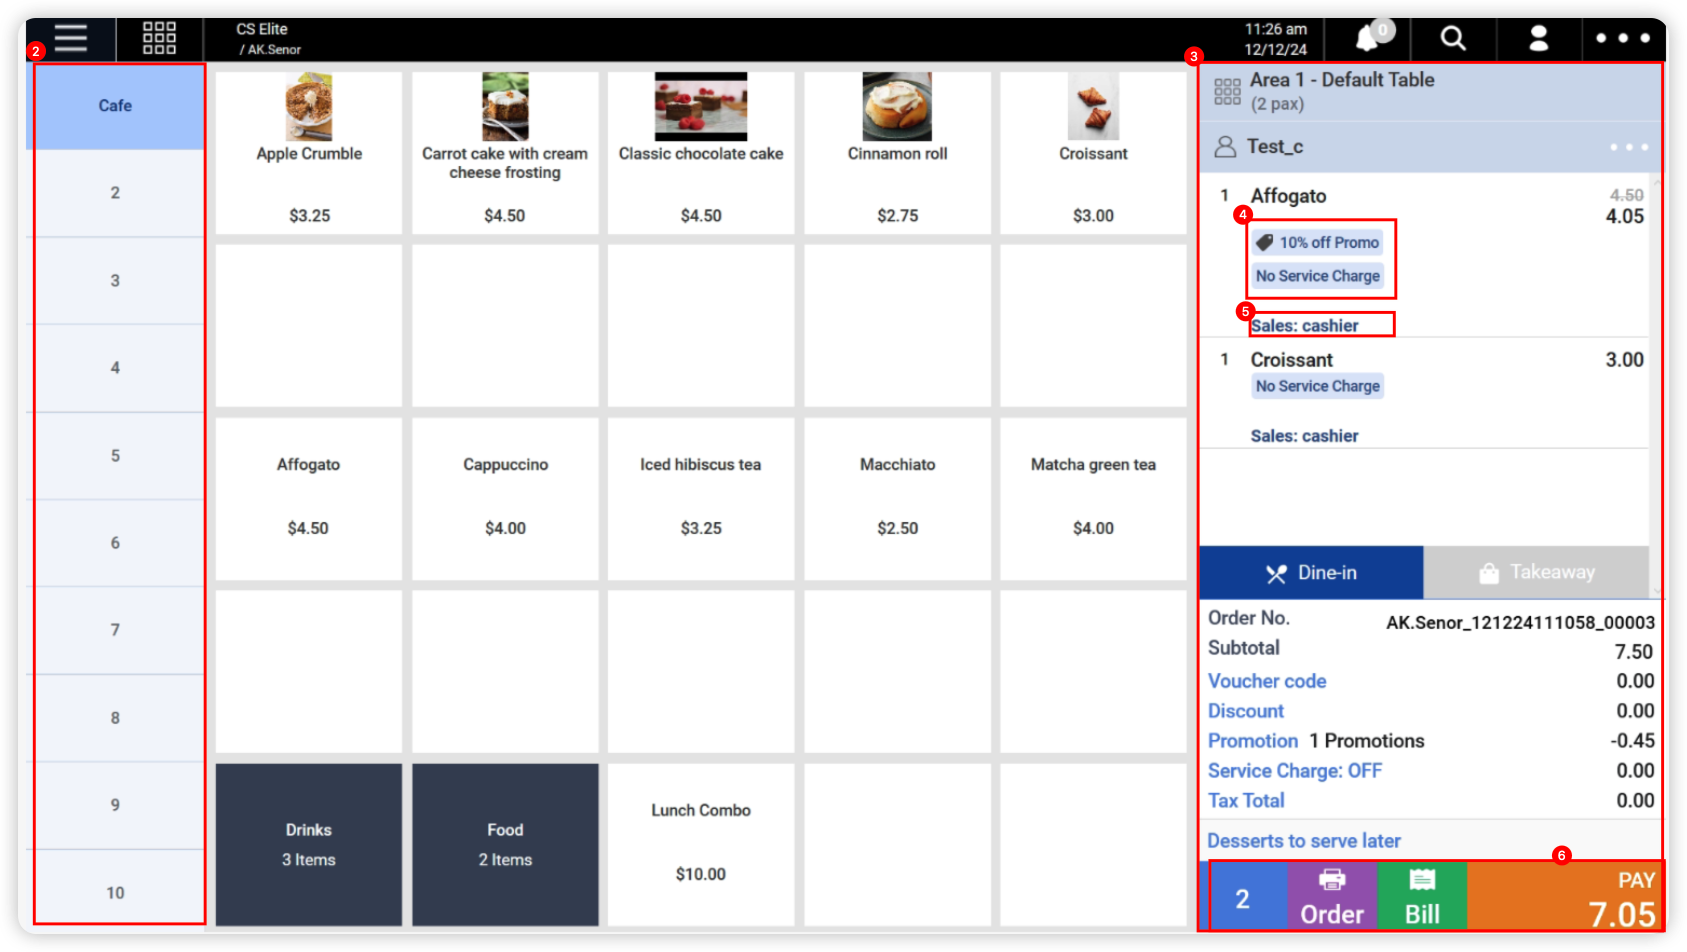
UI Enhancement – Sales View Page
Now we have larger font size and more flexible layout!
1. Overall layout to scale accordingly at 125% under resolution of 1920 x 1080px
2. Quick pick tabs– Move to the left
3. Cart column – Make it wider & increase overall font size
4. Discount & No service charge – include icon, change text and create as a label
5. Sales person – include icon and make it bold
6. Buttons – Increase size
7. (1) For product with images, price to be placed at the bottom of the box just like before. (2) For product without images, align product name to the center and increase line spacing between product name & price.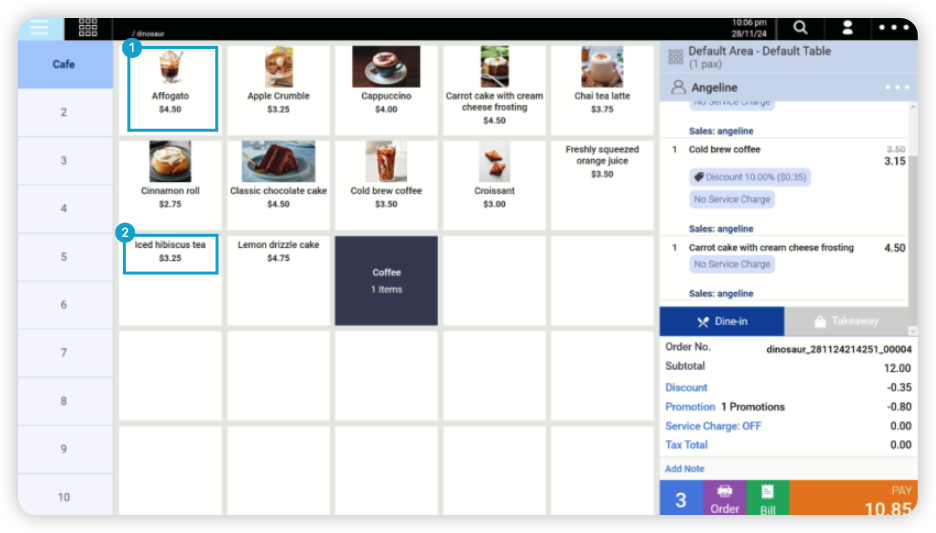
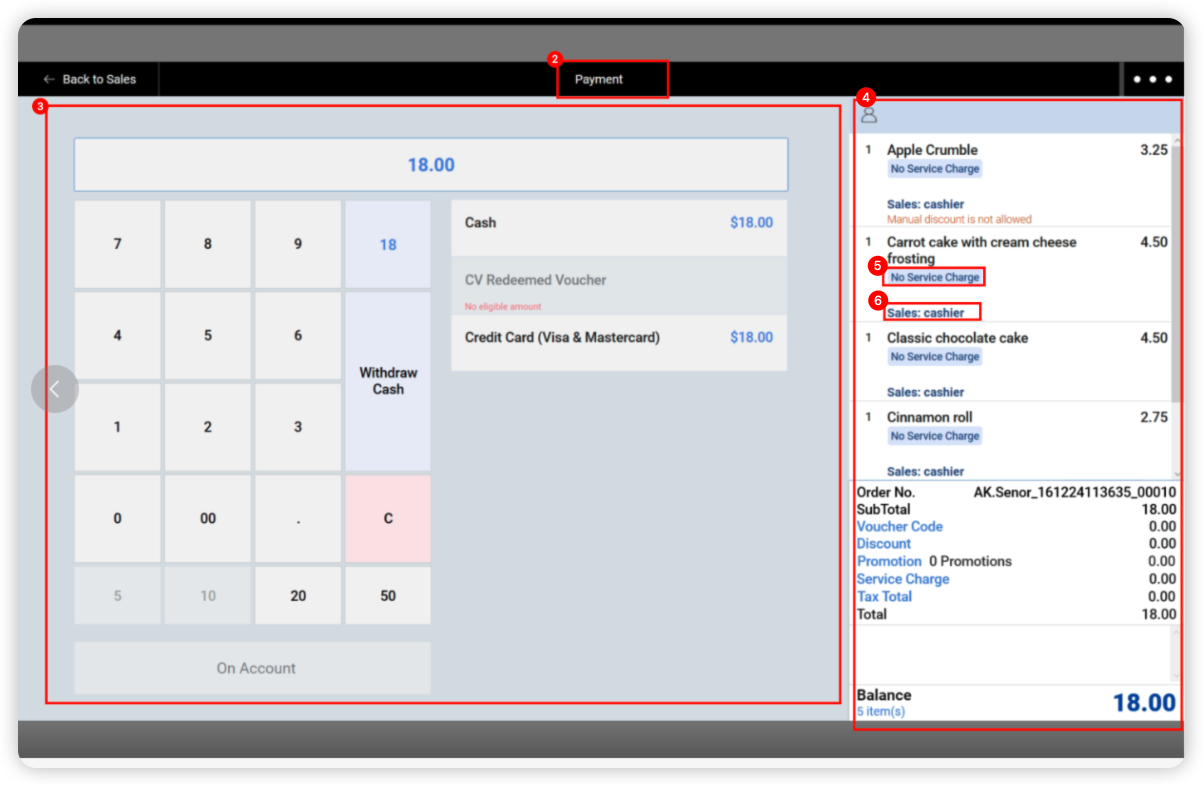
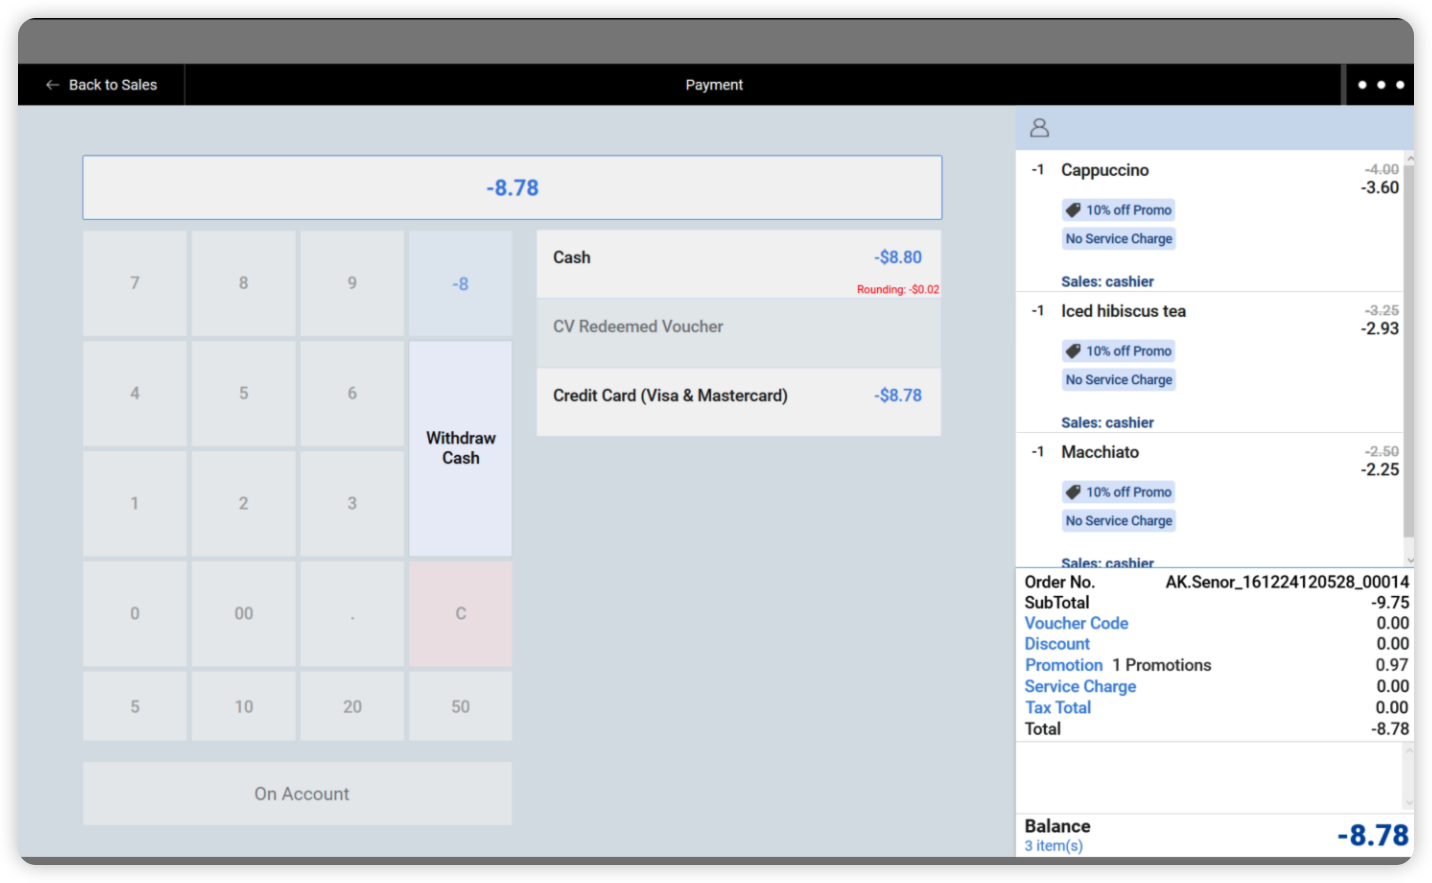
UI Enhancement – Payment Page
Now we have larger font size and more flexible layout!
Main Payment Page:
1. Overall layout to scale accordingly at 125% under resolution of 1920 x 1080px
2. Include header title – Payment
3. Keypad – Increase size of keypad and payment method, align to center
4. Cart column – Make it wider & increase overall font size
5. Discount & No service charge – include icon, change text and create as a label
6. Sales person – include icon and make it bold
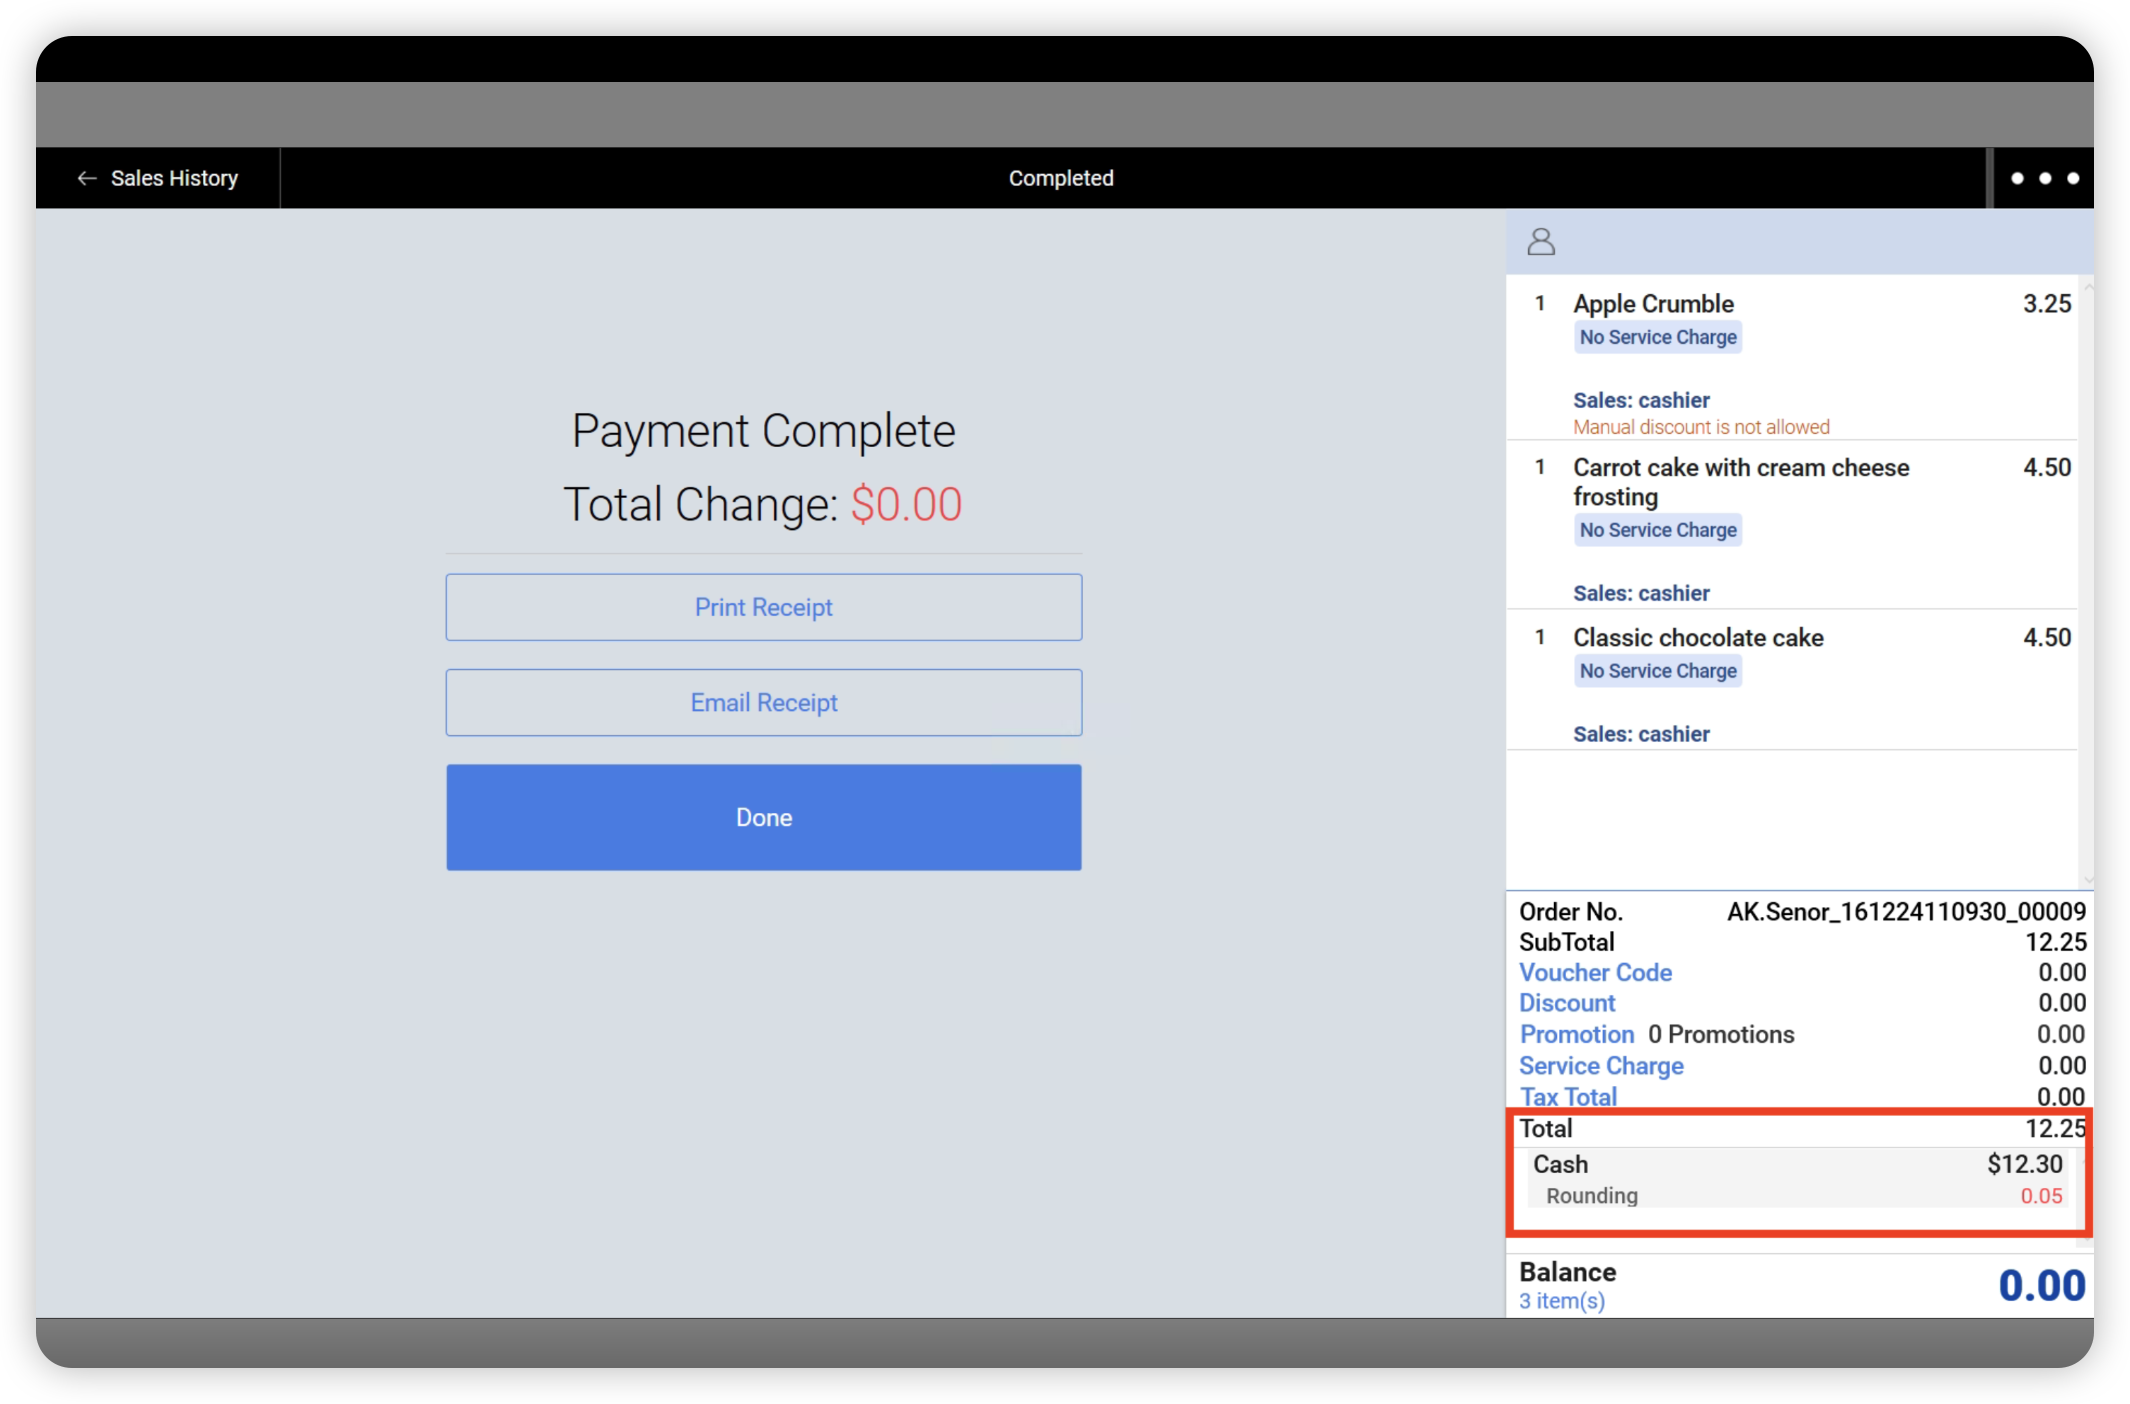
7. Payment added Page – Increase Font Size
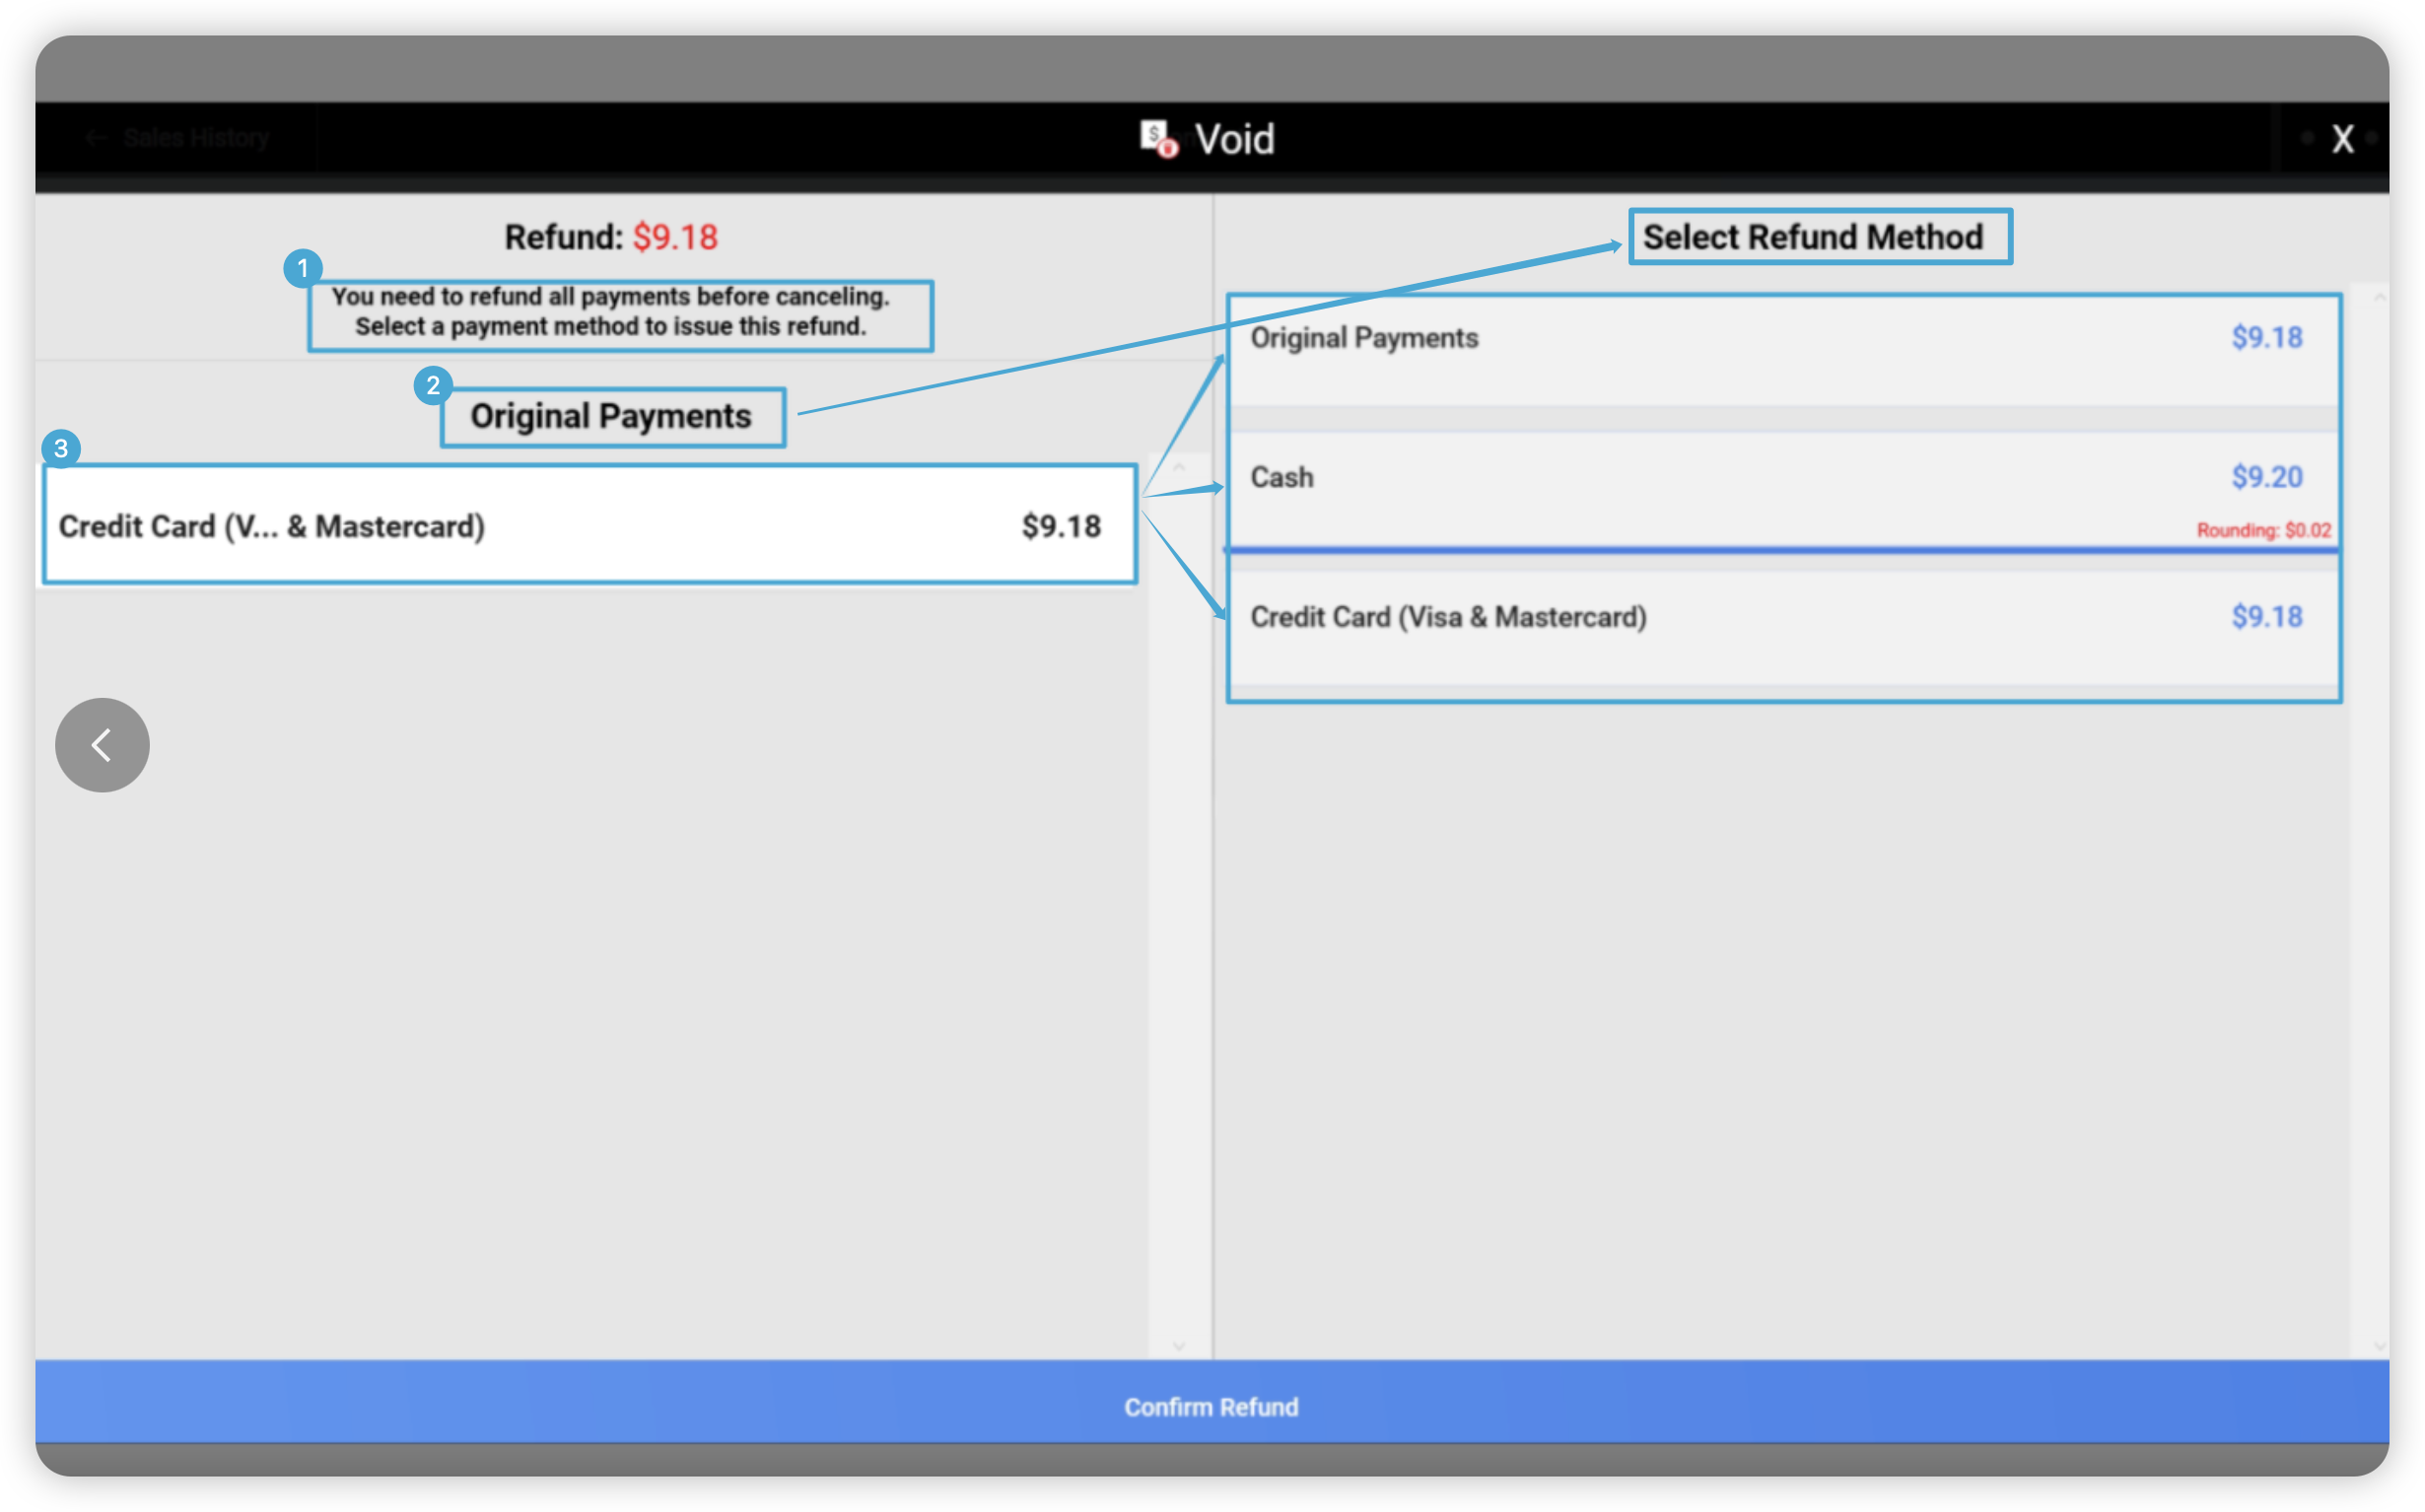
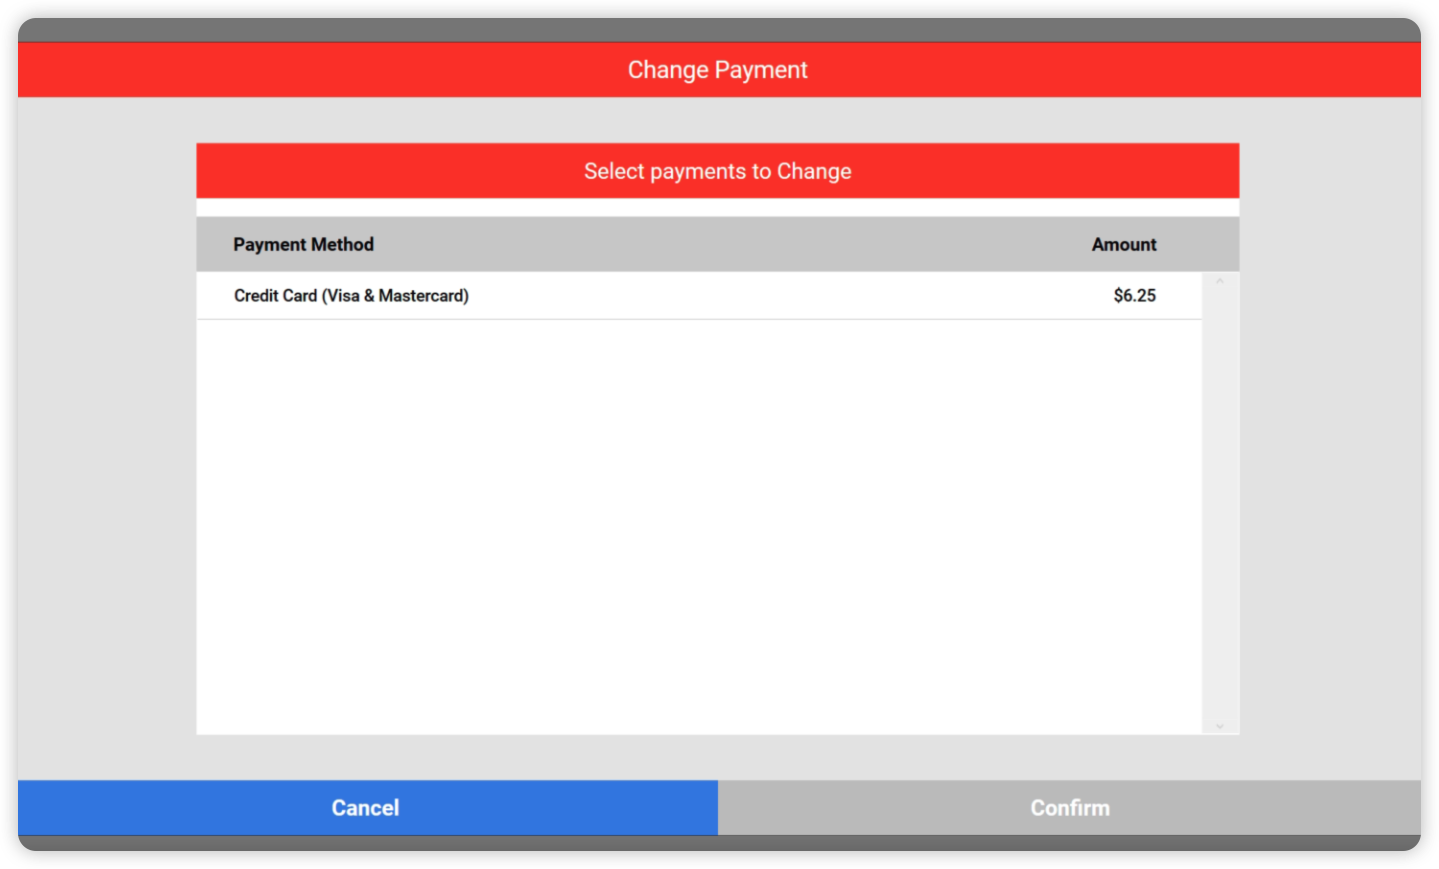
Other Payment Pages:
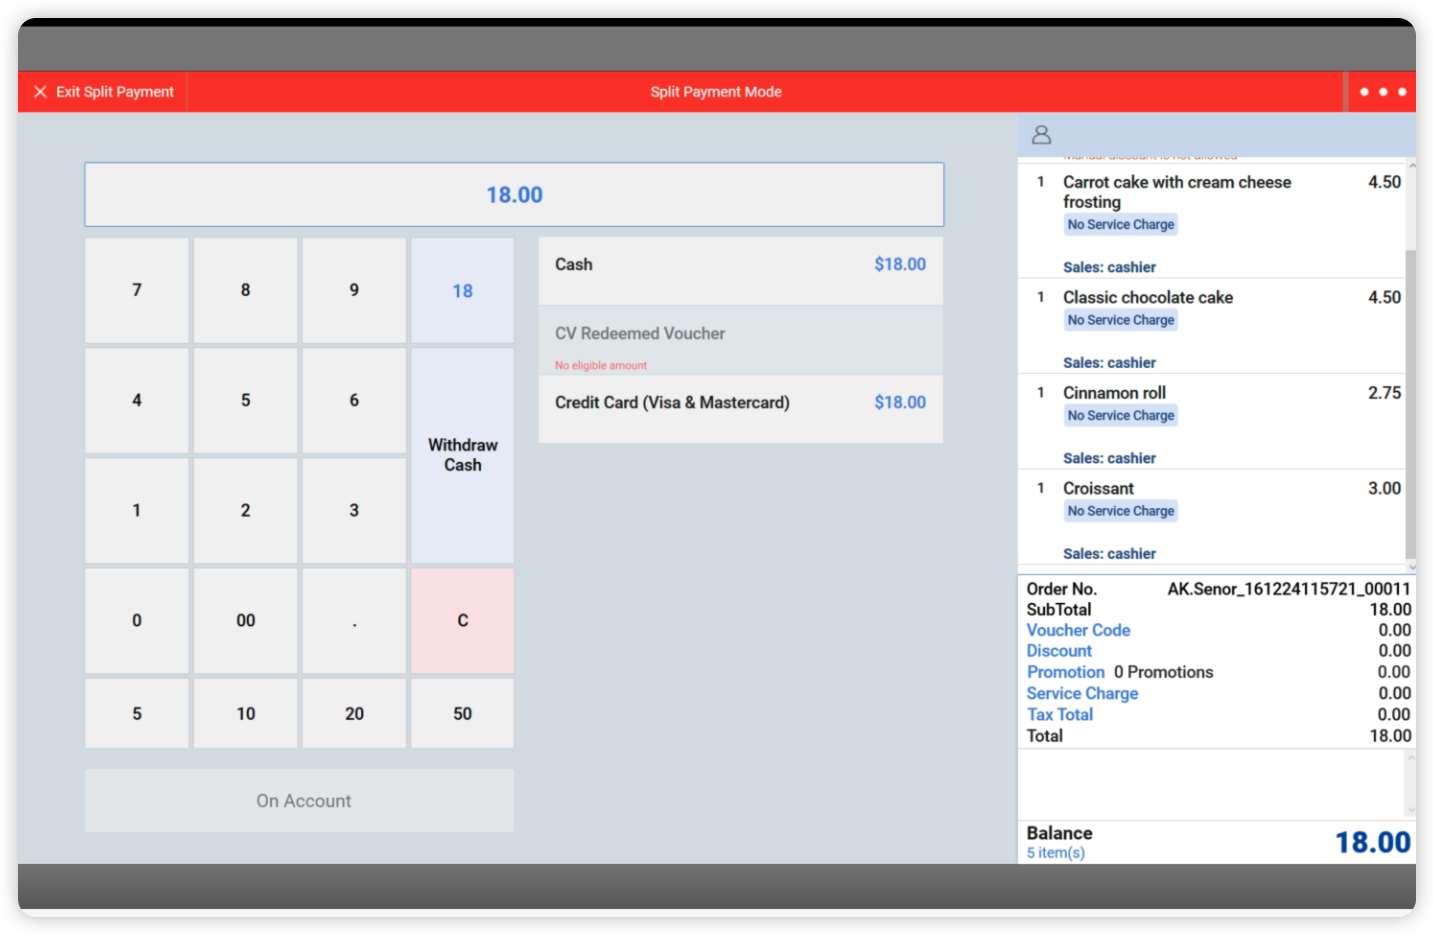
1. Split Payment – no specific changes
2. Refund Order – to be similar to Payment Page above
3. Void Order – (1) Bold “You need to refund…” (2) Match “Original Payments” font size and style to “Select Refund Method” (3) Height of payment method box on left to match with right
4. Change Payment – Page 1 – “Select payment to Revert” → “Select Payment to Change”
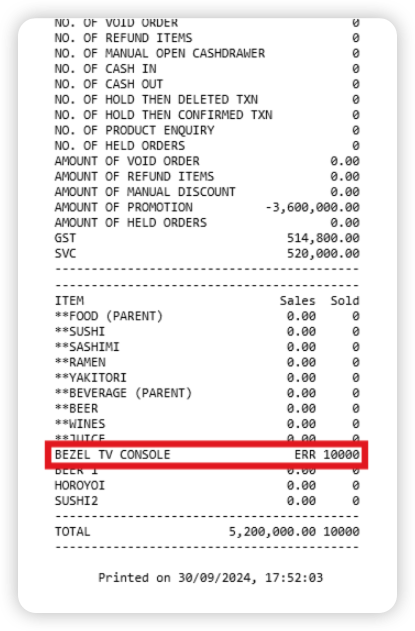
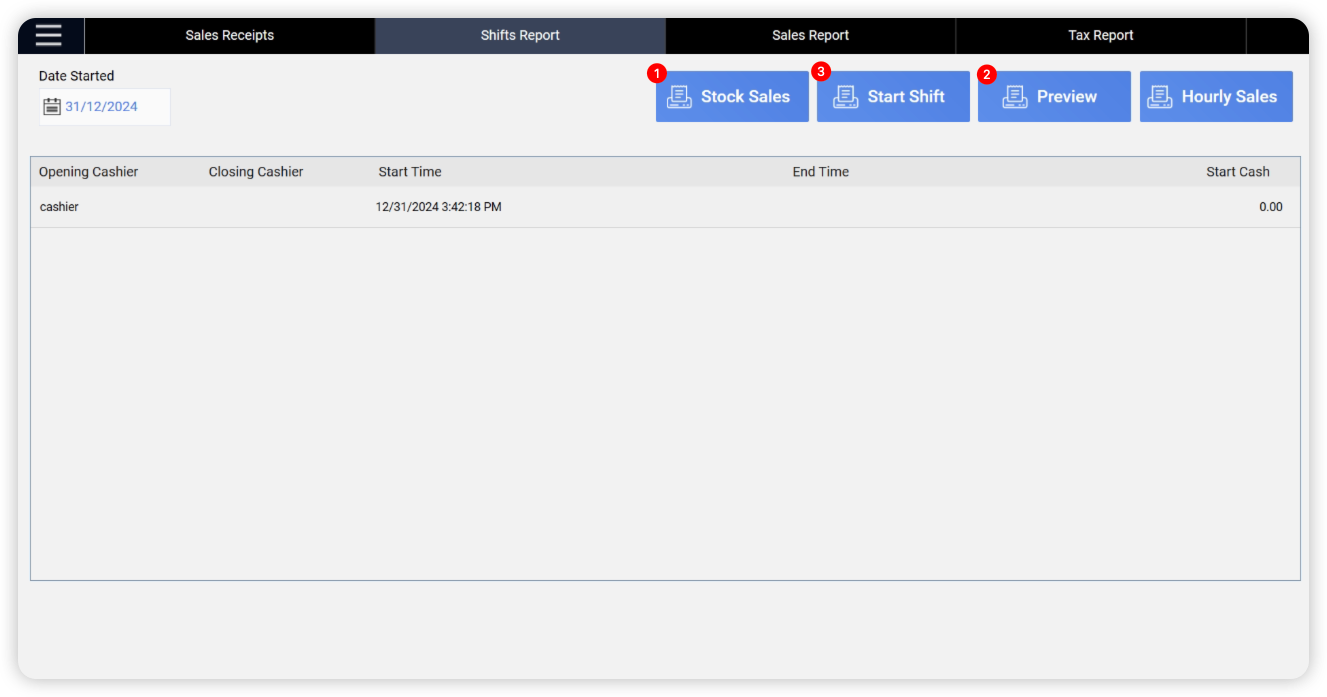
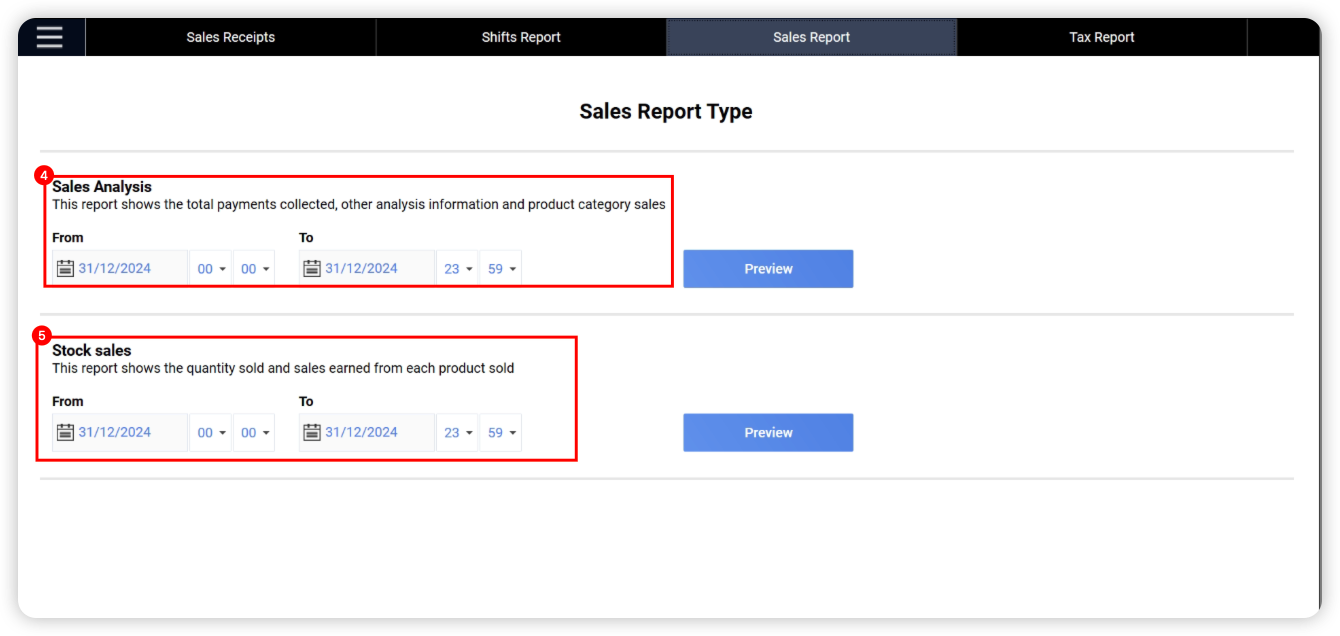
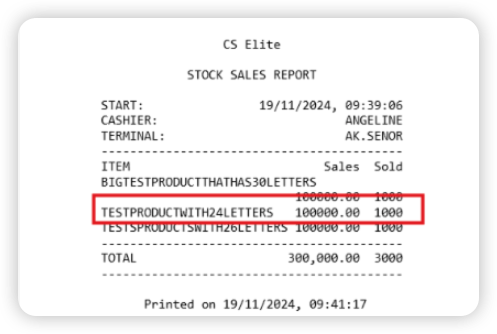
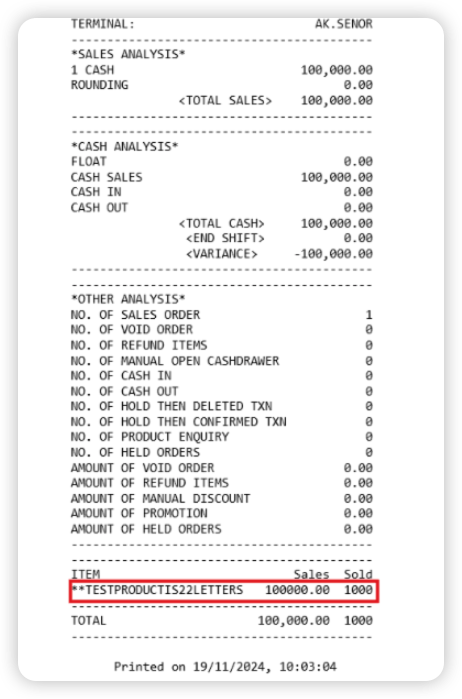
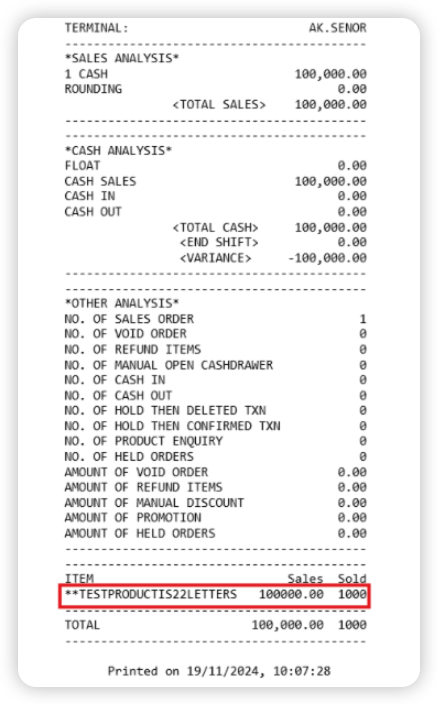
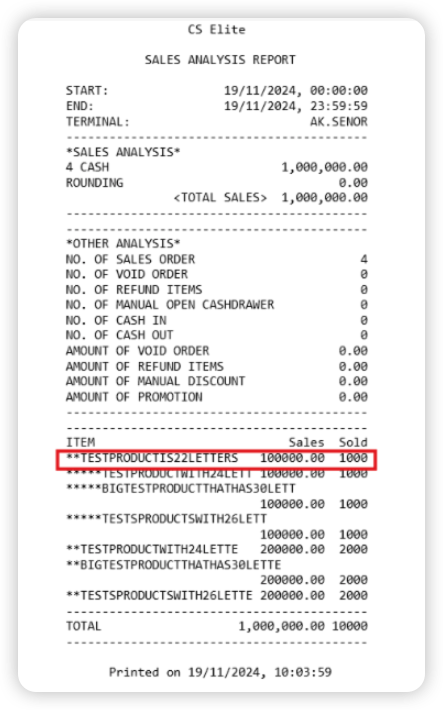
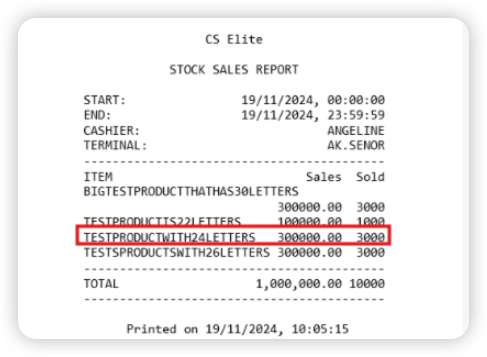
(POS) Shifts Report & Sales Report - Display ERR message 🖥
Now business owners are able to view the full sales data for individual item / categories regardless of the number of figures so that they can have the full clarity of their business performance.
(Before, sales amount that are more than 5 figures would be displayed as “ERR”)
>>>> Before:
>>>> Now:
1. Shifts Report > Stock Sales
2. Shift Report > Preview
3. Shifts Report > Start Shift
4. Sales Analysis Report
5. Stock Sales Reports
How to Update
For POS related features, user will need to update the POS to the latest version, version 5.224.0.0.
For Backend related features, user are not required to perform any actions, the new features would automatically be updated.
Feedback
We value your input! If you encounter any issues or have suggestions for further improvements, please don’t hesitate to contact us.
Stay Connected
Stay updated with the latest news and updates by following us on our social platforms.
Thank You
We appreciate your continued trust in EPOS. This update is just one of many steps we’re taking to provide you with the best POS system on the market.
If you have any questions or need assistance with the update, please contact our support team at:
Call: 6871 8833 / Email: [email protected] / Whatsapp: 8482 1888

Was this article helpful?
YesNo

